MATERIALS:
WW yarn in blue and cream
G Hook
Fiberfill
Small pieces of felt in light red, white and black
Sewing thread and needle to match felt
Yarn Needle
NOTES:
Gauge isn’t terribly important, as long as your hook and yarn choices result in a tight even stitch so that the stuffing won’t come through.
Numbers in ( ) at the end of each round or row indicate the total number of stitches in that round or row.
I prefer to join my rounds, but if you’re more comfortable using the ‘continuous rounds’ technique, that should work fine.
In this pattern, I debated on the ‘tail’. I looked at dozens of official game images of Horsea online, and there are some with a more pronounced (longer) tail, and some with very short tails, and some with a medium tail – depending on which generation of the game or show it came from. I opted for the medium length tail, but if you prefer the longer tail (more ‘curl’) simply add some rounds of crochet between rows 4 and 16 of the body – or leave a couple of rows out for a shorter tail. Also, some of the images had the tail ‘plump’ and others flat, I opted for flat in this pattern simply to make it easier for beginners to manage the curl, but if you want to, add a small amount of stuffing to plump the tail out some. Don’t overstuff the tail though, because you need it be able to curl up later.
BODY:
Rnd 1: 5 sc in magic ring (5)
Rnd 2: 2 sc in each sc around (10)
Rnd 3: sc in next sc, 2 sc in next sc around (15)
Rnd 4-16: sc in each sc around (15)
Rnd 17: sc in next 4 sc, 2 sc in next sc around (18)
Rnd 18: sc in next 2 sc, 2 sc in next sc around (24)
Rnd 19: sc in next 3 sc, 2 sc in next sc around (30)
Rnd 20: sc in next 4 sc, 2 sc in next sc around (36)
Rnd 21: sc in next 5 sc, 2 sc in next sc around (42)
Rnd 22-28: sc in each sc around (42)
Rnd 29: sc in next 5 sc, dec over next 2 sc around (36)
Rnd 30: sc in each sc around (36)
Rnd 31: sc in next 4 sc, dec over next 2 sc around (30)
Rnd 32: sc in each sc around (30)
Begin stuffing at this point if you haven’t already. While I left the tail portion unstuffed, if you prefer to have a plumper tail, stuff the tail section *very* lightly. Stuff the body firmly to shape. Continue stuffing body as you progress.
Rnd 33: sc in next 3 sc, dec over next 2 sc around (24)
Rnd 34: sc in each sc around (24)
Rnd 35: sc in next 2 sc, dec over next 2 sc around (18)
Rnd 36-37: sc in each sc around (18)
Rnd 38: sc in next sc, dec over next 2 sc around (12)
Rnd 39: sc in each sc around (12)
F/O. Leave neck open. Weave in ends.
HEAD:
Rnd 1: 6 sc in magic ring (6)
Rnd 2: 2 sc in each sc around (12)
Rnd 3: sc in next sc, 2 sc in next sc around (18)
Rnd 4: sc in next 2 sc, 2 sc in next sc around (24)
Rnd 5: sc in next 3 sc, 2 sc in next sc around (30)
Rnd 6: sc in next 4 sc, 2 sc in next sc around (36)
Rnd 7: sc in next 5 sc, 2 sc in next sc around (42)
Rnd 8-15: sc in each sc around (42)
Rnd 16: sc in next 5 sc, dec over next 2 sc around (36)
Rnd 17: sc in next 4 sc, dec over next 2 sc around (30)
Rnd 18: sc in next 3 sc, dec over next 2 sc around (24)
Begin stuffing at this point, stuff fairly firmly to shape. Continue to stuff as you progress.
Rnd 19: sc in next 2 sc, dec over next 2 sc around (18)
Rnd 20: sc in next sc, dec over next 2 sc around (12)
Rnd 21: dec over next 2 sc around (6)
F/O. Add any stuffing needed to finalize the shape and weave end through last round of sc. Pull to close tightly. Secure and weave in ends.
BELLY PLATE:
Using cream:
Row 1: Ch 6. Sc in 2nd ch from hook and remaining chs. turn (5)
Row 2: 2 sc in first sc, sc in each sc to last sc, 2 sc in last sc, turn (7)
Row 3: repeat row 2 (9)
Row 4: repeat row 2 (11)
Row 5-12: sc in each sc across (11)
Row 13: sc in each sc across to last 2 sc, dec over last 2 sc, turn (10)
Row 14: repeat row 13 (9)
Row 15: repeat row 13 (8)
Row 16: repeat row 13 (7)
Row 17: repeat row 13 (6)
Row 18: repeat row 13 (5)
Row 19: sc in each sc across. Do not turn (5)
EDGE: Sc in each row end down the side and across the bottom (foundation chain) and back up the other side, crochet across the top to where you begain the edge and slip stitch to the first sc of the edging.
Using a long length of blue yarn and yarn needle, make the lines across the belly plate (I used a straight stitch, but back stitch would work too). I made the lines between the second and third row, then every fourth row, ending where there were two rows left… however, any way that they are evenly spaced is fine.
F/O and weave ends.
WHISKERS (make 12)
Row 1: Ch 11. Slip stitch in 2nd ch from hook. Sc in next 2 chs, hdc in next 2 chs, dc in remaining chains.
F/O. Weave in ends.
Taking 2 of the ‘whiskers’ place them together with ‘right sides’ facing out and using a length of matching yarn, whipstitch them together around the edges. You should have a total of 6 whiskers.
SNOUT:
Rnd 1: 6 sc in magic ring (6)
Rnd 2: 2 sc in each sc around (12)
Rnd 3: Working in FRONT LOOPS ONLY, sc in each sc around. Ch 1 now working in the same round but in the free BACK LOOP, sc in each sc around. [This is to create a ‘lip’ at the end of the snout.] (12 sc in front, and 12 sc in back)
Rnd 4: Working through both loops of the round that was worked through the back loops sc in each sc around (12)
Rnd 5-6: sc in each sc around (12)
Rnd 7: sc in next 3 sc, 2 sc in next sc around (15)
Rnd 8: sc in each sc around (15)
F/O Weave in ends. Stuff snount firmly to shape.
FIN: (make 2)
Using cream:
Row 1: Ch 11. Sc in 2nd ch from hook and in next ch., hdc in next three chs, dc in remaining 5 chs. Ch 1, turn
Row 2: Dc in first 5 dc, hdc in next 3 hdc, sc in last 2 sc. Turn
Row 3: sc in first 2 sc, hdc in next 3 hdc, dc in remaining 5 dc, ch 1 turn
Row 4: repeat row 2
Row 5: repeat row 3
Row 6: repeat row 2
Row 7: repeat row 3
Row 8: repeat row 2
F/O and weave in ends
Place the two pieces together matching the shape, and with a length of matching yarn, whipstitch the two pieces together around the edges.
ASSEMBLY
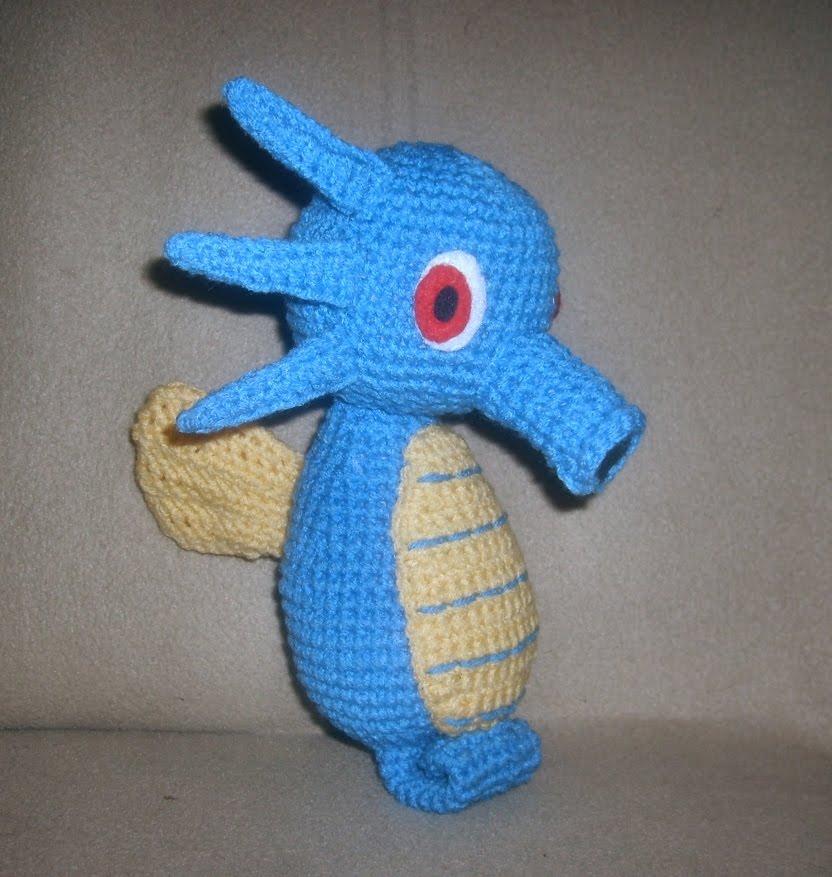
I highly recommend pinning all the pieces in place before sewing. Head is sewn to the body. Belly plate is sewn to the body front centered under the snout. Whiskers are sewn to the face as shown, they should be pointing *slightly* backwards. (see pictures for help with placement). Fin is sewn to the center of the back of the body as shown.
Cut two larger ovals from white felt, 2 smaller ovals in light red and two small ovals from black. Attach as shown for the eyes.
I cut a circle of black and glued it in the ‘lip’ of the snout, because it looks nice, but that’s purely optional.
Curl the tail towards the front and tack it in place with a few stitches.


