Part I: The Head (start with grey)
1) Magic circle (6)
2) 2 sc in each st (12)
3) 1 sc then 2 in the next st (18)
4) 1 sc in the next 2 st then 2 in the next st (24)
5) 1 sc in the next 3 st then 2 in the next st (30)
6) 1 sc in the next 4 st then 2 in the next st (36)
7) 1 sc in the next 5 st then 2 in the next st (42)
8) 1 sc in the next 6 st then 2 in the next st (48)
9) 1 sc in the next 7 st then 2 in the next st (54)
10) 1 sc in the next 8 st then 2 in the next st (60)
11) 1 sc in the next 9 st then 2 in the next st (66)
12-19) I sc in each st for 8 rows (66)
20) 1 sc in the next 9 st then 2 tog (60)
21) 1 sc in the next 8 st then 2 tog (54)
22) 1 sc in the next 7 st then 2 tog (48)
23) 1 sc in the next 6 st then 2 tog (42)
24) 1 sc in the next 5 st then 2 tog (36)
25) 1 sc in the next 4 st then 2 tog (30)
26) 1 sc in the next 3 st then 2 tog (24) – change colour on last st (white)
27) 1 sc for one row – place the safety eyes between row 24 and 25, 10 gaps between (before attachment)
28-29) I sc in each for 2 rows (24) – stuff the head
30) 1 sc in the next 2 st then 2 tog (18)
31) I sc in each st for 1 row
32) 1 sc in the next st then 2 tog (12)
33) 1 sc in the next 2 sts then 2 tog (9) (Stuff and shape the rest of the muzzle)
34) 1 sc in the next st then 2 in the next (6)
f/o Weave in and out of the remaining stitches and close the gap. Use a long thread to sew the top of the muzzle (here: blue).
Part II: The Body (grey)
1) Magic circle (6)
2) 2 sc in each st (12)
3) 1 sc then 2 in the next st (18)
4) 1 sc in the next 2 st then 2 in the next st (24)
5) 1 sc in the next 3 st then 2 in the next st (30)
6-9) 1 sc in each st for 4 rows
10) 1 sc in the next 4 st then 2 in the next st (36)
11) 1 sc in each st for 1 row
12) 1 sc in the next 5 st then 2 in the next st (42)
13-14) 1 sc in each st for 2 rows
15) 1 sc in the next 6 st then 2 in the next st (48)
16-19) 1 sc in each st for 4 rows
20) 1 sc in the next 6 st then 2 tog (42)
21) 1 sc in the next 5 st then 2 tog (36)
22) 1 sc in the next 4 st then 2 tog (30)
23) 1 sc in the next 3 st then 2 tog (24)
24) 1 sc in the next 2 st then 2 tog (18)
25) 1 sc in the next st then 2 tog (12)
26) 1 sc in the next 2 st then 2 tog (9)
27) 2 tog then f/o,
weave in and out of the remaining sts and close the gap –leave a really long thread for sewing
Part III. The Feet (start with blue)
1) Magic circle (6)
2) 2 sc in each st (12)
3) 1 sc then 2 in the next st (18)
4) 1 sc in the next 2 sts then 2 in the next st (24)
5) 1 sc in the next 3 sts then 2 in the next st (30)
6) 1 sc in the next 4 sts then 2 in the next st (36) – change colour on last st (grey)
7) 1 sc in the next 5 sts then 2 in the next st (42)
8-9) 1 sc in each st for 2 rows
10) 1 sc in the next 5 sts, then 2 tog (36)
11) 1 sc in the next 4 sts, then 2 tog (30)
12) 2 tog x 6, then 1 sc in each sc in each of the remaining sts (24)
13) 2 tog x 4, then 1 sc in each sc in each of the remaining sts (20)
14) 2 tog x 2, then 1 sc in each sc in each of the remaining sts (18)
15) 1 sc in the next 4 sts, then 2 tog (15)
16-19) 1 sc in each st for 4 rows – stuff the foot while making the rows
Crochet the sides of the leg together , f/o, and leave a thread for sewing
Part IV: The Arms (grey)
1) Magic circle (6)
2) 2 sc in each st (12)
3) 1 sc then 2 in the next st (18)
4) 1 sc in the next 2 sts then 2 in the next st (24)
5-7) 1 sc in each st for 3 rows
8) 1 sc in the next 2 sts then 2 tog (18)
9) 1 sc in each st for 1 row
10) 1 sc in the next 7 sts then 2 tog (16)
11-21) 1 sc in each st for 11 rows – stuff hand, and the arm lightly
f/o and leave a long thread for sewing.
Part V: The Ears (grey)
1) Magic circle (6)
2) 2 sc in each st (12)
3) 1 sc then 2 in the next st (18)
4) 1 sc in the next 2 sts then 2 in the next st (24)
5-8) 1 sc in each st for 4 rows
f/o and leave a long thread for sewing.
Part VI: The Tail (grey)
1) Magic circle (6)
2) 2 sc in each st (12)
3) 1 sc then 2 in the next st (18)
4-5) 1 sc in each st for 2 rows
f/o and leave a long thread for sewing.
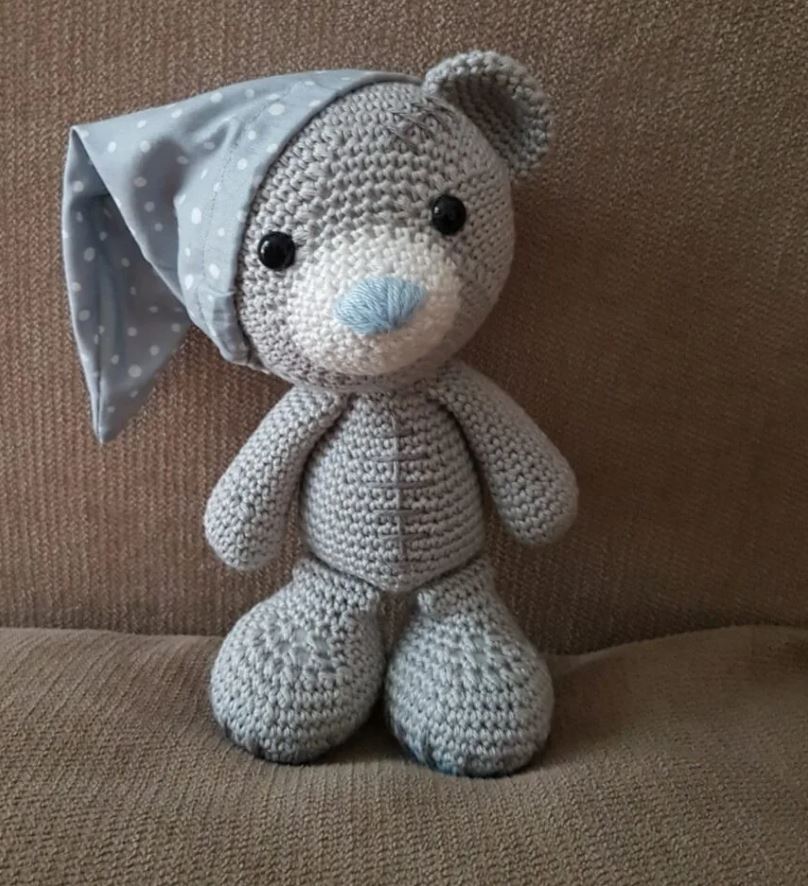
Part VII: Assemble the Bedbugbear!
Part VIII: If you prefer, you can add the details (scars) by sewing them on.
Sleep well!
Congratulations
More Amigurumi Bear Ideas: