Materials
Size 4 worsted weight yarn (I used 75g of Vanna’s Choice yarn in Beige, you will also need a small amount of yarn for the pants/suspenders, shirt and bow)
Pink crochet or embroidery thread for the nose/mouth
12 mm safety eyes (you can visit my crochet eye tutorial here if you would like an alternative)
3.5 mm crochet hook (these are my favorite to use!)
Scissors
Tapestry/sewing needle
Stuffing (Poly-Fil and Morning Glory are my top favorites!)
Stitch markers
Abbreviations: US terminology
MC- Magic circle
SC- Single crochet
SC INC- Single crochet increase
DC INC- Double crochet increase
INV DEC- Invisible decrease
HDC- Half double crochet
DC- Double crochet
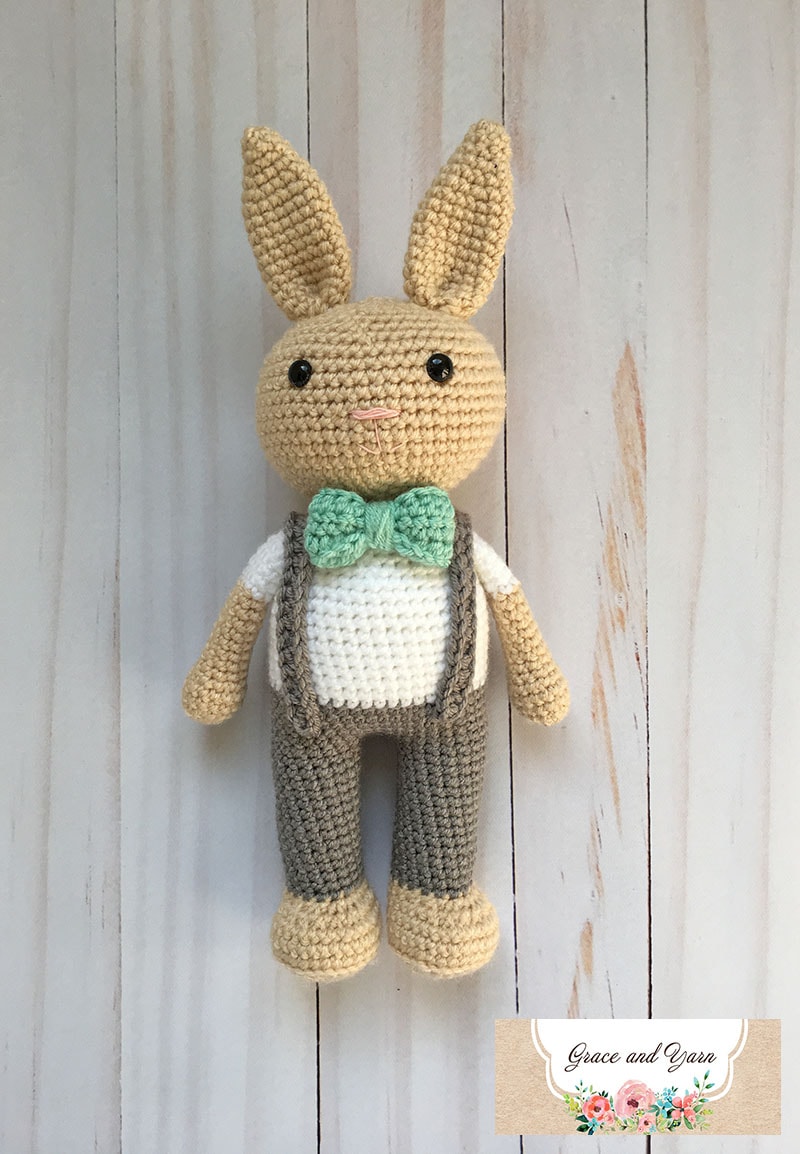
This bunny measures about 14 inches from ears to feet!
*Slowly stuff as you go, you want it to be firm but not stretched. You will be working in the round, I like using a stitch marker at the beginning of each round.
Legs-
Make 2: Using beige
Round 1: Create a magic circle with 6 SC
Round 2: SC INC in each stitch (12)
Round 3: SC in the first stitch, SC INC in the next stitch, repeat around (18)
Round 4: SC in the first 2 stitches, SC INC in the next stitch, repeat around (24)
Round 5: SC in the first 3 stitches, SC INC in the next stitch, repeat around (30)
Round 6: SC around in the back loops only (30)
Rounds 7-8: SC around (30)
Round 9: SC in the first 9 stitches, INV DEC 6 times, SC in the last 9 stitches (24)
Round 10: SC in the first 6 stitches, INV DEC 6 times, SC in the last 6 stitches (18)
Change to pant color
Rounds 11-24: SC around (18)
Fasten off on the first leg only. At the end of Round 24 on the 2nd leg, complete a SC in each of the next 6 stitches (this will line up your legs to be straight when we join. Round 25 joins the legs together and starts the body.
Round 25: Chain 3 and attach to the first leg with a SC (make sure both of your feet are facing the same direction), SC in the remaining stitches around the leg, when you reach the chain make a SC across each of the 3 chains, SC in the remaining stitches of the next leg and SC across each of the 3 chains (you will have SC on both sides of the 3 chains now) (42 SC) This completes your join and is where your next round will start.
Rounds 26-30: SC around (42)
Change to shirt color
Rounds 31-41: SC around (42)
Round 42: SC in the first 5 stitches, INV DEC, repeat around (36)
Round 43: SC in the first 4 stitches, INV DEC, repeat around (30)
Round 44: SC around (30)
Change to beige
Round 45: SC in the first 3 stitches, INV DEC, repeat around (24)
Rounds 46-47: SC around (24)
Fasten off and leave a long tail for sewing.
Head-
With beige
Round 1: Create a magic circle with 6 SC
Round 2: SC INC in each stitch around (12)
Round 3: SC in the first stitch, SC INC in the next, repeat around (18)
Round 4: SC in the first 2 stitches, SC INC in the next, repeat around (24)
Round 5: SC in the first 3 stitches, SC INC in the next, repeat around (30)
Round 6: SC in the first 4 stitches, SC INC in the next, repeat around (36)
Round 7: SC in the first 5 stitches, SC INC in the next, repeat around (42)
Round 8: SC in the first 6 stitches, SC INC in the next, repeat around (48)
Round 9: SC in the first 7 stitches, SC INC in the next, repeat around (54)
Rounds 10-18: SC around (54)
Note: Here is where we will add the facial features before we start closing the head. Insert the eyes between rows 16 and 17, 8 stitches apart.
Nose and mouth- Using pink embroidery thread place the nose two rows beneath your eyes and two stitches in on each side (this will leave 4 stitches in the middle and this is what you will pass your thread through to create the nose).
Pass your thread through 13 times (or as many as you would like for a thinner or wider nose). Use your thread to make a straight line down 3 rows and then a ‘V’ for the smile, please see picture for reference.
Stuff your head firmly as you go.
Round 19: SC in the first 7 stitches, INV DEC in the next, repeat around (48)
Round 20: SC in the first 6 stitches, INV DEC in the next, repeat around (42)
Round 21: SC in the first 5 stitches, INV DEC in the next, repeat around (36)
Round 22: SC in the first 4 stitches, INV DEC in the next, repeat around (30)
Round 23: SC in the first 3 stitches, INV DEC in the next, repeat around (24)
*Continue to stuff the head firmly
Round 24: SC in the first 2 stitches, INV DEC in the next, repeat around (18)
Round 25: SC in the first stitch, INV DEC in the next, repeat around (12)
Round 26: INV DEC around (6)
Fasten off and sew remaining part closed, weave in your end.
Ears–
Make 2
With beige
Round 1: Create a magic circle with 8 SC
Rounds 2-3: SC around (8)
Round 4: SC in the first stitch, SC INC in the next, repeat around (12)
Round 5: SC around (12)
Round 6: SC in the first 2 stitch, SC INC in the next, repeat around (16)
Round 7-15: SC around (16)
Round 16: SC in the first 2 stitches, INV DEC in the next, repeat around (12)
Fold the ears in half as pictured below and SC across the top to close, fasten off and leave a long tail for sewing (this creates a curved ear and will help the ear to be sturdy)
Sew the ears onto the head, place them evenly apart in line with the eyes. I started at the 3rd row and finished at the 6th row.
Arms–
Make 2
*Lightly stuff the bottom of the arms only*
With beige
Round 1: Create a magic circle with 6 SC
Round 2: SC INC in each stitch around (12)
Round 3: SC in the first 3 stitches, SC INC, repeat around (15)
Rounds 4-5: SC around (15)
Round 6: SC in the first stitch, INV DEC, repeat around (10)
Rounds 7-14: SC around (10)
Change to shirt color
Rounds 15-20: SC around (10)
At the end of round 20 pinch the arm flat and make 5 SC across the top to close, fasten off and leave a long tail to sew onto the body.
Suspenders–
Make 2
Chain 30, HDC in the 2nd chain from hook and in each chain across
Fasten off with a long tail for sewing
Bow Tie-
With color of choice chain 20
Row 1: HDC in the 2nd chain from hook and in each chain across (19 HDC)
Rows 2-3: Chain 1 and turn, HDC in each chain across (19 HDC)
Fasten off leaving a long tail .
Using your tail whip stitch the two ends together to make a tube (pictures below), placing your sewn side in the middle wrap your yarn tightly around the middle 7 times to form your bow. Secure it in the back and leave a tail to sew onto the body.
Assembling the body-
1. Sew the head onto the body, making sure to have the facial features centered. Add more stuffing as you go to make it firm and less wobbly.
2. Next, sew the arms onto the body centered with the head at row 44.
3. Sew each suspender onto row 31, front and back over the arms.Two options can be done with the suspenders, they can be only sewn onto front and back of row 31 (meaning they can hang down if wanted) or they can be sewn along the body so they will stay in place.
4. Lastly, attach your bow tie.


