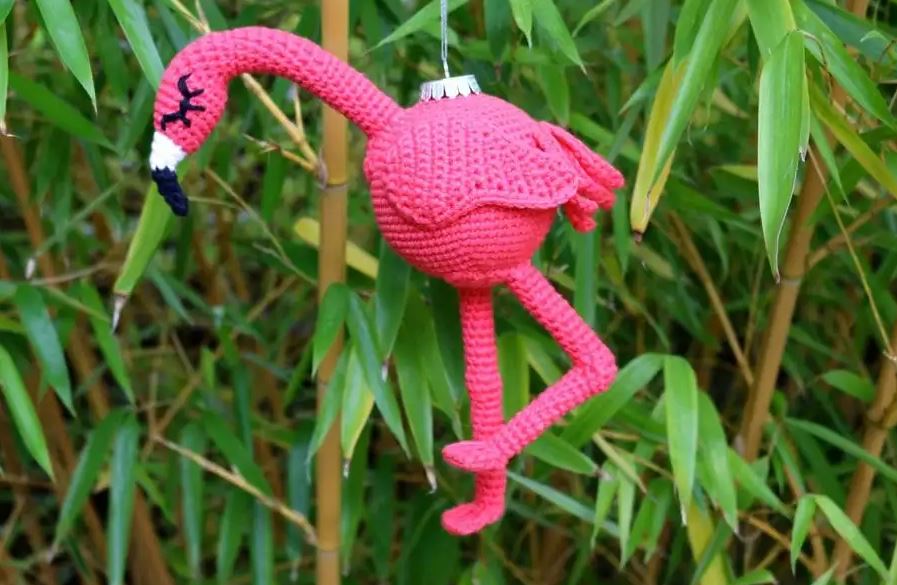
8cm/3.15″ shutterproof bauble (optional)
50g/120 yards Knitcraft Cotton Blend Plain in Coral (50% cotton, 50% acrylic) or any other DK/light worsted cotton, or cotton blend yarn in coral or light pink
small amount of cotton/cotton blend in black and white
fiberfill
3.5 mm crochet hook / US E-4
15 cm ribbon
pins
stitch marker
blunt tapestry needle with bent tip ,
Abbreviations
R = row
Rd = round
ch = chain
st(s) = stitch(es)
yo = yarn over
sc = single crochet
Inc = single crochet 2 in same st
Dc inc = double crochet increase: dc 2 in same st
sk = skip
sl st = slip stitch
Dec = invisible decrease: insert hook in front loops of next 2 sts, yo, pull through both front
loops, yo, pull through 2 remaining loops
C1 = Coral/light pink
C2 = Black
C3 = White
Gauge/Tension
4″ x 4″ (10.16 x 10.16 cm) = 19 sts x 20 rows of sc
Instructions
Begin with the tail feathers, because you will need them to be ready for when you crochet the body. They will be crocheted in with the body while the other body parts will be sewn on later.
Make the tail feathers (in C1)
4th row of tail feathers:
R 1: Ch 9, sc in next 8 ch (starting from 2nd from hook)
R 2: Ch 10, sc in next 9 ch (starting from 2nd from hook)
R 3: Ch 11, sc in next 10 ch (starting from 2nd from hook)
R 4: Ch 10, sc in next 9 ch (starting from 2nd from hook)
R 5: Ch 9, sc in next 8 ch (starting from 2nd from hook)
Fasten off and weave in the yarn ends.
Put them aside and crochet the other 3 rows of tail feathers. You will work them in when you crochet the body/bauble.
R 1: Ch 10, sc in next 9 ch (starting from 2nd from hook)
3rd row of tail feathers:
R 2: Ch 11, sc in next 10 ch (starting from 2nd from hook)
R 3: Ch 11, sc in next 10 ch (starting from 2nd from hook)
R 4: Ch 10, sc in next 9 ch (starting from 2nd from hook)
Fasten off and weave in the yarn ends.
2nd row of tail feathers:
R 1: Ch 10, sc in next 9 ch (starting from 2nd from hook)
R 2: Ch 11, sc in next 10 ch (starting from 2nd from hook)
R 3: Ch 10, sc in next 9 ch (starting from 2nd from hook)
Fasten off and weave in the yarn ends.
1st row of tail feathers:
R 1: Ch 10, sc in next 9 ch (starting from 2nd from hook)
R 2: Ch 10, sc in next 9 ch (starting from 2nd from hook)
Make the body (in C1)
Rd 1: Sc 6 in a magic ring (6)
Rd 2: Inc in all 6 st (12) Place stitch marker in last st.
Rd 3: [sc in next st, inc in next st] repeat 6 times (18)
Rd 4: [sc in next 2 st, inc in next st] repeat 6 times (24)
Rd 5: [sc in next 3 st, inc in next st] repeat 6 times (30)
Rd 6: [sc in next 4 st, inc in next st] repeat 6 times (36)
Rd 7: [sc in next 5 st, inc in next st] repeat 6 times (42)
Rd 8: [sc in next 6 st, inc in next st] repeat 6 times (48)
Rd 9: [sc in next 7 st, inc in next st] repeat 6 times (54)
Rd 10: [sc in next 8 st, inc in next st] repeat 6 times (60)
Rd 11 – 18 (8 rds): Sc in all 60 st (60)
Rd 19: Sc in next 3 st, sc the next 4 sts together with the 1st row of tail feathers, sc in next 53 st (60)
Pin the 2nd row of feathers over the 1st row that you attached in the previous round. Pin it in place with the upper right corner aligning with the 3rd sc of the round. The 3 feathers should be offset with the 2 feathers of the previous round.
Rd 20: Sc in next 2 st, sc the next 6 sts together with the 2nd row of tail feathers, sc in next 52 st (60)
Pin the 3rd row of feathers over the 2nd row. Pin it in place with the upper right corner aligning with the 2nd sc of the round. The 4 feathers should be offset with the 3 feathers of the previous round and align with the 2 feathers of rd 19.
Rd 21: Sc in next st, sc the next 8 sts together with the 3rd row of tail feathers, sc in next 51 st (60),
Pin the 4th row of feathers over the 3rd row. Pin it in place with the upper right corner aligning with the 1st sc of the round. The 5 feathers should be offset with the 4 feathers of the previous round and align with the 3 feathers of rd 20.
Rd 22: Sc the next 10 sts together with the4th row of tail feathers, sc in next 50 st (60)
Rd 23: [sc in next 8 st, dec] repeat 6 times (54)
Rd 24: [sc in next 7 st, dec] repeat 6 times (48)
Insert the bauble, remove its cap. Continue crocheting around the bauble. If you are making your flamingo without a bauble, fill it with fiberfill as you go.
Rd 25: [sc in next 6 st, dec] repeat 6 times (42)
Rd 26: [sc in next 5 st, dec] repeat 6 times (36)
Rd 27: [sc in next 4 st, dec] repeat 6 times (30)
Rd 28: [sc in next 3 st, dec] repeat 6 times (24)
Rd 29: [sc in next 2 st, dec] repeat 6 times (18)
Fasten off. Hide the yarn end inside the bauble, put the cap back on.
If you filled the body with fiberfill instead of a bauble, crochet 2 more rds:
Rd 30: [sc in next st, dec] repeat 6 times (12)
Rd 31: Dec 6 times (6)
Fasten off.
Make the wings (in C1)
Left wing:
Leaving a long tail for sewing, ch 4
R 1: Inc in next 3 ch (starting from 2nd from hook) (6)
R 2: Ch 1, turn, sc in all 6 st (6)
R 3: Ch 1, turn, [sc in next st, inc] repeat 3 times (9)
R 4: Ch 1, turn, sc in all 9 st (9)
R 5: Ch 1, turn, [sc in next 2 st, inc] repeat 3 times (12)
R 6 & 7 (2 rs): Ch 1, turn, sc in all 12 st (12)
R 8: Ch 1, turn, sc in next st, sk next st, sc in next 10 st (11)
R 9: Ch 1, turn, sc in next 9 st, sk next st, sc in next st (10)
R 10: Ch 1, turn, sc in next st, sk next st, sc in next 8 st (9)
R 11: Ch 1, turn, sc in next st, sk next st, sc in next 5 st, sk next st, sc in next st (7)
R 12: Ch 1, turn, inc in next st, sc in next 4 st, sk next st, sc in next st (7)
R 13: Ch 1, turn, sc in next st, sk next st, sc in next 5 st (6)
R 14: Ch 1, turn, inc in next st, sc in next 3 st, sk next st, sc in next st (6)
R 15: Ch 1, turn, sc in next st, sk next st, sc in next 4 st (5)
R 16: Ch 1, turn, inc in next st, sc in next 2 st, sk next st, sc in next st (5)
R 17: Ch 1, turn, sc in next st, sk next st, sc in next 2 st, inc in next st (5)
R 18: Ch 1, turn, sc in next 3 st, sk next st, sc in next st (4)
R 19: Ch 1, turn, sc in next st, sk next st, sc in next 2 st (3)
R 20: Ch 1, turn, sc in next st, sk next st, sc in next st (2)
R 21: Ch 1, turn, sk next st, sl st in next st (1)
Sc all around the wing from where you are: Sc 1 in the side of each row (21) towards the top of the wing, sc 1 in the middle ch on top of the wing, sc 1 in the side of each row (21) back down towards the tip of the wing.
Slip stitch and fasten off with an invisible finish. Weave in the yarn end.
Right wing:
Leaving a long tail for sewing, ch 4
R 1: Inc in next 3 ch (starting from 2nd from hook) (6)
R 2: Ch 1, turn, sc in all 6 st (6)
R 3: Ch 1, turn, [inc in next st, sc in next st] repeat 3 times (9)
R 4: Ch 1, turn, sc in all 9 st (9)
R 5: Ch 1, turn, [inc in next st, sc in next 2 st] repeat 3 times (12)
R 6 & 7 (2 rs): Ch 1, turn, sc in all 12 st (12)
R 8: Ch 1, turn, sc in next 10 st, sk next st, sc in next st (11)
R 9: Ch 1, turn, sc in next st, sk next st, sc in next 9 st (10)
R 10: Ch 1, turn, sc in next 8 st, sk next st, sc in next st (9)
R 11: Ch 1, turn, sc in next st, sk next st, sc in next 5 st, sk next st, sc in next st (7)
R 12: Ch 1, turn, sc in next st, sk next st, sc in 4 next st, inc in next st (7)
R 13: Ch 1, turn, sc in next 5 st, sk next st, sc in next st (6)
R 14: Ch 1, turn, sc in next st, sk next st, sc in next 3 st, inc in next st (6)
R 15: Ch 1, turn, sc in next 4 st, sk next st, sc in next st (5)
R 16: Ch 1, turn, sc in next st, sk next st, sc in next 2 st, inc in next st (5)
R 17: Ch 1, turn, inc in next st, sc in next 2 st, sk next st, sc in next st (5)
R 18: Ch 1, turn, sc in next st, sk next st, sc in next 3 st (4)
R 19: Ch 1, turn, sc in next 2 st, sk next st, sc in next st (3)
R 20: Ch 1, turn, sc in next st, sk next st, sc in next st (2)
R 21: Ch 1, turn, sk next st, sl st in next st (1)
Sc all around the wing from where you are:
Sc 1 in the side of each row (21) towards the of the wing, sc 1 in the middle ch on top of the wing, sc 1 in the side of each row (21) back down towards the tip of the wing.
Fasten off with an invisible finish. Weave in the yarn end.
Make the legs (in C1)
Right leg:
Leaving a long tail for sewing ch 8, close to a round with 1 sl st in 1st chain
Rd 1 – 12 (12 rds): Sc in all 8 st (Stuff with fiberfill as you go. You can push the stuffing in with the
back of your hook.)
Rd 13: [sc in next st, inc in next st] repeat 4 times (12)
Rd 14: Sc in all 12 st (12)
Rd 15: [sc in next st, dec] repeat 4 times (8)
Rd 16 – 28 (13 rds): Sc in all 8 st
Continue with the foot from where you are:
R 1: Ch 1, turn, sc in next 4 st (starting from 2nd from hook) (4)
R 2: Ch 1, turn, inc in next st, sc in next 2 st, inc in next st (6)
R 3: Ch 1, turn, inc in next st, sc in next 4 st, inc in next st (8)
R 4 to 7 (4 rs): Ch 1, turn, sc in all 8 st (8)
R 8: Ch 1, turn, sc in next st, sk next st, sc in next 4 st, sk next st, sc in next st (6)
R 9: Ch 1, turn, sc in next st, sk next st, sc in next 2 st, sk next st, sc in next st (4)
R 10 & 11 (2 rs): Ch 1, turn, sc in all 4 st (4)
R 12: Ch 1, turn, fold over, sl st in next 4 st (through both layers to form the heel)
Pull yarn through and leave a long tail for sewing. Close one side of the foot and stitch in between the webs. Close the other side of the foot, fasten off and weave in end.
Left leg:
Leaving a long end for sewing, ch 4
R 1: Sc in 2nd ch from hook, inc in next ch, sc in next ch (4)
R 2 to 4 (3 rs): Ch 1, turn, sc in all 4 st (4)
R 5: Ch 1, turn, sc in next 4 st, ch 4 (8)
Rd 1: Sc in the last st of the row to close to a round, sc in next 7 st (8)
Rd 2 – 12 (11 rds): Sc in all 8 st (fill with fiberfill as you go)
Make the knee joint, working in rows:
R 1: Sc in next 3 st
R 2: Ch 1, turn, [sc in next st, inc in next st] repeat 2 times (6)
R 3 & 4 (2 rs): Ch 1, turn, sc in all 6 st (6)
R 5: Ch 1, turn, sc in next st, sk next st, sc in next 2 st, sk next st, sc in next st (4)
Close to rd:
Rd 1: Sc 2 down the side of the knee joint, sc in next 4 st, sc 2 up the other side of the knee joint, sc in next 4 st (12)
Rd 2: [sc in next st, dec] repeat 4 times (8)
Continue leg:
Rd 3 – 14 (12 rds): Sc in all 8 st (8)
Make the left foot the same way you did the right one.
Make the beak, head and neck (in C1, C2 and C3)
Beak (in C2 and C3)
Using C2 (black) make a magic ring.
Rd 1: Sc 4 in the magic ring (4)
Rd 2 & 3 (2 rds): Sc in all 4 st (4)
Rd 4: Sc in next st, inc in next st, sc in next st, inc in next st (6)
Rd 5: Sc in next 5 st, change color to C3 (white) in a sc (6)
Rd 6: Sc in next 3 st, dc in next st, dc inc in next st, dc in next st (7)
Rd 7: Inc in next st, sc in next st, inc in next st, sc in next st, inc in next st, sc in next st, inc in next st (11)
Rd 8: Sc in next 10 st, change color to C1 (coral) in a sc (11)
Make the head (in C1)
Rd 9: (sc only in front loops in this rd): Sc in next 3 st, [inc in next st, sc in next st] repeat 4 times (15)
Rd 10: Sc in next 15 st (15)
Rd 11: Sc in next 5 st, inc in next st, sc in next st, inc in next st, sc in next 2 st, inc in next st, sc in next st, inc in next st, sc in next 2 st (19)
Rd 12 & 13 (2rds): Sc in all 19 st (19)
Rd 14: Sc in next 12 st, hdc in next 2 st, dc in next 3 st, hdc in next 2 st (19)
Rd 15: Sc in next 12 st, hdc in next 2 st, dc in next 3 st, hdc in next 2 st (19)
Rd 16: Sc in next 2 st, dec, sc in next st, dec, sc in next st, dec, sc in next 2 st, hdc in next 7 st (16)
Rd 17: Sc in next 2 st, dec, sc in next st, dec, sc in next 2 st, hdc in next 7 st (14)
Rd 18: Sc in next 9 st, hdc in next 3 st, sc in next 2 st (14)
Embroider the eyes (in C2)
Embroider the eyes with black yarn or embroidery thread and a large eyed sewing needle.
Fill the head with fiberfill and crochet the neck.
Rd 19: Dec, sc in next 2 st, dec, sc in next 2 st, dec, sc in next 4 st (11)
Rd 20 – 23 (4 rds): Sc in next 7 st, hdc in next 4 st (11)
Rd 24 – 26 (3 rds): Hdc in next st, sc in next 7 st, hdc in next 3 st (11)
Rd 27 – 36 (10 rds): Sc in all 11 st (11)
Fill the neck with fiberfill. You can push it in with the back of your hook. Make sure the head and neck are stuffed enough to hold their shape.
Continue working in rows to create the lower part of the neck.
R 1: Sc 1
R 2 to 4 (3 rs): Ch 1, turn, sc in next 4 st
R 5: Ch 1, turn, [sk next st, sc in next st] repeat 2 times
Fasten off, leaving a long tail for sewing.
Attach the legs
Start with the right (straight leg). Make sure that it is enough stuffed and add fiberfill if necessary.
Pin the leg close to the bottom middle, right next to the magic ring. Double check if the foot is pointing forward and if it is in the desired position. Sew all around the leg twice to make sure it is firmly attached. Weave in the end.
Pin the left (bent) leg close to the right leg. Make sure it’s in the desired position by looking at it from each side. Sew on the leg by stitching around it twice to make sure it’s firmly attached. Weave in the end.
Attach the head
Add more stuffing to the neck if necessary. Attach it to the front of the body in the upper half, close to the bauble’s cap.
Make sure it aligns with the legs and the tail feathers.
Sew 2 rounds around the neck to ensure it’s firmly attached. Weave in the end.
Attach the wings
Pin one of the wings in place. First sew 2/3 of the top side on from where the “shoulder” towards the tip.
Then lift the wing and stitch through the body to the bottom side of the wing.
Sew along the bottom side of the wing, back towards the “shoulder” to where you started.
Weave in the end. Repeat with the other wing.
Make the santa hat (optional)
If you’re making your crochet flamingo as an exotic addition to your Christmas decorations, you might wanna make her a festive Santa hat.
You need:
A small amount of red and white cotton yarn (DK/Light worsted weight)
3.5mm/ E hook
Instructions:
Using white yarn ch 14
Rd 1: Join 1st ch in a sl st to form a circle, sc in next 14 st (14)
Fasten off, weave in ends.
Flip the circle around.
Rd 1: Using red yarn join the other side of the chain in a sc, sc 11 more forming a complete round (12)
Rd 2: [Sc in next st, dec] repeat 4 times (8)
Rd 3 & 4 (2 rds): Sc in all 8 st(8)
Rd 5: Dec 3 times (leave the last 2 sts)
Fasten off, stitch end through tip of hat to the inside. Weave in the other end.
Make the pom pom using white yarn: Ch 3
R 1: Sc in 2nd from hook, sc in next st
R 2: Ch 1, turn, sc in next 2 st
Fasten off, tie both ends together tightly to shape a pom pom.
Thread both ends onto one needle and stitch through tip of hat. Make a few knots and cut the ends short.
You can sew the hat on the head if you want it there permanently, or pin it on with pins temporarily (please only if it’s not in reach of young children or pets).
Congratulations
More Amigurumi Flamingo Ideas:
