Materials and tools:
– Yarn Alize Cotton Gold (330 m/100 g) yellow, white and orange, different colors for circles
– Hook 2.0 mm and 1.75 mm for tying the shell
– Eyes 6 mm on a secure mount
– Knitting marker
– Needle and scissors
– Filler
Symbols:
KA – amigurumi ring
v.p. – air loop
sbn – single crochet
ssn – double crochet
ss2n – double crochet
ss – connecting column
pr – increase
dec – decrease
(…) * N – repeat N times
(…) – total number of loops in the row
Head and body with
Yellow yarn:
1: 6 sc in KA (6)
2: (pr) * 6 (12)
3: (1 sc, inc) * 6 (18)
4: (2 sc, inc) * 6 (24 )
5: (3 sc, inc) * 6 (30)
6: 30 sc
7: (4 sc, inc) * 6 (36)
8: 36 sc
9: (5 sc, inc) * 6 (42)
10: 42 sb
11: (6 sb, inc) *: (48)
12: 48 sb
13: (7 sb, inc) * 6 (54)
14-19: 54 sb (9 rows)
Insert eyes between 15 and 16 rows on a distance of 5 sc from each other.
20: (7 sb, dec) * 6 (48)
21: (4 sb, dec) * 8 (40)
22: (3 sb, dec) * 8 (32)
23: (2 sb, dec) * 8 ( 24) We
continue to knit the body:
24-26: 24 sc (3 rows)
27: (3 sc, inc) * 6 (30)
28: 30 sc
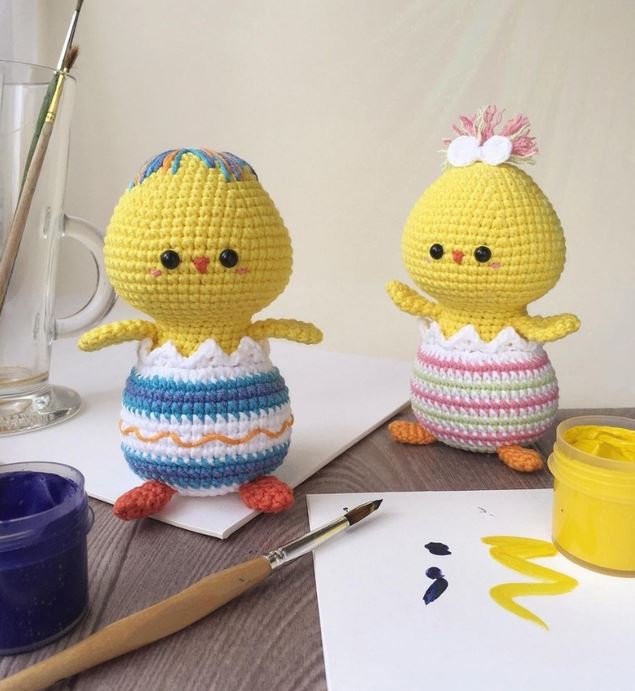
Stuff the head with filler, embroider cheeks, beak and hair.
Change yarn to white:
29: (4 sc, inc) * 6 (36)
30: Knit behind the back walls of the loops: (2 sc, inc) * 12 (48)
31-40: 48 sc (10 rows)
41: ( 4 sc, dec) * 8 (40)
42: 40 sc
43: (3 sc, dec) * 8 (32)
44: (2 sc, dec) * 8 (24)
45: (1 sc, dec) * 8 (16)
46: (dec) * 8 (8)
Try not to stuff the bottom of the body too tightly so that it is flat, for the stability of the toy.
Cut the thread, pull off the hole and hide the end of the thread inside the body.
Wings (2 parts)
Yellow yarn:
1: 6 sc in KA (6)
2: (1 sc, inc) * 3 (9)
3: (2 sc, inc) * 3 (12)
4: 12 sc
5: ( dec) * 6 (6)
6: 6 sc
Do not stuff with filler.
Leave the end of the thread for sewing.
Paws (2 parts)
Orange yarn:
1: 6 sc in KA (6)
2: (2 sc, inc) * 2 (8)
3-4: 8 sc (2 rows)
5: (2 sc, dec) * 2 (6)
Do not stuff with filler.
Leave the end of the thread for sewing.
Tail (optional)
With yellow yarn:
In the amigurumi ring: ch 8, sl-st, ch 14, sl-st, ch 10, sl-st Tie the
ends of the yarn, leave the end of the thread for sewing.
You can knit a chicken forelock according to the description of the tail.
Circles 2 sizes (for decorating the shell)
We knit in different colors.
Circle 1
1: 6 sc in KA (6)
Sc in the next column.
Leave the end of the thread for sewing.
Circle 2
1: 6 sc in KA (6)
2: (inc) * 6 (12)
Sc in the next column.
Leave the end of the thread for sewing.
Assembly and decoration
We tie the shell, forming an uneven edge.
We attach white yarn to the 29th row, we crochet 1.75 mm behind the front walls:
1: (sl-st, (in the next column: ch 2, 1 sb in the 2nd loop from the hook) * 9, sl-st in the first loop Tighten the
ends of the threads, hide inside the body.
If you decide to knit a chicken girl, insert a 1.75 mm hook into the top of the head, make hair, fixing the yarn like a fringe for a scarf.
Bow
Color of your choice.
In the amigurumi ring: (2 ch, 1 dc, 1 ss2n, 1 dc, 2 ch, sl-st) * 2
Wind the thread around the center of the bow several times.
Leave the end of the thread for sewing.
Sew wings, paws, tail and circles to the body.
For the chicken girl:
Tie a bow in the hair and sew to the head.
Hide the end of the thread inside the head.


