Materials
– Yarn (cotton, acrylic, wool…) in colour A (for skin tone), B (pink, fuchsia…), C (green, aqua…) and D (black)… or the colours you prefer.
– Crochet hook in accordance with the yarn you use.
– Stitch marker.
– Fiberfill for stuffing.
– Buttons or beads to decorate.
– Yarn needle.
Abbreviations
– mr: magic ring
– ch: chain
– sc: single crochet
– sl st: slip stitch
– st(s): stitch (es)
– rep: repeat
– inc: increase
– dec: decrease (sc2tog)
– flo: front loops only
– blo: back loops only
– Rnd: round
About the pattern
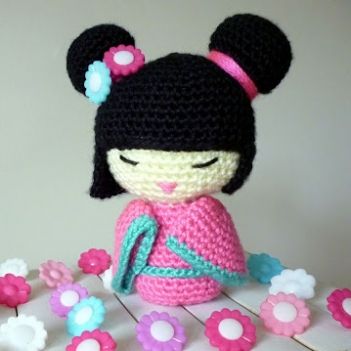
My kokeshi is woven with an acrylic yarn and I have used a needle suitable for the thread (in this case is 2 mm). With this thread, my kokeshi measures 10 cm. high. Remember that with another thread and hook, it will resize.
In this pattern we work in spiral (continuous rounds). Every detail in this pattern begins with a “magic ring”.
At the end of each line you will find the number of stitches you should have in brackets, for example (6).
We only work in rows in some parts of the “obi” and hair. When working in rows, you make a turning chain and turn the piece and the end of each row. Skip the turning chain and start the next row in the next stitch. PATTERN
The head and body (kimono) are crocheted in one piece.
Head
In colour A (skin tone)
Rnd 1: start 6 sc in a magic ring (6)
Rnd 2: inc 6 times (12)
Rnd 3: (sc in next stitch, inc in next stitch) repeat 6 times (18)
Rnd 4: (sc in next 2 st, inc in next st) repeat 6 times (24)
Rnd 5: (sc in next 3 st, inc in next st) repeat 6 times (30)
Rnd 6: (sc in next 4 st, inc in next st) repeat 6 times (36)
Rnd 7: (sc in next 5 st, inc in next st) repeat 6 times (42)
Rnd 8. sc in all 42 st (42)
Rnd 9: (sc in next 6 st, inc in next st) repeat 6 times (48)
Rnd 10-15: sc in all 48 st (48)
Rnd 16: (sc in next 6 st, dec ) repeat 6 times (42)
Rnd 17: sc in all 42 st (42)
Rnd 18: (sc in next 5 st, dec ) repeat 6 times (36)
Rnd 19: (sc in next 4 st, dec ) repeat 6 times (30)
Rnd 20: (sc in next 3 st, dec ) repeat 6 times (24)
Rnd 21: (sc in next 2 st, dec ) repeat 6 times (18)
Rnd 22: (sc in next 1 st, dec ) repeat 6 times (12)
Stuff the head with fiberfill and change the colour (B) to continue to the body (kimono).
Body (kimono)
In colour B.
Rnd 23: (sc in next stitch, inc in next stitch) repeat 6 times (18)
Rnd 24: (sc in next stitch, inc in next stitch) repeat 9 times (27).
Note that in this round we have increased 9 stitches, not 6.
Rnd 25-33: sc in all 27 st (27)
Rnd 34: (sc in next 7 st, dec ) repeat 3 times (24)
Rnd 35: sc in all 24 st, but blo: back loops only. (24)
Rnd 36: (sc in next 2 st, dec ) repeat 6 times (18)
Rnd 37: (sc in next 1 st, dec ) repeat 6 times (12)
Stuff, and continue to finish the body.
Rnd 38: dec 6 times (6)
Fasten off and hide the thread on body.
Arms (kimono sleeves)(x2)
With the same colour used in the body.
Rnd 1: start 6 sc in a magic ring (6)
Rnd 2: inc 6 times (12)
Rnd 3: (sc in next stitch, inc in next stitch) repeat 6 times (18)
Rnd 4: sc in all 18 st (18)
Rnd 5: (sc in next 2 st, inc in next st) repeat 6 times (24)
Rnd 6-9: sc in all 24 st (24)
Fasten off leaving a long tail for sewing.
Don’t stuff the sleeves. Sew them to the body.
Note: In round number 9 we use a different colour than the previous ones. We’ll use this second colour (C) later, in the “obi” .
Hair
In colour D (black). We start in continuous rounds
Rnd 1: start 6 sc in a magic ring (6)
Rnd 2: inc 6 times (12)
Rnd 3: (sc in next stitch, inc in next stitch) repeat 6 times (18)
Rnd 4: (sc in next 2 st, inc in next st) repeat 6 times (24)
Rnd 5: (sc in next 3 st, inc in next st) repeat 6 times (30)
Rnd 6: (sc in next 4 st, inc in next st) repeat 6 times (36)
Rnd 7: (sc in next 5 st, inc in next st) repeat 6 times (42)
Rnd 8. sc in all 42 st (42)
Rnd 9: (sc in next 6 st, inc in next st) repeat 6 times (48)
Rnd 10-15: sc in all 48 st (48)
From here we’ll work in rows. And so, at the end of round number 15 you’ll make a turning chain and turn the piece to follow… Remember to make a turning chain at the end of each the next rounds.Rnd 16: (sc in next 6 st, dec ) repeat 4 times (28)
Rnd 17: sc in all 28 st (28)
Rnd 18: (sc in next 5 st, dec ) repeat 4 times (24)
Rnd 19: sc in all 24 st (24)
Fasten off leaving a long tail for sewing.
Hair bun (x2)
In colour D (black). We work in spiral (continous rounds).
Rnd 1: start 6 sc in a magic ring (6)
Rnd 2: inc 6 times (12)
Rnd 3: (sc in next stitch, inc in next stitch) repeat 6 times (18)
Rnd 4: (sc in next 2 st, inc in next st) repeat 6 times (24)
Rnd 5-8: sc in all 24 st (24)
Rnd 9: (sc in next 2 st, dec ) repeat 6 times (18)
Rnd 10: (sc in next 1 st, dec ) repeat 6 times (12).
Fasten off leaving a long tail for sewing. Stuff the two hair buns and sew them on the top of the hair. Then, sew the hair in the head. To decorate the hair buns, sew a pair of buttons who match well with the clothes colours and surrounded the junction area of the hair bun with the hair, with several turns of thread in the kimono’s colour. Embroider kokeshi’s eyes and mouth.
Obi
In colour C (green, aqua… remember it’s the same colour of the last row of the sleeves).
We work in rows.
Row 1: Start with 7 chain (6+1turning ch). Skip the last chain and start the next row on the second chain from the hook.Row 2: sc in next 6 chains. (6). Remember to make a turning chain at the end of each the next rounds.
Row 3-12: sc in all 6 st. (6).
Fasten off leaving a long tail.
Note that the size of each doll is different… it depends of the yarn you use and how you crocheting. So, to make the chain which surround the kokeshi’s body, must think there is not an exact number of chain stitches. You must do as many as you need to surround the waist of your kokeshi.
Finally sew the “Obi” at the body.


