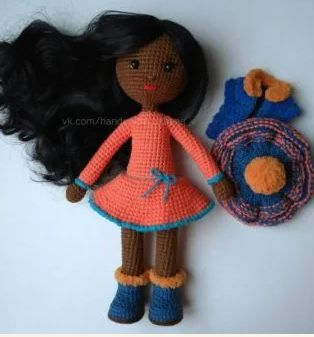
Materials needed:
1. YarnArt Jeans yarn (or equivalent) is smaller than a skein of each color. (On the body I took color No. 40).
2. A little Alize Softy yarn (for a vest, collar and fur on boots).
3. Eyes d 6-7mm (I took half beads 7 mm).
4. Wefts – 1 pack (length 1 meter).
5. Filler.
6. Hook No. 2.25 (the number may be different, depending on the type of yarn and the density of your knitting).
7. Knitting needles No. 2.5 (the number may be different, depending on the type of yarn and the density of your knitting).
8. Sewing threads, floss threads.
9. Needle, scissors and other tools you need to work.
10. Material for the insole (this can be a nylon cover, modeling board, etc.).
Legend:
ka – amigurumi ring
vp- air loop
sbn – single crochet
pssn – half double crochet
pr – increase
prpssn – increase from pssn
ub – decrease (invisible for the front half loops)
UB – decrease (normal)
ss – connecting column
for zs – behind the rear wall
behind the ps – behind the front wall
Hands (2 parts)
We start knitting with yarn in body color:
We fill the part in the course of knitting.
1) In ka 6 sc (6)
2) (inc, 1 sc) * 3 (9)
3) 1 sc, 2 inc, 2 sc, 2 inc, 1 sc, inc (14)
4) 6 sc, dec, 6 sc (13)
5) dec, 11 sc (12)
6) 3 sc, dec, 4 sc, dec, 1 sc (10)
We knit 6 more sc with body color,
! Then we change the color of the dress to the yarn and we already consider the beginning of the row from here.
1) for zs 10 sb (10)
2-19) 10 sb (10) (18 rows) Cut the
working thread, tighten the loop.

Next, we knit the edge of the sleeve (I have it tied in blue):
In the first row (where we changed the color of the yarn) we knit for ps 10 sc (hold the handle with the brown palm down), cut the thread, leaving the tail longer.
We insert the tail into the needle and sew the edge of the sleeve, as shown in the photo:
– first, insert the needle into the arm [photo 1], stretch the thread [photo 2], insert the needle into the half-loop of the edge of the sleeve [photo 3], stretch the thread and repeat such stitches along the entire circle.
Then we fix the thread and hide it inside the hand. The pen is ready!We knit the second handle in the same way.
We knit legs + body and hem of the dress.
Legs (2 parts)
We start with the sole.
For the sole, I used a darker shade of brown (Kartopu Amigurumi yarn).
We fill the part in the course of knitting.
1) dial 5 ch, start knitting from the 2nd loop from the hook on two sides of the chain, forming an oval:
3 sc, 3 sc in one loop, 2 sc, inc (10)
2) inc, 2 sc, 3 inc, 2 sc, 2 inc (16)
3) sc, inc, 3 sc, inc, sc, inc, sc, inc, 3 sc, inc, sc, inc (22)
4) 2 sc, inc, sc, 3 pss, 4 inc, 5 prss, 2 prs, inc, 2 prs, inc (29) + 2 prs
[photo 1]
We make insoles. I first make a pattern of the insole on paper, figure it out [photo 2], only then I cut it out of a flat (not embossed) nylon lid for a jar. You can make insoles out of something else.
We continue knitting:
5) 29 sl-st for zs (29)
Change the color of the yarn (for the boot itself):
6) 29 sb for zs of the 5th row (29) [photo 3]
7-8) 29 sb (29)
9) 7 sb, 4 UB (regular) for s, 9 sb, 2 dec, 1 sb (23)
Insert the insole.
10) 5 sbn, dec, 2 UB (regular) for zs, dec, 10 sbn (19)
11) 6 sbn, UB (normal) for zs, 11 sbn (18)
12) 18 sbn (18)
13 boots) 18 sc for ps of the 12th row (18)
! It is convenient to knit the next three rows after you have knitted the brown part of the leg (see below, after a few lines).
14a) 18 sbn (18)
15a) 18 sbn (18)
16a) from Alize Softy 18 pssn 18)
Cut the threads, fasten and hide inside the legs.
We knit the leg itself with a brown thread: leg
13) 18 sbn for zc of the 12th row (18) [photo 4]
14) 1 sb, dec, 8 sb, dec, 5 sb (16)
15) 5 sb, dec, 6 sb , dec, 1 sc (14)
16-34) 14 sc (14) (19 rows)
Now I am knitting the boot (rows 14a, 15a, 16a).
The 35th row is incomplete and is different for the left and right legs!
Left leg:
35) 4 sc; cut the thread, tighten the loop.
Right leg:
35) 13 sc; we continue knitting, connecting the legs (we begin to knit the body).
If you want to make an imitation of panties on the doll, then here we change the thread to a different color.
The beginning of the row is now considered from here!
36) 5 ch, 14 sb, 5 sb in ch, 14 sb (38) [photo 5, taken after the first 5 ch of the row]
37) 5 sb in ch, 6 sb, inc, 18 sb, inc, 7 sb (40 )
38-41) 40 sc (40) (4 rows)
+ 11 sc to the left side and change to a brown thread, now we count the beginning of the row from here! [photo 6]
42) dec, 19 sc, dec, 17 sc (38)
43) 1 sc, dec, 16 sc, dec, 17 sc (36) [photo 7]
Change the thread to the color of the dress:
44) 36 sc (36)
45) 36 sc for zs (36)
46) dec, 16 sc, dec, 16 sc (34)
47) 7 sc, dec, 25 sc (33)
48) 16 sc, dec, 13 sc, dec (31)
49) 31 sc (31)
50) dec, 13 sc, dec, 14 sc (29)
51) 6 sc, dec, 21 sc (28)
52) dec, 9 sc, dec, 15 sc (26)
53-55) 26 sc (26) (3 rows) [photo 8]
At this stage, I knit the hem of the dress (see the description of the hem below), it is more convenient for me to knit it until my hands are tied. You can link it later, see how you feel more comfortable.
56) 25 sc (do not knit one loop, transfer the marker here)
57) 3 sc along with three loops of the handle, 10 sc, 3 sc along with three loops of the other handle, 10 sc (26) [photo 10]
58) 7 sc on the handle, 10 sc, 7 sc on the other handle, 10 sc ( 34)
59) dec, 3 sc, dec, 10 sc, dec, 3 sc, dec, 10 sc (30)
60) 21 sc, dec, 4 sc, dec, 1 sc (28)
61) 4 dec, 4 sc , 5 dec, 4 sc, dec (18)

Hem (skirt) of the dress:
We knit with the color of the dress:
1) 36 sb for the ps of the 45th row (36)
From the next row, I change the hook to N3.5. So the skirt will be less rigid.
You can come up with your own version of the skirt, for example, knit from pssn or ssn, make more increases so that the skirt is fuller, etc.
2) (2 sbn + inc) * 12 (48)
3-5) 48 sbn (48) (3 rows)
6) (3 sbn + pr) * 12 (60)
7-9) 60 sbn (60) (3 rows)
10) (4 sbn + inc) * 12 (72)
11-12) 7 sbn (72)
Next, I tie with a crustacean step yarn of the same color as the edges of the sleeves [photo 9]
Fasten and hide all tails of threads.
The hem of the dress is ready!
Knit neck + head
We continue:
Change the thread to brown:
62) 2 dec, 1 sc, 4 dec, 1 sc, 2 dec (10)
63-64) 10 sc (10)
65) 10 inc (20)
In order for a large head not to collapse on a thin neck, the neck needs to be strengthened. I use a hard plastic stick 6-8 cm long for this. The wand must be placed in the center of the neck so that half goes into the body, half remains in the head. Fill the remaining voids in the neck tightly with filler.

66) (inc + 2 sc) * 6, 2 sc (26)
67) (inc + 3 sc) * 3, inc, 2 sc, (inc + 3 sc) * 2, inc, 2 sc (33)
68) (inc+4 sc)*3, inc, 3 sc, (inc+4 sc)*2, inc, 3 sc (40)
69) (inc+4 sc)*8 (48)
70) (inc+5) * 8 (56)
71-80) 56 sc (56) (11 rows)
If you use carnation eyes with plugs, you can already fix them out. In height between 75 and 76 nearby, in width at a distance of 9 sc, if we take the distance from the center of the eye. Look carefully so that the eyes are located symmetrically relative to the body!
81) dec, 9 sc, dec, 13 sc, dec, 9 sc, dec, 17 sc (52)
82) 12 sc, dec, 8 sc, dec, 12 sc, dec, 12 sc, dec (48)
Change the thread to a color close to the color of the hair (in my case, I change to black).
(It is not necessary to change the color of the thread here, but I recommend it! Why? Because the head looks very neat this way, the “bald spot” does not show through the hair).
83) 3 sc, (dec + 6 sc) * 5, dec, 3 sc (42)
84) (dec + 5 sc) * 6 (36)
85) 3 sc, dec, 2 sc, dec, 3 sc, dec , 2 sc, dec, 3 sc, dec, 2 sc, dec, 3 sc, dec, 2 sc, dec (28)
86) (2 sc + dec) * 7 (21)
87) (2 sc, dec, 1 sbn, ub) * 3 (15)
88) (1 sbn + ub) * 5 (10)
Cut off the working thread, but do not tighten the hole on the top of the head!When I created the doll, I did not yet know what kind of face she would have. When the face is framed by hair, it is clearer where to place the eyes, eyebrows, etc., in general, the picture of the creation of the face is clearer. Therefore, it is better to do the hair first, and then shape the face.
But if it’s more convenient for you to shape your face first (especially if you want to shape it in the same way as my mulatto), and then sew on the hair, then swap the steps.
MK is detailed and understandable, below I will sign where I did not according to MK:
1) For the crown, I took a piece of tress of a shorter length, about 8-10 mm, [and not 15-20 mm].
2) The “sausage” for the crown, twisted from tress, was sewn together with threads [and not glued with glue].
3) The next row of tress was located almost back to back, with a minimum gap.
4) The wefts were sewn straight up to the very hole in the top of the head.
5) With an iron, she steamed not only the crown, but also the hair in front of the forehead, after giving them the desired position.
6) If you do not use up all the wefts from the package, then you can sew another half-row from the bottom (approximately from ear to ear from the back of the head).
That’s all the differences
I placed the first row of tress on the border of brown and black.
So that the hair does not fall on the face, in addition to steaming, you can additionally sew it with one snowball to the head in the places where it is shown in the photo below. Just sew on without grabbing the topmost layer of hair, so that they can then cover the stitch!
After sewing, you can steam again.
Also, at the final stage, you can make a haircut, trim the tips. Here everything depends on your imagination. My mulatto, for example, was originally with toe-length hair, but it was decided to cut it.
Making out the face
: Initially, I didn’t plan online for this doll, I didn’t photograph the process of making a face.
But in the design of the face there is nothing super complicated, I will try to paint everything in detail in order. I don’t think there should be any problem.
1) We estimate the location of the eyes.
I settled on the option: between the centers of the peephole, the distance is 9 sbn, in height they are located between 75 and 76 rows.
2) In places where the eyes will be located, we make weights (just a little bit). Literally small holes for the eyes of half beads. (Tightening can be omitted, the eyes will simply be more convex).
3) Glue the eyes with super glue (or sew on if the eyes are sewn on). I used half beads with a diameter of 7 mm. I think 6mm eyes would work well too.
4) With the usual black sewing thread in two additions, we embroider eyes and eyebrows. Since it is not very clearly visible on a brown background, I selected all the stitches with a marker (see photo).
All stitches are embroidered one at a time!
5) With a white sewing thread in two additions, we embroider a stitch from the outside of the eye closer to the bottom (see photo).
6) We estimate the location of the spout.
I placed it between 72 and 73 rows, strictly in the center.
Then we embroider it with the same threads that knitted the body. We make several stitches 2 sb wide, going out and going into one point.
7) To make the nose look more expressive and voluminous, we embroider one stitch under it with a thin thread of a slightly darker shade of brown (see photo, highlighted with a marker).
8) Under the spout, two rows below, we embroider the mouth. We make several stitches 4 sb wide, going out and going into one point. I used bright scarlet floss threads.
Pretty face done!

PS You can come up with and design a face in your own way.
Knitted
vest (Description of the crochet vest can be found below).
Symbols:
kr – edging
faces – front
purl – purl
raglan – nakid + front + nakid
I calculated the number of loops specifically for our mulatto doll.
We knit, alternating 2 rows of Alize Softy, 2 rows of semi-cotton.
We start from Alize Softy:
1) We collect 13 loops.
2) cr, 11 out, cr (13)
3) cr, raglan, 2 persons, raglan, 3 persons, raglan, 2 persons, raglan, cr (21)
4) cr, 19 out, cr (21)
5) cr , 1 persons, raglan, 4 persons, raglan, 5 persons, raglan, 4 persons, raglan, 1 persons, kr (29)
6) kr, 27 out, kr (29)
7) kr, 2 persons, raglan, 6 persons , raglan, 7 persons, raglan, 6 persons, raglan, 2 persons, cr (37)
8) cr, 35 out, cr (37)
9) cr, 3 persons, raglan, 8 persons, raglan, 9 persons, raglan, 8 knit, raglan, 3 knit, cr (45)
10) cr, 43 out, cr (45)
11) cr, 4 knit, close 12 loops, knit 11, close 12 loops, knit 4, cr (21)
12) cr, 19 out, cr (21)
13) cr, 3 knit, yarn over, 6 knit, yarn over, 7 knit, yarn over, 3 knit, cr (24)
14) cr, 22 out, cr (24)
15) cr, 22 persons, cr (24)
16) cr, 22 out, cr (24)
17) cr, 2 persons, nakid, 18 persons, nakid, 2 persons, cr (26)
18) cr, 24 out, cr (26)
19) cr, 24 knit, cr (26)
20) cr, 24 out, cr (26)
21) cr, 4 knit, yarn over, 8 knit, yarn over , 8 knit, yarn over, 4 knit, cr (29)
22) cr, 27 out, cr (29) do not change the thread, leave Alize Softy!
We close all 29 loops, then attach the thread from the semi-cotton and crochet one side edge of the vest. We cut the thread, fasten and hide.
Similarly, we crochet the other side edge of the vest.

Then we crochet the neckline with Alize Softy threads.
(X is the number of sbn with which you will tie the neck)
1) X sbn
2) the second row in this order: pss, 2 dc, pss, (X-8) sb, pss, 2 dc, pss Cut the
thread, fasten and hide.
The vest is ready!
Crochet vest
Symbols:
Double crochet – ssn
Air loop – vp
Raglan – in one loop ssn; vp; ssn.
At the end of each row ch 2. Then we turn the product and start knitting in the same loop.
Cast on 29 stitches. We begin to knit in the 2nd loop from the hook.
1) 4 dc; raglan; 4 dc; raglan; 8 ssn; raglan; 4 dc; raglan; 4 dc
2) 5 dc; raglan; 6 ssn; raglan; 10 ssn; raglan; 6 ssn; raglan; 5 dc
3) 6 dc; raglan; 8 ssn; raglan; 12 ssn; raglan; 8 ssn; raglan; 6 dc
4) 7 dc; 5 ch (instead of 12 loops); 14 ssn; 5 ch (instead of 12 loops); 7 dc
5-6) 38 dc (2 rows)
Tie the side edges of the vest.
Tie the neck with Alize Softy yarn in the same way as we knit when knitting.
The crochet vest is ready!


