Materials
Size 4 worsted weight yarn
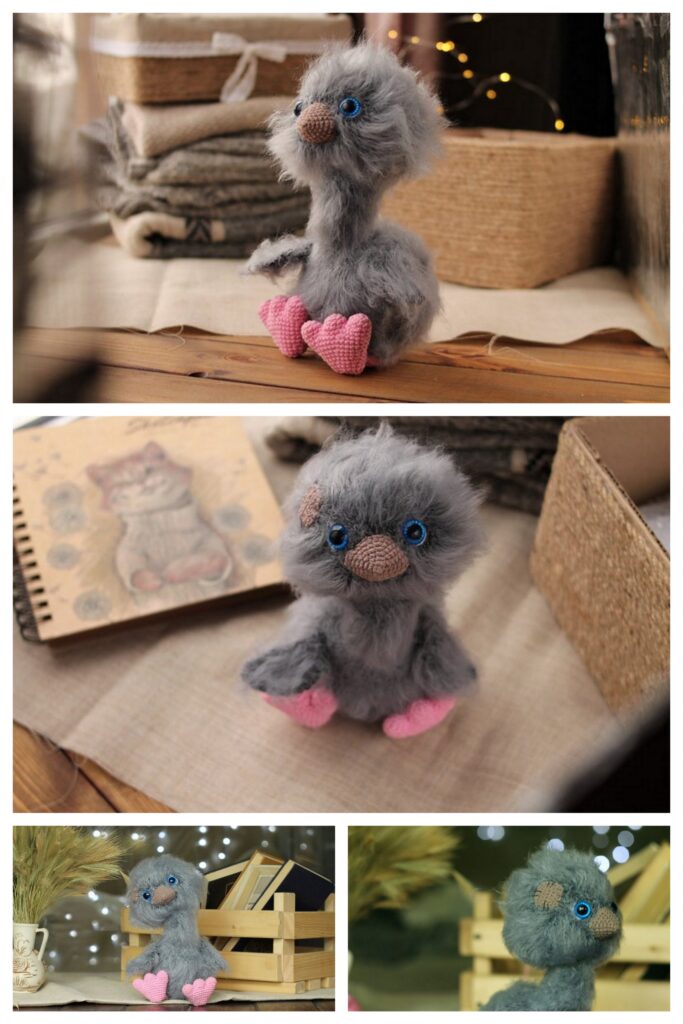
75g light gray (I used Yarn Bee Soft and Sleek in Light Gray)
75g choice of color for outfit/bows/slippers
Small amount of
White
Ivory for the legs and beak
3.5 mm crochet hook
12mm safety eyes
Crochet thread for eyelashes (optional)
Scissors
Tapestry needle (I love using the bent tip needles)
Stuffing
Stitch markers
Abbreviations: US terminology
SC- Single crochet
SC INC- Single crochet increase
INV DEC- Invisible decrease
DC- Double crochet
Ch – Chain
Sl st – Slip stitch
Rep – Repeat
*Slowly stuff as you go, you want it to be firm but not stretched. You will be working in the round, I like using a stitch marker at the beginning of each round.
(For this pattern the body and head will be made as one piece.)
Beak
With ivory
Round 1: Create a magic circle with 6 SC
Round 2: SC INC in each stitch (12)
Rounds 3-4: SC around (12)
Round 5: SC in the first stitch, SC INC in the next, repeat around (18)
Round 6: SC around (18)
Round 7: SC in the first 2 stitches, SC INC in the next, repeat around (24 SC)
Fasten off leaving a long tail for sewing
Body
With outfit color
Round 1: Create a magic circle with 6 SC
Round 2: SC INC in each stitch around (12)
Round 3: SC in the first stitch, SC INC in the next, rep around (18)
Round 4: SC in the first 2 stitches, SC INC in the next, rep around (24)
Round 5: SC in the first 3 stitches, SC INC in the next, rep around (30)
Round 6: SC in the first 4 stitches, SC INC in the next, rep around (36)
Round 7: SC in the first 5 stitches, SC INC in the next, rep around (42)
Round 8: SC in the first 6 stitches, SC INC in the next, rep around (48)
Rounds 9-12: SC around (48)
Round 13: SC in the back loops only (48)
Rounds 14-15: SC around (48)
Round 16: SC in the first 6 stitches, INV DEC in the next, rep around (42)
Round 17-18: SC around (42)
Round 19: SC in the first 5 stitches, INV DEC in the next, rep around (36)
Rounds 20-21: SC around (36)
Round 22: SC in the first 4 stitches, INV DEC in the next, rep around (30)
Rounds 23-24: SC around (30)
Round 25: SC in the first 3 stitches, INV DEC in the next, rep around (24) Change to light gray
Rounds 26-27: SC around (24)
Round 28: SC in the first 2 stitches, INV DEC in the next, rep around (18)
Rounds 29-38: SC around (18)
*We will now start the head*
Round 39: SC in the first 2 stitches, SC INC in the next, rep around (24)
Round 40: SC in the first 3 stitches, SC INC in the next, rep around (30)
Round 41: SC in the first 4 stitches, SC INC in the next, rep around (36)
Round 42: SC in the first 5 stitches, SC INC in the next, rep around (42)
Round 43: SC in the first 6 stitches, SC INC in the next, rep around (48)
Round 44: SC in the first 7 stitches, SC INC in the next, rep around (54)
Rounds 45-52: SC around (54)
Note: Here is where we will add the facial features before we start closing the head. Insert the eyes between rows 49 and 50, 9 stitches apart. Place your eyes where you would like them and then remove to embroider your eyelashes before attaching the washer to the back. (This creates a little hole to help see where you want your eyelashes to go)
Sew the beak on evenly between the eyes, stuff lightly before closing.
Round 53: SC in the first 7 stitches, INV DEC in the next, rep around (48)
Round 54: SC in the first 6 stitches, INV DEC in the next, rep around (42)
Round 55: SC in the first 5 stitches, INV DEC in the next, rep around (36)
Round 56: SC in the first 4 stitches, INV DEC in the next, rep around (30)
Round 57: SC in the first 3 stitches, INV DEC in the next, rep around (24) *Continue to stuff the head firmly
Round 58: SC in the first 2 stitches, INV DEC in the next, rep around (18)
Round 59: SC in the first stitch, INV DEC in the next, rep around (12)
Round 60: INV DEC around (6)
Fasten off and sew remaining part closed, weave in your end
Tutu
To work the tutu, have the head towards you and body away from you (see pictures for example).
With color of choice create a slip knot and attach with a slip stitch to one of the front loops from round 13 (For a cleaner look attach at the back of the body)
Round 1: Ch 2 (this does not count as your first stitch), 3DC in the same stitch and in each stitch around, join with a slip stitch to the first DC (144) Change to white (I carried my yarn as we will pick it back up for the last round, but fastening off works as well)
*Note – It is not necessary to count each stitch of the tutu, if a few are missed it will still have its nice ruffles
Round 2: Ch 2, DC in each stitch around, join with a slip stitch to the first DC (144) Change to color of choice
Round 3: Ch 2, DC in each stitch around, join with a slip stitch to the first DC (144)
Fasten off and weave in end
Wings
Make 2
*I left the wings unstuffed*
(Each wing is made with two “feathers” that we will join together.)
Small Feather: With light gray
Round 1: Create a magic circle with 6 SC
Round 2: SC INC in each stitch around (12)
Rounds 3-4: SC around (12)
Fasten off
Large Feather:
Round 1: Create a magic circle with 6 SC
Round 2: SC INC in each stitch around (12)
Rounds 3-5: SC around (12)
Do not fasten off, here is where we will join the feathers and continue the wing.
Round 6: Attach to the first feather with a SC. SC around the first feather and then the second feather (24 SC) This completes your join and is where your next round will start, from here we will work the wing.
Rounds 7-10: SC around (24)
Fasten off and leave a long tail to sew onto the body.
Legs
Make 2 stuffing lightly in the bottom half
With color of choice for slippersRound 1: Create a magic circle with 6 SC
Round 2: SC INC in each stitch (12)
Round 3: SC in the first stitch, SC INC in the next, rep around (18)
Round 4: SC in the first 2 stitches, SC INC in the next, rep around (24)
Round 5: SC around in the back loops only (24)
Round 6: SC around (24)
Round 7: SC in the first 6 stitches, INV DEC 6 times, SC in the last 6 stitches (18)
Round 8: SC in the first 3 stitches, INV DEC 6 times, SC in the last 3 stitches (12) Change to ivory
Rounds 9-24: SC around (12)
At the end of round 24 pinch the leg flat and make 6 SC across the top to close, fasten off and leave a long tail to sew onto the body.
Accessories
“Ribbons” for slippers – Make 2
With color of choice, make a chain until it reaches around the leg, crossing at the front. Tension and stuffing can vary from person to person and this number may be different for some. As a reference my chain was 26. Fasten off leaving about 6 inches to sew onto the slipper.
Bows for Slippers – Make 2
Working in a magic circle make 4 DCs, slip stitch, 4 DCs, and slip stitch again, pull your string tight and wrap it around the middle of the bow 3-4 times. Tie/secure in the back and cut your string leaving a long section to sew with.
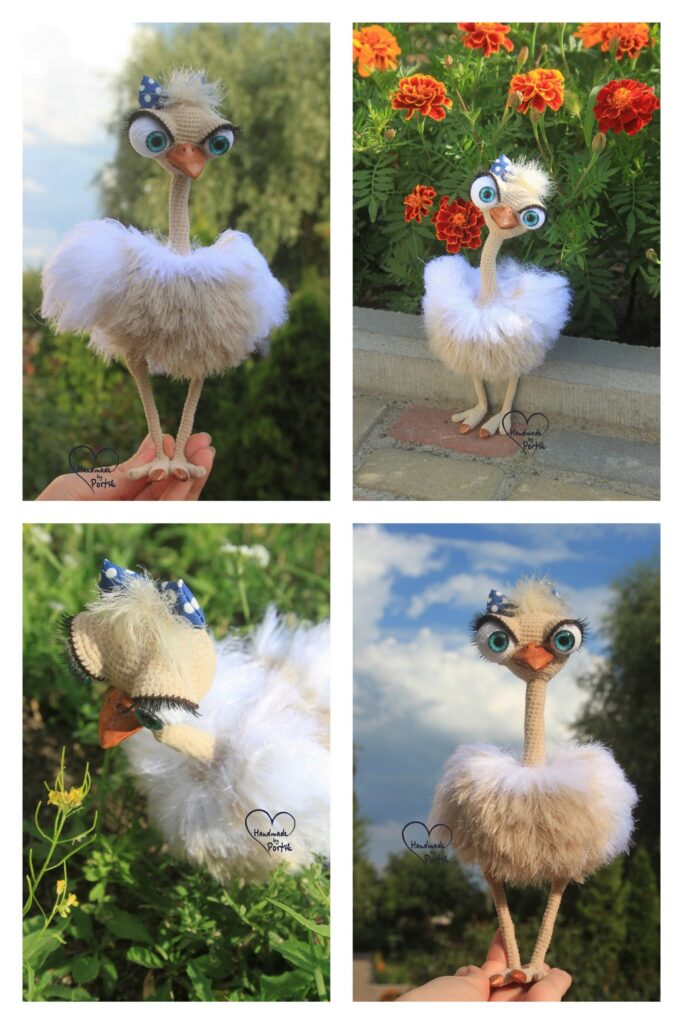
Headband –
Make a chain long enough to reach around the head, my chain was 48, fasten off leaving a long tail to sew with.
Bow for headband –
Working in a magic circle make 7 DCs, slip stitch, 7 DCs, and slip stitch again, pull your string tight and wrap it around the middle of the bow 3-4 times. Tie/secure in the back and cut your string leaving a long section to sew with.
Assembly
1. Sew on the headband and bow. I placed the headband where I wanted it and sewed it in place, I had enough remaining yarn from my tail to tie a bow at the back.
2. Attach the wings onto the body starting at round 25 (near the top of her outfit) and ending at round 16 (right above the tutu). I placed the larger feather facing up.
3. Attach the “ribbon” for the slippers to each leg. I attached to one side, wrapped around the back to the front to create an “x” and secured to the other side of the slipper.
4. Sew each bow onto the outsides of the slippers.
5. Sew the legs onto the bottom of the body, making sure to keep them centered with the facial features.
More Amigurumi Ostrich Ideas: