Materials
Crochet Hook, Size E/4 (3.5 mm)
Stitch Marker(s)
Stuffing
Scissors
Tapestry Needle
Pins (optional)
Safety Eyes, 15 mm (optional)
– Bear with the Red Bow Tie: Red Heart Super Saver (worsted 4-Medium, 100% acrylic, 364 yds/333 m, 7 oz/198 g): Color (A) Warm Brown, used approx. 193 yds/176 m, Color (B) Coffee, used approx. 10 yds/9 m, Color (C) Black, used approx. 10 yds/9 m (only needed if not using safety eyes)
– Bear with the Blue Bow Tie: Lion Brand Vanna’s Choice (worsted 4-Medium, 100% acrylic, 145 yds/133 m, 3 oz/85 g): Color (A) Taupe Mist, used approx. 193 yds/176 m (2 skeins needed)
– Lion Brand Vanna’s Choice (worsted 4-Medium, 100% acrylic, 170 yds/156 m, 3.5 oz/100 g): Color (B) Black, used approx. 10 yds/9 m (additional 10yds/9 m needed if not using safety eyes)
– Bow Tie: Lion Brand Vanna’s Choice (worsted 4-Medium, 100% acrylic, 170 yds/156 m, 3.5 oz/100 g): Color (D) Cranberry OR Colonial Blue, used approx. 15 yds/14 m
Design Notes
This pattern is written using US crochet terminology.
The majority of the pattern is worked in continuous rounds.
It will be helpful to place a stitch marker at the beginning stitch of the round and move it up at the start each additional round.
At the end of each round/row the number of stitches for completion is noted in parentheses.
Further design notes and tips will be provided throughout the pattern to help aid in construction.
Abbreviations/Stitches Used
back bar – work stitches into the horizontal bar on the underside of a foundation chain
ch – chain
hdc – half double crochet
Rnd(s) – Round(s)
sc – single crochet
sc2tog – single crochet 2 stitches together (decrease)
sl st – Slip stitch
st(s) – Stitch(s)
[ ] – work instructions between brackets as many times as directed
magic circle/adjustable ring
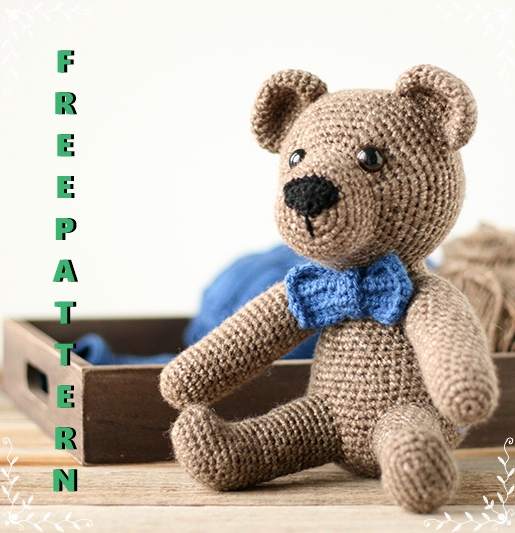
Amigurumi bear free crochet pattern
Body
The body is worked from the bottom up to the neck.
Using Color (A)
Rnd 1: 6sc in adjustable (magic) circle. (6sts)
Rnd 2: 2sc in each st around. (12sts)
Rnd 3: [Sc in the next st, 2sc in next st] 6 times. (18sts)
Rnd 4: [Sc in the next 2sts, 2sc in the next st] 6 times. (24sts)
Rnd 5: [Sc in the next 3sts, 2sc in the next st] 6 times. (30sts)
Rnd 6: [Sc in the next 4sts, 2sc in the next st] 6 times. (36sts)
Rnd 7: [Sc in the next 5sts, 2sc in the next st] 6 times. (42sts)
Rnd 8: [Sc in the next 6sts, 2sc in the next st] 6 times. (48sts)
Rnd 9: [Sc in the next 7sts, 2sc in the next st] 6 times. (54sts)
Rnd 10: [Sc in the next 8sts, 2sc in the next st] 6 times. (60sts)
Rnds 11-14: Sc in each st around. (60sts for 4 rows)
Rnd 15: [Sc in the next 8sts, sc2tog] 6 times. (54sts)
Rnd 16: [Sc in the next 7sts, sc2tog] 6 times. (48sts)
Rnds 17-18: Sc in each st around. (48sts for 2 Rows)
Rnd 19: [Sc in the next 6sts, sc2tog] 6 times. (42sts)
Rnds 20-21: Sc in each st around. (42sts for 2 Rows)
Rnd 22: [Sc in the next 5sts, sc2tog] 6 times. (36sts)
Rnd 23-24: Sc in each st around. (36sts for 2 Rows)
Rnd 25: [Sc in the next 4sts, sc2tog] 6 times. (30sts)
Rnds 26-27: Sc in each st around. (30sts for 2 Rows)
Begin to firmly stuff and shape the body and continue to do so as the body continues.
Rnd 28: [Sc in the next 3stsc, sc2tog] 6 times. (24sts)
Rnds 29-32: Sc in each st around. (24sts for 4 rows)
Sl st to first st of the round and fasten off leaving a long tail for stitching the body to the head.
Head
The head is worked from the snout towards the back of the head.
Using Color (A)
Rnd 1: 6sc in adjustable (magic) circle. (6sts)
Rnd 2: 2sc in each st around. (12sts)
Rnd 3: [Sc in the next st, 2sc in next st] 6 times. (18sts)
Rnd 4: [Sc in the next 2sts, 2sc in the next st] 6 times. (24sts)
Rnd 5: [Sc in the next 3sts, 2sc in the next st] 6 times. (30sts)
Rnds 6-9: Sc in each st around. (30sts for 4 rows)
Rnd 10: [Sc in the next 3sts, sc2tog] 6 times. (24sts)
Rnd 11: 2sc in each of the next 12sts, sc in the last 12sts. (36sts)
Design Note: The increases made at the beginning or Rnd 11 begin the shaping of the forehead of the bear. Remember this when stuffing and shaping the head.
Rnd 12: [Sc in the next 5sts, 2sc in the next st] 6 times. (42sts)
Rnd 13: [Sc in the next 6sts, 2sc in the next st] 6 times. (48sts)
Rnd 14: Sc in each st around. (48sts)
Rnd 15: [Sc in the next 7sts, 2sc in the next st] 6 times. (54sts)
Rnds 16-17: Sc in each st around. (54sts for 2 Rows)
Rnd 18: [Sc in the next 8sts, 2sc in the next st] 6 times. (60sts)
Rnds 19-20: Sc in each st around. (60sts for 2 rows)
Rnd 21: [Sc in the next 9sts, 2sc in the next st] 6 times. (66sts)
Rnd 22: [Sc in the next 9sts, sc2tog] 6 times. (60sts)
Rnd 23: Sc in each st around. (60sts)
Rnd 24: [Sc in the next 8sts, sc2tog] 6 times. (54sts)
Rnd 25: Sc in each st around. (54sts)
Rnd 26: [Sc in the next 7sts, sc2tog] 6 times. (48sts)
Rnd 27: Sc in each st around. (48sts)
Rnd 28: [Sc in the next 6stsc, sc2tog] 6 times. (42sts)
Rnd 29: [Sc in the next 5sts, sc2tog] 6 times. (36sts)
Design Note: Instructions are given later for a crocheted eye, but if planning to use safety eyes be sure to insert them before the hole gets too small. Suggested placement: between Rnds 12 and 13 about 12sts apart.
Begin to firmly stuff and shape the head and continue to do so as the pattern progresses. Remember that Rnd 11 created a bit of a forehead. This will be at the top. Stuff and shape accordingly.
Rnd 30: [Sc in the next 4sts, sc2tog] 6 times. (30sts)
Rnd 31: [Sc in the next 3sts, sc2tog] 6 times. (24sts)
Rnd 32: [Sc in the next 2sts, sc2tog] 6 times. (18sts)
Rnd 33: [Sc in the next st, sc2tog] 6 times. (12sts)
Rnd 34: [Sc in the next st, sc2tog] 4 times. (8sts)
Sl st to the first st and fasten off leaving a long tail to close up the hole. Close the hole with a tapestry needle stitching only through the front loops until the hole pulls nicely closed, secure and weave in the end.
Ears
The ears are worked from the top of the ear to the base of the ear.
Make 2
Using Color (A)
Rnd 1: 6sc in adjustable (magic) circle. (6sts)
Rnd 2: 2sc in each st around. (12sts)
Rnd 3: [Sc in the next st, 2sc in next st] 6 times. (18sts)
Rnd 4: [Sc in the next 2sts, 2sc in the next st] 6 times. (24sts)
Rnd 5: [Sc in the next 3sts, 2sc in the next st] 6 times. (30sts)
Rnds 6-7: Sc in each st around. (30sts for 2 Rows)
Rnd 8: [Sc in the next 3st, sc2tog] 6 times. (24sts)
Rnd 9: [Sc in the next 2sts, sc2tog] 6 times. (18sts)
Rnd 10: Line the bottom two edges of the ear up side by side and single crochet them together. (9sts)
Fasten off leaving a long tail for sewing the ears to the head.
Eyes
Using Color (C)
Rnd 1: 5sc in adjustable (magic) circle. (5sts)
Sl st into the first st and fasten off leaving a long tail for sewing the eyes to the head. Weave in the starting tail.
Nose
Using Color (B)
Design Note: The nose is NOT worked in rounds.
Ch 1 and turn at the end of each Row.
Row 1: 3sc in adjustable (magic) circle. (3sts)
Row 2: 2sc in the first st, sc in the next st, 2sc in the last st. (5sts)
Row 3: 2sc in the first st, sc in the next 3sts, 2sc in the last st. (7sts)
Row 4: Sc in each st across. (7sts)
Fasten off leaving a tail long enough to sew the nose onto the snout as well as embroider the desired mouth. Weave in the starting tail.
Arms
Make 2
The arms are worked from the paw up to the shoulder.
Stuff and shape the arms as the pattern progresses, but don’t over stuff so they will lie against the body rather than sticking straight out.
Using Color (A)
Rnd 1: 6sc in adjustable (magic) circle. (6sts)
Rnd 2: 2sc in each st around. (12sts)
Rnd 3: [Sc in the next st, 2sc in next st] 6 times. (18sts)
Rnd 4-23: Sc in each st around. (18sts for 20 Rnds)
Rnd 24: [Sc in the next st, sc2tog] 6 times. (12sts)
Rnd 25-26: Sc in each st around. (12sts for 2 Rnds)
Rnd 27: Ch 1, turn, [sc2tog] 3 times, leave the remaining sc unworked.
Fasten off leaving a long tail to stitch the arm to the body.
Legs
Make 2
The legs are worked from the soles of the feet to the top of the leg.
Firmly stuff and shape as the pattern progresses.
Using Color (A)
Ch 6
Rnd 1: Working in the back bar of the ch: Sc in the 2nd chain from the hook (mark this as the first st), sc in the next 3sts, 3sc in the last st, Working in the top of the ch: sc the next 3sts, 2sc in the last st. (12sts)
Rnd 2: 2sc in the first st, sc the next 3sts, 2sc in the next st, sc in the next st, 2sc in the next st, sc in the next 3sts, 2sc in the next st, sc in the last st. (16sts)
Rnd 3: Sc in the first st, 2sc in the next st, sc in the next 4sts, 2sc in the next st, sc in the next 2sts, 2sc in the next st, sc in the next 4sts, 2sc in the next st, sc in the last st. (20sts)
Rnd 4: Sc in the first st, 2 sc in the next st, sc in the next 5sts, 2sc in the next st, sc in the next 3sts, 2sc in the next st, sc in the next 5sts, 2sc in the next st, sc in the last 2sts. (24sts)
Rnd 5: Sc in the next 2sts, 2sc in the next st, sc in the next 6sts, 2sc in the next st, sc in the next 4sts, 2sc in the next st, sc in the next 6sts, 2sc in the next st, sc in the last 2sts. (28sts)
Rnd 6: Sc in the next 10sts, [sc2tog] 4 times, sc in the next 10sts. (24sts)
Rnd 7: Sc in the next 8sts, [sc2tog] 4 times, sc in the next 8sts. (20sts)
Rnd 8: Sc in the next 8sts, [sc2tog] 2times, sc in the next 8sts. (18sts)
Rnd 9-22: Sc in each st around. (18sts for 14 Rnds)
Sl st to the first st and fasten off leaving a long tail for sewing the leg to the body.
Tail
Using Color (A)
Rnd 1: 6sc in adjustable (magic) circle. (6sts)
Rnd 2: 2sc in each st around. (12sts)
Rnd 3: [Sc in the next st, 2sc in next st] 6 times. (18sts)
Rnds 4-5: Sc in each st around. (18sts for 2 Rnds)
Rnd 6: [Sc in the next st, sc2tog] 6 times. (12sts)
Sl st to the first st and fasten off leaving a long tail to attach the tail to the body.
Assembly
Pin all the pieces together to determine the desired placement for the entire piece and then stitch them securely into place. Remember to add any additional stuffing needed before closing up the holes on the pieces requiring stuffing.
General stitching and placement suggestions:
Center the body over the back part of the head. Adding additional stuffing right before closing is especially beneficial so that the neck remains sturdy and does not wobble.
Ears. Position the ears so they arch slightly with the front two sides at about around row 20 of the head and the back curve of the ear around row 22. No need to be too fussy.
Crocheted Eyes. Place the eyes at about Rnds 12-13 and about 6sts apart.
Nose. Place over the top front of the snout. When attaching the nose remember to also embroider any sort of desired mouth.
Arms. Place them about 2-3 rows down from where the head is attached to the body. The last round of the arm made a bit of a shoulder for the bear. When attaching the arms to the body add a bit more stuffing to help shape this shoulder right before closing up the hole.
Legs. The legs are attached over about Rnd 7-12 with about 5-6 stitches apart.
Tail. Lightly stuff the tail if desired. Place the tail at about Rnd 8 of the body, centered on the back.
Bow Tie
Bow Tie colors include: Vanna’s Choice in Kelly Green, Colonial Blue, and Cranberry
The bow tie is totally optional, but such a fun addition! Use it as a traditional bow tie or as a hair bow!
Main Part of the Bow
Using Color (D)
Ch 15
Row 1: Working in the back bars of the ch: hdc in the 3rd ch from the hook and in each st across. (13sts)
Rows 2-4: Turn, ch2 (doesn’t count as a st), hdc in each st across. (13sts for 2 Rows)
Place a st marker in the working loop and weave in the starting tail.
Row 5: Sc around the entire outside of the rectangle putting 2sc in each corner to help round the corner. Sl st in the first st and fasten off. Weave in the tail.
Center of the Bow
Using Color (D)
Ch 11
Design Note: Loop the chain around the middle of the main part of the bow to make sure that it reaches all the way around. It should be snug but reach all the way around, cinching the middle together. If it doesn’t quite reach add any additional chains needed to make it fit.
Row 1: Working in the back bar of the ch: sc in the 2nd ch from the hook and in each st across. (10sts)
Rows 2-3: Turn, ch1, sc in each st across (10sts for 2 Rows)
Fasten off leaving a long tail for stitching. Weave in the starting tail. Fasten around the center of the main part of the bow and stitch in place. Use the remaining tail to attach the bow to the bear.
You’ve done it! Enjoy your new snugly teddy bear! I’m sure there are many others who would love one too! Spread kindness!

