ABOUT YARN:
Use any yarn you like. I’ve used an acrylic yarn quite chunky, 50 gr=50 meters.
I’ve used 4 skeins in fucsia, 4.5 skeins in green and 0.3 skeins in yellow.
ABOUT GAUGE:
It is not important, as far as you are consistent with your tension.
ABOUT HOOK:
It depends on the yarn. I’ve used a 4 mm hook, so the stitches were tight as required
in amigurumi. If I had used the yarn for a scarf, the hook would have been a 5 or 5.5
mm.
YOU WILL NEED:
Yarn in three colors: fucsia, green and yellow.
Two black eyes.
Stuffing.
Tapestry needle.
ABOUT CROCHET TERMS:
I’ve followed the US terminology.
Stitch: st
Chain: ch
Slip stitch: sl st
Single crochet: sc
Half double crochet: hdc
Double crochet: dc
Treble crochet: tr
Double treble crochet: dtr
Picot: ch 3 and sl st in the 1st st
ABOUT THE PATTERN:
All the pattern is worked in spirals, so do not join at the end/beginning of a row.
All the decreases are worked as invisible decreases.
Petal: ( make 10)
Round 1: magic ring, 6 sc (alternatively, 2 ch and 6 sc in 2nd ch from hook).
Round 2: 2sc in each st across (12 sts)
Round 3: [2sc in next stitch, 1sc in next st.] repeat 6 times (18 sts)
Round 4: [2sc in next stitch, 1sc in next 2st.] repeat 6 times (24 sts)
Round 5-9: sc in each st across (24 sts)
Round 10: [sc2tog in next stitch, sc in next 6st.] repeat 3 times (21 sts)
Round 11: sc in each st across (21 st)
Round 12: [sc2tog in next stitch, sc in next 5st.] repeat 3 times (18 sts)
Round 13: sc in each st across (18 st)
Round 14: [sc2tog in next stitch, sc in next 4st.] repeat 3 times (15 sts)
Round 15-16: sc in each st across (15 st)
Round 17: [sc2tog in next stitch, sc in next 3st.] repeat 3 times (12 sts)
Round 18: sc in each st across (12 st)
Fasten off
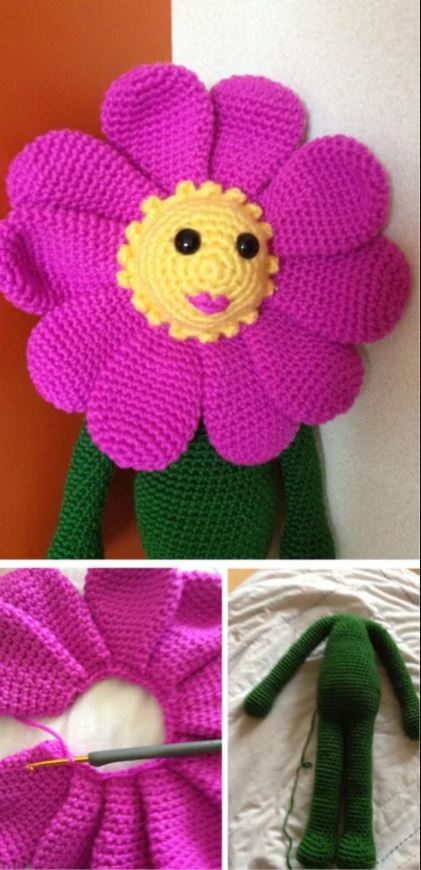
Repeat this for all the petals. Finally, close the circle working through the last 2 stitches of petal 10 and the first two stitches of petal 1:
Using yellow:
Round 1: magic ring, 6 sc (alternatively, 2 ch and 6 sc in 2nd ch from hook).
Round 2: 2sc in next 6 st, (12 sts)
Round 3: [2sc in next st, 1sc in next st] repeat 6 times (18 sts)
Round 4: [1sc in next st., 2sc in next st, 1sc in next st] repeat 6 times (24 sts)
Round 5: [2sc in next st, 1sc in next 2st] repeat 6 times (30 sts)
Round 6: [1sc in next 2st., 2sc in next st, 1sc in next 3st] repeat 6 times (36 sts)
Round 7: [2sc in next st, sc in next 17st] repeat 2 times (38 sts)
Round 8-9: sc in each st across (38sts)
Round 10: working in FLO, [sl st, picot, sl st in next st] repeat 19 times
Using the unused back loop of round 10, join the face to the petals:
Eyes can be attached and mouth embroidered.
Head: back (green)
Using green:
Round 1-9: work the first 9 rounds of the face.
Round 10: we work the sepals: [sl st, ch 9, sl st in 2nd ch from hk, sc in next ch, hdc in next ch, dc in next 2 ch, tr in next two ch, dtr in next ch, sk 4 st of round 9 and sl st in next st] repeat 7 times.
NOTE: as 7×5=35 and we have 38 st, you need to skip 5 st, three times and 4 st 4 times.
The sepals will curl, I like the effect!. This part can be sewn to the petals and face, leaving a 6st space for the neck: the body and the head will be joined there.
Arms (make two)
Using green. It is better to stuff the arms as you go.
Round 1: magic ring, 6 sc (alternatively, 2 ch and 6 sc in 2nd ch from hook).
Round 2: 2sc in each st (12 sts)
Round 3: [2sc in next stitch, 1sc in next st.] repeat 6 times (18 sts)
Round 4-7: sc in each st across (18 st)
Round 8: [sc2tog in next st, 1sc in next 4st.] repeat 3 times (15 sts).
Round 9: sc in each st across (15 st)
Round 10: [sc2tog in next st, 1sc in next 3st.] repeat 3 times (12 sts).
Round 11-35: sc in each st across (12 st)
Fasten off Round
11-20: sc in each st across (10sts)
Round 21: [sc2tog in next st, 1sc in next 3st.] repeat 2 times (8 sts) And then fasten off.
Legs (make two)
It is better to stuff the legs as you go.
Round 1: magic ring, 6 sc (alternatively, 2 ch and 6 sc in 2nd ch from hook).
Round 2: 2sc in each st (12 sts).
Round 3: [2sc in next stitch, 1sc in next st.] repeat 6 times (18 sts)
Round 4: [1sc in next st., 2sc in next st, 1sc in next st] repeat 6 times (24 sts)
Round 4: working in BLO, sc in each st across (24 sts).
Round 5: [sc2tog in next st, 1sc in next 6st.] repeat 3 times (21 sts).
Round 6-7: sc in each st across (21 st)
Round 8: [sc2tog in next st] repeat 3 times, sc in each st across (18 sts).
Round 9: [sc2tog in next st] repeat 2 times, sc in each st across (16 sts).
Note: these decreases will shape the foot
Round 10-35: sc in each st across (16 sts).
Fasten off Body (green) Using green. We’ll join together the legs, the body is worked bottom up. This draw summarizes what we have to do to join legs in the first round of the body:
Round 1:Two slip stitches to join both legs, and then sc in all the remaining stitches (28 st). Note: at the joining points you can reinforce them with an additional sc, if so, the final number of stitches would be 30.
Round 2: case a) if you finished round 1 with 30 stitches: sc in every st across (30 st). Case b) if you finished round 1 with 28 stitches: [2sc in next st, sc in next 13 st] repeat 2 times (30 st). Round 3: [2sc in next st, sc in next 4 st] repeat 6 times (36 st) Note: in the following rounds we are going to make two increases in each round, as the desired body shape is: The increases will be made at the sides: (from round 14 onwards, this approach applies for decreases)
Round 4: one increase at each side and sc in the remaining st (38 st) Round 5-6: sc in each st across (38st)
Round 7: one increase at each side and sc in the remaining st (40 st)
Round 8-9: sc in each st across (40st)
Round 10: one increase at each side and sc in the remaining st (42 st)
Round 11-13: sc in each st across (42st)
Stuff body as you work, it’s easier!
Decreases begin:
Round 14: one decrease at each side and sc in the remaining st (40 st)
Round 15-16: sc in each st across (40st)
Round 17: one decrease at each side and sc in the remaining st (38 st)
Round 18: one decrease at each side and sc in the remaining st (36 st)
Round 19: sc in each st across (36 st)
Round 20: one decrease at each side and sc in the remaining st (34 st)
Round 21: sc in each st across (34 st)
Round 22: one decrease at each side and sc in the remaining st (32 st)
Round 23: sc in each st across (32 st)
Round 24: one decrease at each side and sc in the remaining st (30 st)
Round 25: sc in each st across (30 st)
Round 26: four decreases evenly distributed (one at each side, one at the front and one at the back) (26st)
Round 27: joining arms. Note about joining arms: if we look at the arms and body from above we see: This round we sc in each st of the arms and body, taken care when placing the arms. So we have 12+26+12=50 st
Round 28: one decrease at each side and sc in the remaining st (48 st)
Round 29: [sc2tog, sc in next 4 st] repeat 8 times (40 st)
Round 30: [sc2tog, sc in next 3 st] repeat 8 times (32 st)
Round 31: [sc2tog, sc in next 2 st] repeat 8 times (24 st)
Round 32: [sc2tog] repeat 12 times (12 st)
Fasten off and finish stuffing.
Congratulations
More Amigurumi Doll Ideas: