Materials
• 2 mm crochet hook or a hook suitable for your yarn
• Any type of yarn you like, in off white, mint, light pink, fuchsia, red and black
• Metallic gold yarn or a yellow yarn for the star and buttons
• Yarn needle
• Scissors
• Stitch marker
• Polyester fiber fill for stuffing
Abbreviations (US terms)
• Mr – magic ring
• St/sts – stitch/stitches
• Sl st – slip stitch
• Sc – single crochet
• Dc – double crochet
• Inc – increase (2 sc in 1 st)
• Dcinc – double crochet increase (2 dc in 1 st)
• Dec – decrease (sc 2 sts together)
• Ch – chain
• FO – fasten off
Legs x2
With off white
1: 6 sc in a mr (6)
2: (1 sc, inc) x 3 (9)
3: (2 sc, inc) x 3 (12)
4: (3 sc, inc) x 3 (15)
5: Sc (15)
FO and hide the yarn tail.
Make the 2nd leg and don’t FO, we will join them.
Joining legs:
6: With the 2nd leg still on your hook ch 3, take the 1st leg and put a sc next to the st you stopped, make 14 sc more around the first leg, 3 sc into the ch, 15 sc around the 2nd leg, 3 sc into the ch (36)
7: (3 sc, inc) 9 (45)
8: (14 sc, inc) x 3 (48) Stuff evenly and firmly as you go
9: (7 sc, inc) x (6) (54)
10-13: Sc (54) 4 rounds
14: (16 sc, dec) x 3 (51)
15-17: Sc (51) 3 rounds
18: (15 sc, dec) x 3 (48)
19-21: Sc (48) 3 rounds
22: (14 sc, dec) x 3 (45)
23: Sc (45)
24: (13 sc, dec) x 3 (42)
25: Sc (42) Stuff as you go
26: (12 sc, dec) * 3 (39)
27: Sc (39)
28: (11 sc, dec) x 3 (36)
29: (4 sc, dec) x 6 (30)
30: (3 sc, dec) x 6 (24)
Head
31: (1 sc, inc) x 12 (36)
32: (2 sc, inc) x 12 (48)
33: (7 sc, inc) x 6 (54)
34: (8 sc, inc) x 6 (60)
35-44: Sc (60) 10 rounds
45: (8 sc, dec) x 6 (54)
46: (7 sc, dec) x 6 (48)
Stuff as you go
47: (6 sc, dec) x 6 (42)
48: (5 sc, dec) x 6 (36)
49: (4 sc, dec) x 6 (30)
50: (3 sc, dec) x 6 (24)
Stuff evenly and firmly until the end
51: (2 sc, dec) x6 (18)
52: (1 sc, dec) x 6 (12)
53: Dec x 6 (6)
FO and leave a tail to close the hole of the head.
Arms x 2
With off white
1: 5 sc in a mr (5)
2: Inc x 5 (10)
3-4: Sc (10) 2 rounds
5: Dec, 8 sc (9)
6: 3 sc, dec, 4 sc (8) Stuff until round 6
7-16: Sc (8) 10 rounds
Fold in half and sc 4 through both sides.
FO and leave a long tail for sewing the arms onto the body.
Collar x 2
(I made 2 collars and I placed them one upon the other. You can make just one if you like in any of the 2 colours)
The colours I used are light pink and fuchsia.
With light pink
1: Ch 32, starting from the 3rd ch from the hook make 30 dc, ch 1, turn
2: (Inc, dcinc) x 15 (60), ch 2, turn
3: (Dc, dcinc, sc, inc) x 15 (90)
FO and leave a tail for sewing the collar.
*Make another collar with fuchsia following the same steps.*
Hat
Starting with mint
1: 3 sc in a mr (3)
2: Inc x 3 (6) Change to off white
3: (1 sc, inc) x 3 (9) Change to fuchsia
4: Sc (9)
5: (2 sc, inc) x 3 (12)
Change to off white
6: Sc (12)
Change to mint
7: (3 sc, inc) x 3 (15)
8: Sc (15)
Change to off white
9: (4 sc, inc) x 3 (18)
Change to fuchsia
10: Ss (18)
11: (5 sc, inc) x 3 (21)
Change to off white
12: Sc (21) Change to mint
13: (6 sc, inc) x 3 (24)
14: Sc (24)
FO and leave a tail for sewing the hat onto the head.
Little star
With metallic gold
In a mr: (sc, dc, ch 2, dc, sc) x 5
Sl st into the 1st sc
FO and leave a tail for sewing the star onto the hat.
Buttons x 2
With metallic gold
8 sc in a mr
FO and leave a tail for sewing the buttons onto the body.
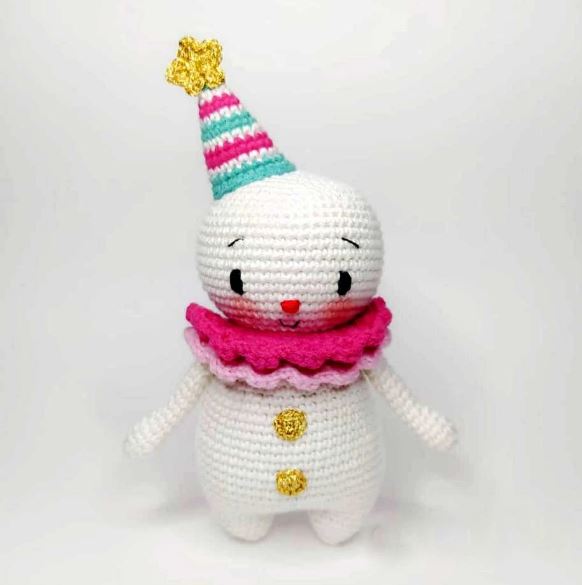
How to assemble Aska
• In rounds 36-37 embroider the eyes leaving 10 sts apart with black yarn.
• Split your black yarn to get a thinner thread and embroider the eyebrows in round 40 diagonally.
• Between rounds 34-35 embroider the nose with red yarn.
• In round 32 embroider the mouth with black yarn to create a little smile as you.
• Sew the arms between rounds 27-28 aligned with the legs.
• Put the collar around Aska’s neck and sew it with a few sts at the back and if you decided to make another collar put the 2nd upon the first and do the same.
• Sew the buttons onto the body centered with the 1st at least 7 rounds below the collar and the 2nd 3 rounds below the 1st.
• Sew the little star on the top of the hat.
• Sew the hat a bit sideways onto the head.
• Put blush below each eye to form the cheeks.
Congratulations
More Amigurumi Snowman Ideas: