Supplies
– 3.5mm (E) hook
– 15mm safety eyes
– Stitch markers
– Yarn needle
– Fiber fill
– Disappearing ink marker
Yarn (acrylic, weight 4) – 265 total yards
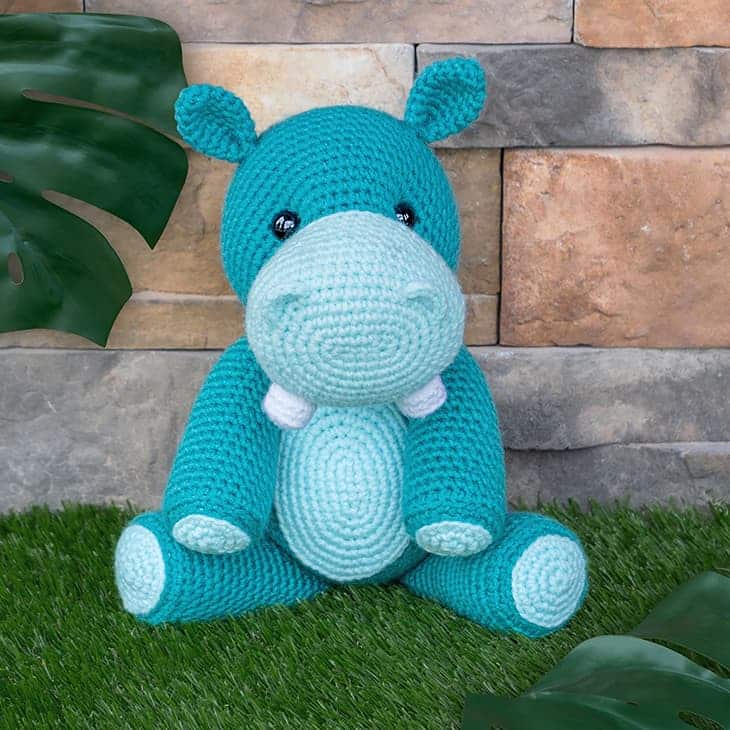
– Medium Teal – 213 yards (I used Red Heart Super Saver – Jade)
– Aqua – 47 yards (I used Red Heart Super Saver – Aruba Sea)
– Dark Teal – 1 yard (I used Red Heart Super Saver – Real Teal)
– White – 4 yards (I used Red Heart Super Saver – White)
Abbreviations
ch – chain
slst – slip stitch
sc – single crochet
inc – complete two single crochets within the same stitch
dec – combine two stitches into one with an invisible decrease
2hdc – Complete two half double crochets in the same stitch. Also known as a double crochet increase. You do not need to chain before completing the 2hdc.
BLO – crochet in the back loop only
*sc x* – repeat the instructions between asterisks(*) the indicated number of times. If the pattern doesn’t tell you how many times to repeat, then repeat the sequence until you reach the end of the round.
General Instructions
Work all stitches in both loops unless the pattern instructs otherwise.
This pattern is worked in one continuous spiral. Do not join rounds unless the pattern indicates otherwise (in other words, do not slip stitch and chain to start a new round).
Use a stitch marker to keep track of where one round ends and the next begins. I prefer to place my stitch marker in the last stitch of the round.
Recommended Sequence
Here are the steps to create your hippo, in order:
1. Crochet the Snout & Head
2. Crochet the Ears
3. Attach the Ears to the Head
4. Crochet the Teeth
5. Crochet the Body
6. Crochet the Belly
7. Crochet the Arms
8. Crochet the Legs
9. Crochet the Tail
10. Attach the Head to the Body
11. Attach the Legs to the Body
12. Attach the Arms to the Body
13. Attach the Tail to the Body
14. Attach the Belly to the Body
15. Add the Nostrils
16. Attach the Teeth
Snout & Head: Round 11 – Marking Stitches for the Teeth
Between rounds 10 and 11, you are going to insert 2 markers, showing you where to attach the teeth at a later step.Center them above the chain 5 start with 11 stitches in between (counted on row 10), as shown in the photo.You will leave the stitch markers in place as you crochet the remaining rounds of the head, so I recommend using strands of yarn to mark these stitches, ensuring they’re easy to crochet around.Use a yarn needle to insert each strand to mark your stitches.
Snout & Head: Round 16 – Additional Stitches
At the end of round 15, continue to single crochet until your most recent stitch is centered above your teeth markers, as pictured. This ensures your color join will be on the bottom of the head.These additional stitches are not included in the stitch count for round 15 nor for round 16.Move your stitch marker to the last stitch you made and continue on with round 16 as normal.
Snout & Head: Round 20 – Marking Stitches for the Eyes
Between rounds 19 and 20, you are going to insert 2 markers, showing you where to insert the eyes at a later step.Center the markers above the snout with 18 stitches in between (counted on row 19), as shown in the photo.Note that the eye markers should be centered above the snout, and the teeth markers added in a previous step should be centered on the bottom of the snout.You will leave the eye markers in place as you crochet rounds 21 – 35, so I recommend using strands of yarn to mark these stitches, ensuring they’re easy to crochet around.Use a yarn needle to insert each strand to mark your stitches.
Snout & Head: Round 29 – Marking Stitches for the Ears
Between rounds 28 and 29, you are going to insert 2 markers, showing you where to attach the ears at a later step.Center the ear markers above the eye markers with 13 stitches in between (counted on row 28), as shown in the photo.You will leave the stitch markers in place as you crochet the remaining rounds of the head, so I recommend using strands of yarn to mark these stitches, ensuring they’re easy to crochet around.Use a yarn needle to insert each strand to mark your stitches.
Snout & Head
With aqua yarn:
01. Chain 5 start: ch5, inc in 2nd ch from hook, sc 2, 5sc in the last ch. Continue on the other side of the chain base, sc 2, 3sc in the last ch [14]
02. inc, sc 4, *inc* 3 times, sc 4, *inc* 2 times [20]
03. inc, sc 6, *inc* 2 times, sc, inc, sc 6, *inc* 2 times, sc [26]
04. inc, sc 8, *inc, sc* 2 times, inc, sc 8, *inc, sc* 2 times [32]
05. inc, sc 10, inc, sc 2, inc, sc, inc, sc 10, inc, sc 2, inc, sc [38]
06. inc, sc 12, *inc, sc 2* 2 times, inc, sc 12, *inc, sc 2* 2 times [44]
07. inc, sc 14, inc, sc 3, inc, sc 2, inc, sc 14, inc, sc 3, inc, sc 2 [50]
08. inc, sc 16, *inc, sc 3* 2 times, inc, sc 16, *inc, sc 3* 2 times [56]
09. *sc 26, dec* [54]
10. sc in each st around [54]
11. *sc 7, dec* [48]
12. sc 3, dec, *sc 6, dec* 5 times, sc 3 [42]
13. sc in each st around [42]
14. *sc 5, dec* [36]
15. sc in each st around [36]
Now sc until your most recent stitch is centered perpendicular to your Chain 5 Start. See “Snout & Head: Round 16 – Additional Stitches” in the Notes section for more details.
Switch to Medium Teal Yarn:
16. BLO: slst in each st around [36]
17. BLO: *sc 5, inc* [42]
18. sc 3, inc, *sc 6, inc* 5 times, sc 3 [48]
19. *sc 7, inc* [54]
20. sc 4, inc, *sc 8, inc* 5 times, sc 4 [60]
Between rounds 19 and 20 (the last two rounds you completed), you are going to insert 2 markers. Center them above the snout with 18 stitches in between. See “Snout & Head: Round 20 – Marking Stitches for the Eyes” in the Notes section for more details.
21 – 29. sc in each st around [60]
Between rounds 28 and 29 (the last two rounds you completed), you are going to insert 2 markers. Center them above the eye markers with 13 stitches in between. See “Snout & Head: Round 29 – Marking Stitches for the Ears” in the Notes section for more details.
30. sc in each st around [60]
31. sc 4, dec, *sc 8, dec* 5 times, sc 4 [54]
32. *sc 7, dec* [48]
33. sc 3, dec, *sc 6, dec* 5 times, sc 3 [42]
34. *sc 5, dec* [36]
35. sc 2, dec, *sc 4, dec* 5 times, sc 2 [30]
Stuff head ¾ full and create indents for the eyes. See “How to indent the eyes” in the notes section. Insert your safety eyes and secure the backings.
36. *sc 3, dec* [24]
37. sc, dec, *sc 2, dec* 5 times, sc [18]
38. *sc, dec* [12]
Finish stuffing.
39. *dec* [6]
Cut working yarn and close with an ultimate finish.
Ears (make 2)
With medium teal yarn:
01. start 6 sc into a magic ring [6]
02. *sc, inc* [9]
03. sc, inc, *sc 2, inc* 2 times, sc [12]
04. *sc 3, inc* [15]
05. sc in each st around [15]
06. *sc 3, dec* [12]
07 – 09. sc in each st around [12]
Fasten off and leave a long tail for sewing. Fold the top opening in half and slip stitch closed.
Teeth (make 2)
With white yarn:
01. start 6 sc into a magic ring [6]
02. inc in each st around [12]
03. BLO: sc in each st around [12]
04. sc in each st around [12]
Fasten off and leave a long tail for sewing. When attaching the teeth, I recommend sewing them 3/4 around, stuffing, then sewing the remaining 1/4.
Body
With medium teal yarn:
01. start 6 sc into a magic ring [6]
02. inc in each st around [12]
03. *sc, inc* [18]
04. sc, inc, *sc 2, inc* 5 times, sc [24]
05. *sc 3, inc* [30]
06. sc 2, inc, *sc 4, inc* 5 times, sc 2 [36]
07. *sc 5, inc* [42]
08. sc 3, inc, *sc 6, inc* 5 times, sc 3 [48]
09. *sc 7, inc* [54]
10. sc 4, inc, *sc 8, inc* 5 times, sc 4 [60]
11 – 17. sc in each st around [60]
18. sc 4, dec, *sc 8, dec* 5 times, sc 4 [54]
19. sc in each st around [54]
20. *sc 7, dec* [48]
21. sc in each st around [48]
22. sc 3, dec, *sc 6, dec* 5 times, sc 3 [42]
23 – 24. sc in each st around [42]
25. *sc 5, dec* [36]
26 – 27. sc in each st around [36]
28. sc 2, dec, *sc 4, dec* 5 times, sc 2 [30]
29 – 30. sc in each st around [30]
31. *sc 3, dec* [24]
Fasten off and create an invisible finish. Leave an 24″ tail for sewing. Stuff firmly with fiber fill.
Belly
With aqua yarn:
01. Chain 5 start: ch5, inc in 2nd ch from hook, sc 2, 5sc in the last ch. Continue on the other side of the chain base, sc 2, 3sc in the last ch [14]
02. inc, sc 4, *inc* 3 times, sc 4, *inc* 2 times [20]
03. inc, sc 6, *inc* 2 times, sc, inc, sc 6, *inc* 2 times, sc [26]
04. inc, sc 8, *inc, sc* 2 times, inc, sc 8, *inc, sc* 2 times [32]
05. inc, sc 10, inc, sc 2, inc, sc, inc, sc 10, inc, sc 2, inc, sc [38]
06. inc, sc 12, *inc, sc 2* 2 times, inc, sc 12, *inc, sc 2* 2 times [44]
07. inc, sc 14, inc, sc 3, inc, sc 2, inc, sc 14, inc, sc 3, inc, sc 2 [50]
Fasten off and create an invisible finish. Leave a 24″ tail for sewing.
Optional: Rather than sewing the belly on with the yarn tail, I chose to weave the tail into the back of the work and trim it short, then sew the belly on to the body with matching thread and a sewing needle. Either way works!
Arms (make 2)
Tip: Follow my Perfect Arm Base tutorial for seamless color transitions.
With aqua yarn:
01. start 6 sc into a magic ring [6]
02. inc in each st around [12]
03. *sc, inc* [18]
Switch to medium teal yarn:
04. BLO: slst in each st around [18]
05. BLO: sc, inc, *sc 2, inc* 5 times, sc [24]
06. BLO: sc in each st around [24]
07 – 09. sc in each st around [24]
10. sc 11, dec, sc 11 [23]
11. sc in each st around [23]
12. sc 21, dec [22]
13. sc in each st around [22]
14. sc 10, dec, sc 10 [21]
15. sc in each st around [21]
16. sc 19, dec [20]
17. sc in each st around [20]
18. sc 9, dec, sc 9 [19]
19. sc in each st around [19]
20. sc 17, dec [18]
21. sc in each st around [18]
22. sc 8, dec, sc 8 [17]
23. sc in each st around [17]
24. sc 15, dec [16]
25 – 26. sc in each st around [16]
27. *sc 2, dec* [12]
Fasten off and leave a 24″ tail for sewing. Stuff with fiber fill, then fold the top opening in half and slip stitch closed.
Legs (make 2)
Tip:Follow my Perfect Leg Base tutorial for seamless color transitions.
With aqua yarn:
01. start 6 sc into a magic ring [6]
02. inc in each st around [12]
03. *sc, inc* [18]
04. sc, inc, *sc 2, inc* 5 times, sc [24]
Switch to medium teal yarn:
05. BLO: slst in each st around [24]
06. BLO: *sc 3, inc* [30]
07. BLO: sc in each st around [30]
08 – 10. sc in each st around [30]
11. sc 14, dec, sc 14 [29]
12. sc 27, dec [28]
13. sc 13, dec, sc 13 [27]
14. sc 25, dec [26]
15. sc 12, dec, sc 12 [25]
16. sc 23, dec [24]
17. sc 11, dec, sc 11 [23]
18. sc 21, dec [22]
19. sc 10, dec, sc 10 [21]
20. sc 19, dec [20]
21. sc 9, dec, sc 9 [19]
22. sc 17, dec [18]
23. *sc 7, dec* [16]
24. *sc 2, dec* [12]
Fasten off and leave a 24″ tail for sewing. Stuff with fiber fill, then fold the top opening in half and slip stitch closed.
Tail
With medium teal yarn:01. start 6 sc into a magic ring [6]02 – 08. sc around [6]
Fasten off and leave a 18″ for sewing. Fold the top opening in half and slip stitch closed. Thread the yarn tail into the work and out the magic ring with a yarn needle (use it to sew the tail to the body at a later step).
You are now going to add a tuft of fur to the slip-stitched end of the tail. With dark teal yarn, create a sip knot on your hook.
01. *slst, ch 6, slst into the same st*
Congratulations
More Amigurumi Hippo Ideas:
