Legend:
KA – ring of the amigurumi
r. – row
sbn – single crochet
ssn – column with crochet
add – increase (two loops from one column)
ub – decrease (two columns together)
ss – connecting column
(…) x6 – repeat specified in brackets 6 times
(12 st.) – the number of columns at the end of the row
Bottom (2 parts)
1r. – 6 sbn in spacecraft (6 st.)
2r.- (1 arr) x6 (12 st.)
3r.- (1 sbn, 1 arr.)X6 (18 st.)
4r.- ( 2 sc, 1 prib) x6 (24 st.)
5 rubles – 1 sc, (1 prib, 3 sc) x5, 1 prib, 2 sc (30 st.)
6 rubles – (4 sc, 1 sc) x6 (36 st.)
7 rubles – (2 sc, 1 prib) x12 (48 st.)
8 r.- 3 sc, (1 prib, 7 sc) x5, 1 prib, 4 sc (54 st.)
9 r.- (8 sc , 1 arr) x6 (60 st.)
10 rubles – 4 sbn, (1 arr, 9 sbn) x5, 1 arr, 5 sbn (66 st.)
Cut the thread.
We knit one more such detail, we do not cut the thread. We will continue to work with this thread.
We cut out a circle with a diameter like our finished bottom from a plastic lid, thick cardboard or thin foam.
We fold all the details: the first part of the bottom with the wrong side up, put the blank from the seal on it, cover with the second part of the bottom with the
wrong side inward.
Now we connect in a circle without increments of 66 sbn, simultaneously capturing the loops of both parts.
Turn the work and knit 1 row with connecting posts. Rotate work. We knit the body.
Body
1-13 r. – 66 sbn (66 st.)
14 r. – weknit the handles (distribute the loops so that the seam – the junction of the loops – is in front in the center, so we will hide the flaws under the beard) 13 sb, 6 sb tie the hand ( to do this, attach a detail of the hand and knit, grabbing the loop of the hand and the working loop), 27 sc, 6 sc hand, 14 sc (66 st.)
15 rubles – 66 sc (66 st.)
16 rubles – (9 sc, 1 dec) x6 (60 st.)
17 rubles – 60 sc (60 st.)
18 rubles – (8 sc, 1 dec) x6 (54 st.)
19-33 rubles – 54 sc (54 st.)
Tie in a circle with connecting posts.
Hands (2 parts)
Knit with red yarn.
1p. – 6 sbn in KA (6 st.)
2p.- (1 pribl) x6 (12 st.)
3-4 r.- 12 sbn (12 st.)
5r.- 3 PRS in one loop, 11 sbn (12 st.)
6 r.- (1 ub) x2, 10 sc (12 st.)
7-8 r.- 12 sc (12 st.)
9 r.- 12 cc (12 st.)
Change the thread to gray.
We knit the first row behind the back wall of the loop, the rest, as usual.
10-16 rubles – 12 sbn (12 st.)
Stuff the part a little, only the edge of the hand, where the mitten is.
We fold the part and connect both edges 6 sbn.
Hoc
1p. – 6 sbn in KA (6 st.)
2p.- (1 arr.)X6 (12 st.)
3p.- (1 sbn, 1 arr.)X6 (18 st.)
4-5 r. – 18 sbn (18 tbsp.)
6p.- (1 sbn, 1 ub) x6 (12 tbsp.)
Cut off the thread, leave the end for sewing.
Hat
1p. – 6 sbn in spacecraft (6 tbsp.)
2p. (1 arr, 1 sc) x3 (9 st.)
3-4 r.- 9 sc (9 st.)
5 r.- (1 arr, 2 sc) x3 (12 st.)
6 r.- 12 sc (12 st.) )
7 rubles – (1 prib, 3 sc) x3 (15 st.)
8 r.- 15 sc (15 st.)
9 r.- (1 prib, 4 sc) x3 (18 st.)
10 r.- 18 sc (18 Art.)
11 rubles – (1 arr, 5 sc) x3 (21 st.)
12 rubles – 21 sc (21 sc.)
13 rubles – (1 arr, 6 sc) x3 (24 st.)
14 rubles – 24 sc. (24 st.)
15 rubles – (1 prib, 7 sc) x3 (27 st.)
16 rubles – 27 sc (27 st.)
17 r.- (1 prib, 8 sc) x3 (30 st.)
18 rubles – 30 sc (30 st.)
19 rubles – (1 prib, 9 sc) x3 (33 st.)
20 rubles – 33 sc (33 st.)
21 rubles – (1 prib, 10 sc) x3 (36 st.)
22 rubles – 36 sc (36 st.)
23 rubles – (1 prib, 11 sc) x3 (39 st.)
24 r . – 39 sc (39 st.)
25 rubles – (1 prib, 12 sc) x3 (42 st.) )
26 rubles – 42 sbn (42 st.)
27 r . – (1 arr, 13 sbn) x3 (45 st.)
28 r . – 45 sbn (45 st.)
29 r . – (1 arr, 14 sbn) x3 ( 48 st.)
30 rubles – 48 sc (48 sc.)
31 rubles – (1 arr, 15 sc) x3 (51 st.)
32 rubles – 51 sc (51 st.)
33 rubles – (1 arr, 16 sc) x3 (54 st.)
34-35 rubles – 54 sc (54 st.)
36 rubles – (1 prib, 17 sc) x3 (57 st.)
37-38 rubles – 57 sc (57 st.)
39 rubles – (1 arr, 18 sc) x3 (60 st.)
40-41 r . – 60 sc (60 st.)
42 r . – (1 arr, 19 sc) x3 (63 st.)
43-44 r . – 63 sc (63 st.) )
45 rubles – (1 arr, 20 sc) x3 (66 st.)
46-47 rubles – 66 sbn (66 st.) The
hat is ready.
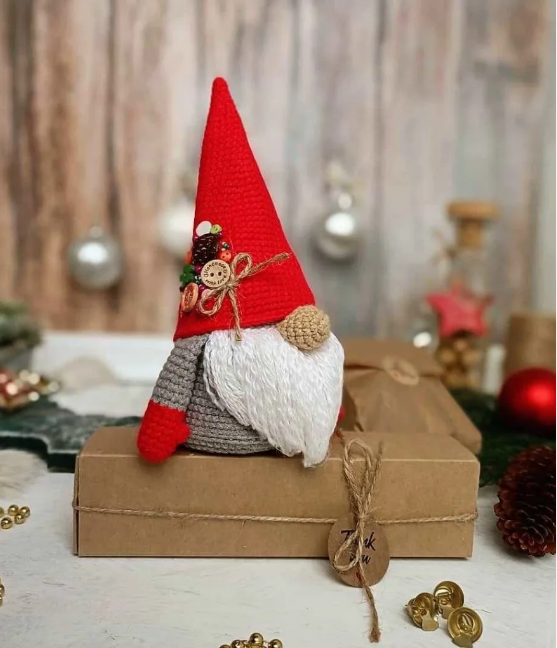
Beard We
make a beard from white yarn.
We cut pieces of thread 8-10 cm (it is better to cut off the excess later).
.Along the line of attaching the handles, we begin to stretch the threads for each loop. Fold the thread in half, thread the hook into the loop, grab the thread at the fold, stretch, making a loop, tie it like an air loop, tighten the loop.
We do this for 3-4 rows, with each row leaving 2 loops on the sides. If your threads are thick, you can do with 2-3 rows.
Next, trim the beard straight or pointed to the center.
We raise the beard up, glue the part of the body under the beard in the form of a triangle with glue and glue each row of threads, forming a beard. So we glue each row, but very lightly and airy, so that the beard comes out lush.
We decorate the eyes, sew on the nose, tighten the lace.
The gnome is ready! We put candies or a gift in a ready-made bag.
More Amigurumi Gnome İdeas: