Materials –
- Size 4 worsted weight yarn (75 yards of white, small amount of orange)
- 3.5 mm crochet hook
- 9mm safety eyes
- Black crochet/embroidery thread for eyebrows/eyelashes (optional)
- Scissors
- Tapestry needle
- Stuffing
- Stitch markers
Abbreviations – US terminology
MC- Magic circle
SC- Single crochet
SC INC- Single crochet increase
INV DEC- Invisible decrease
St(s)- Stitch(es)
Ch – Chain
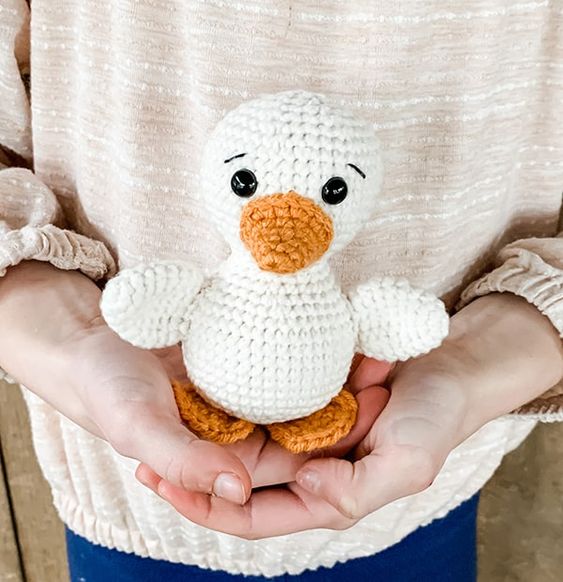
Finished mini duck measures approximately 4.5 inches tall.
NOTES –
– Slowly stuff as you go, you want it to be firm but not stretched. You will be working in the round; I like to use a stitch marker at the beginning of each round.
– The body and head will be made in one piece.
Beak –
With orange
Round 1: Create a magic circle with 6 SC
Round 2: SC around (6)
Round 3: SC in the first st, SC INC in the next, rep around (9)
Round 4: SC around (9)
Round 5: SC in the first 2 sts, SC INC in the next, rep around (12)
Round 6: SC in the first st, SC INC in the next, rep around (18)
Fasten off leaving a long tail for sewing.
Body –
With white
Round 1: Create a magic circle with 6 SC
Round 2: SC INC in each st around (12)
Round 3: SC in the first st, SC INC in the next, rep around (18)
Round 4: SC in the first 2 sts, SC INC in the next, rep around (24)
Round 5: SC in the first 3 sts, SC INC in the next, rep around (30)
Round 6: SC in the first 4 sts, SC INC in the next, rep around (36)
Round 7: SC in the first 5 sts, SC INC in the next, rep around (42)
Rounds 8-15: SC around (42)
Round 16: SC in the first 5 sts, INV DEC in the next, rep around (36)
Round 17: SC in the first 4 sts, INV DEC in the next, rep around (30)
Round 18: SC in the first 3 sts, INV DEC in the next, rep around (24)
Round 19: SC in the first 2 sts, INV DEC in the next, rep around (18)
Round 20: SC around (18)
*We will now start the head*
Round 21: SC in the first 2 sts, SC INC in the next, rep around (24)
Round 22: SC in the first 3 sts, SC INC in the next, rep around (30)
Round 23: SC in the first 4 sts, SC INC in the next, rep around (36)
Round 24: SC in the first 5 sts, SC INC in the next, rep around (42)
Rounds 25-31: SC around (42)
Note: Here is where we will add the facial features before we start closing the head. Insert the eyes between rows 28 and 29, 5 stitches apart.
(Embroider your eyelashes/eyebrows before attaching the washer to the back.)
– Next sew your beak centered between the eyes adding a little bit of stuffing as you go.
Round 32: SC in the first 5 sts, INV DEC in the next, rep around (36)
Round 33: SC in the first 4 sts, INV DEC in the next, rep around (30)
Round 34: SC in the first 3 sts, INV DEC in the next, rep around (24)
*Continue to stuff the head firmly.
Round 35: SC in the first 2 sts, INV DEC in the next, rep around (18)
Round 36: SC in the first st, INV DEC in the next, rep around (12)
Round 37: INV DEC around (6)
Fasten off and sew remaining part closed, weave in your end.
Wings-
Make 2 (we will not be stuffing the wings)
With white
Round 1: Create a magic circle with 6 SC
Round 2: SC INC in each st around (12)
Rounds 3-4: SC around (12)
Round 5: SC in the first st, SC INC in the next, rep around (18)
Rounds 6-7: SC around (18)
Round 8: SC in the first st, INV DEC in the next, rep around (12)
Round 9: SC around (12)
Fasten off leaving a long tail for sewing.
Feet-
Make 2 with orange
Round 1: Create a magic circle with 6 SC
Round 2: SC INC in each st around (12)
Round 3: *SC in the first 3 sts, ch 3, SC into the next st*, rep twice more
Fasten off leaving a long tail for sewing.
Tail –
With white
Round 1: Create a magic circle with 6 SC
Round 2: SC INC in each st (12)
Rounds 3-4: SC around (12)
Round 5: SC in the first 3 sts, SC INC in the next 6, SC in the last 3 sts (18)
Round 6: SC around (18)
Round 7: SC in the first 6 sts, SC INC in the next 6, SC in the last 6 sts (24)
Round 8: SC around (24)
Fasten off leaving a long tail for sewing.
Assembly –
– Sew the feet onto the bottom of the body. Optional – Pin in place before sewing to find the depth you would like your feet to stick out.
– Next, sew the wings onto the body. I started at round 11 and ended at round 16 when counting from the bottom.
– Lastly, sew the tail onto the back of the body, stuffing lightly as you go.

