Materials Needed
- Yarn colors: light pink, fuchsia pink, yellow, and small amounts of black, blue and white.
- Stuffing (artificial cotton or polifil).
- Wooden button in the shape of a flower.
- A “handmade” label.
Abbreviations
- Sc = single crochet
- Inc = increase
- dec = decrease
Head
Crochet in rounds, in light pink.
Round 1: 6 sc in magic ring (6)
Round 2: 1 inc in every stitch (12)
Round 3: Repeat (1 sc, 1 inc) (18)
Round 4: Repeat (2 sc, 1 inc) (24)
Round 5: Repeat ( 3 sc, 1 inc) (30)
Round 6: Repeat (4 sc, 1 inc) (36)
Round 7: Repeat (5 sc, 1 inc) (42)
Round 8: Repeat (6 sc, 1 inc) (48)
Round 9: Repeat (7 sc, 1 inc) (54)
Round 10: Repeat (8 sc, 1 inc) (60)
Round 11: Repeat (9 sc, 1 inc) (66)
Round 12 – 23: 1 sc in every stitch (66)
Round 24: Repeat (9 sc, 1 dec) (60)
Round 25: Repeat (8 sc, 1 dec) (54)
Round 26: Repeat 7 sc, 1 dec) (48)
Round 27: Repeat (6 sc, 1 dec) (42)
Round 28: Repeat (5 sc, 1 dec) (36)
Round 29: Repeat (4 sc, 1 dec) (30)
Round 30: Repeat (3 sc, 1 dec) (24)
Fasten off, but leave a long yarn tail for sewing the head to the body.
Stuff the head.
Body
Crochet in rounds in light pink yarn.
Round 1: 6 sc in magic ring (6)
Round 2: 1 inc in every stitch (12)
Round 3: Repeat (1 sc, 1 inc) (18)
Round 4: Repeat (2 sc, 1 inc) (24)
Round 5: Repeat (3 sc, 1 inc) (30)
Round 6: Repeat (4 sc, 1 inc) (36)
Round 7: Repeat (5 sc, 1 inc) (42)
Round 8: Repeat (6 sc, 1 inc) (48)
Round 9: Repeat (7 sc, 1 inc) (54)
Round 10 -13: 1 sc in every stitch (54)
Round 14: Repeat (7 sc, 1 dec) (48)
Round 15-16: 1 sc in every stitch (48)
Round 17: Repeat (6 sc, 1 dec) (42)
Round 18-19: 1 sc in every stitch (42)
Round 20: Repeat (5 sc, 1 dec) (36)
Round 21-22: 1 sc in every stitch (36)
Round 23: Repeat (4 sc, 1 dec) (30)
Round 24-25: 1 sc in every stitch (30)
Round 26: Repeat (3 sc, 1 dec) (24)
Fasten off, leave a long yarn tail.
Stuff the body.
Wings
Make two, crochet in rounds with fuschia pink yarn.
Round 1: 6 sc in magic ring (6)
Round 2: 6 inc (12)
Round 3-4: 1 sc in every stitch (12)
Round 5: Repeat (1 inc, 1 sc) (18)
Round 6-7: 1 sc in every stitch (18)
Round 8: Repeat (2 sc, 1 inc) (24)
Round 9-16: 1 sc in every stitch (24)
Round 17: Repeat (2 sc, 1 dec) (18)
Round 18: Repeat (1 sc, 1 dec) (12)
Round 19: 6 dec (6)
Fasten off and leave long yarn tail.
Eyes
Make two.
The eyes are crocheted in joined rounds, not in spirals. End each round with a slip stitch and start each round by chaining one stitch.
Round 1: In black, 6 sc in magic ring (6).
Round 2: In light blue, 6 inc (12)
Round 3: Switch to white. Repeat (1 dc, 1 inc) (18)
Round 4: Repeat (2 sc, 1 inc) (24)
With white yarn embroider a glitter in each eye. (See photo).
Sew or or glue the eyes on the face (in this case they are glued with a silicone gun).
Embroider three little eyelashes in black yarn on each eye (see photo).
Beak
In yellow.
Crochet in rows, not in rounds.
Round 1: Chain 5
Round 2: 4 sc
Round 3: 2 dec
Chain 1 and sc around the entire piece.
Sew or glue the beak between and on top of the eyes
Feet
In yellow, make two, crochet in rounds.
Each foot is made up of three little toes joined together.
Toes (3 per foot):
Round 1: 6 sc in magic ring (6)
Round 2-4: 1 sc in every stitch (6)
Put the 3 toes together like this:
Round 5: 3 sc in the first toe, 3 sc in the second toe, 6 sc in the third toe, 3 dc in the second toe, 3 sc in the first toe (18)
Round 6-7: 1 sc in every stitch (18)
Round 8: Repeat (1 sp, 1 dec) (12)
Round 9-10: 1 sc in every stitch (12)
Round 11: 6 dec (6)
Don’t stuff the toes or feet, sew to close.
Sew or stick the feet under the body (see photo). This will also give more stability to the owl.
Ears And Feathers
The ears are made in fuchsia pink by making little tassels on top op the head.
The easiest way to do this is by cutting some yarn stings and looping them in under a stitch on the head. You can then finish the tassels by knotting a smaller piece of yarn around it.
Embroider the little feathers on the belly in fuchsia pink.
Sew a pink fuchsia wood flower next to the owl’s left ear.
And finally add a wooden button with the word “handmade” on the back.
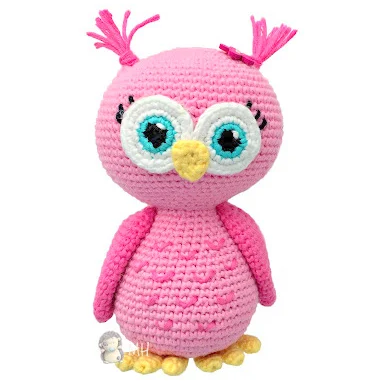
Congratulations! You’ve finished your cute amigurumi owl!

