Materials
size 5 or F crochet hook
scissors
needle for weaving in ends
stitch markers
light grey yarn for the body (I used Big Twist in Soft Grey)
grey yarn for the limbs (I used Big Twist in Medium Gray)
pink yarn for the hands and feet (I used Big Twist in Medium Rose)
purple yarn for the joints (I used Big Twist in Lilac)
a little bit of black yarn for the antennas (I used Big Twist in Black)
red, green, yellow, and blue yarn for embellishments (I used Big Twist in Varsity Red, Varsity Green, Varsity Yellow, and Varsity Blue)
fiberfill for stuffing
safety eyes
pipe cleaner
optional hot glue gun
Abbreviations
Here are the crochet stitches and abbreviations I use.
chain – ch
magic ring – mr
slip stitch – slst
single crochet – sc
half double crochet – hdc
increase – inc
decrease – dec
back loops only – BLO
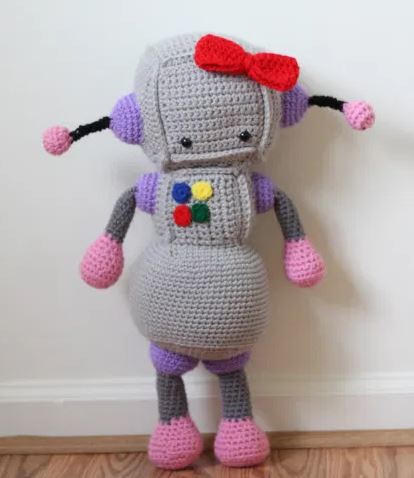
Amigurumi robot girl free pattern
Head
Begin by making six panels in Soft Grey. You will attach them all together to create a block.
Panels – make 6
Ch 16
Row 1: in the 2nd ch from the hook, sc in each remaining stitch across (15)
Rows 2-15: ch, turn, and sc across (15)
Do not fasten off. Now you are going to crochet down one side, across the bottom, and up the other side. Turn your work to the right to begin single crocheting down the first side.
Place 15 single crochets evenly down the length of the panel. I placed matching colored stitch markers on the first and last stitch to make it easier to differentiate when attaching the panels to each other.
Turn the panel to the right and sc 15 across the bottom into the loops of the starting ch.
Turn the panel to the right and sc 15 evenly across the third side of the panel. Once again, I placed matching stitch markers in the first and last stitches.
Finally, slst to the first sc of row 15. Fasten off and weave in the end. That completes one panel. Make five more till you have a total of six.
Putting it together
Now you are going to begin attaching them to create a block. I use single crochet to attach them together. If you are as OCD as I am, you’ll want to make sure that all your rows are going the same way (like have all the rows going horizontal or vertical).
Begin by placing two of the panels together. You will join them by single crocheting into the tops of both panels. Using the Soft Grey yarn, attach to one side of the two panels.
Single crochet into all 15 stitches across the two panels. Make sure that you are working into the stitches on both panels. Once you’ve worked single crochets across the entire side, fasten off and weave in end.
Attach two more panels to these first ones in the same manner till you have a row of four panels.
Now, fold this row of four panels in half and attach the first panel to the last panel in the same manner.
This creates the outline of your block. Take one of the two remaining panels and place it on one side of the outline of the block.
Attach the Soft Grey yarn to your work and join this panel to the others by single crocheting around all four sides making sure to work your stitches into both the panel and the block outline. You may find that you need to add extra stitches in the corner to make sure you don’t have any large gaps. Fasten off and hide the end.
Now would be a good time to add the safety eyes. It doesn’t matter too much which side you put them on, so choose whichever side you’d like. Put the safety eyes between rows 13 and 14 and about 13 stitches apart.
Now you will add the final panel on the other side. Before you have completely attached the last panel, however, stuff firmly.
Finish attaching the final panel, fasten off, and hide the end. Whew! Your head is finished! I know that was probably a little confusing, so feel free to comment or email me if you have any questions!
Body
Just like the head, the body is made with the Soft Grey yarn and uses six panels that you crochet together to form a block.
Panels – make 6
Ch 11
Row 1: in the 2nd ch from the hook, sc in each remaining stitch across (10)
Rows 2-10: ch, turn, and sc across (10)
Without fastening off, you will crochet down one side, across the bottom, and up the other side just as you did with each panel for the head. Crochet 10 sc evenly across the first side, 10 sc into the other loops from the beginning ch along the bottom, and 10 sc evenly across the other side.
I placed stitch markers on the first and last stitches of the two sides, just as I did when making the head panels to make it easier to differentiate where the sides begin and end when attaching them together.
Slst to the the first sc of row 10. Fasten off and hide end. That completes one panel. Make five more till you have a total of six.
Putting it together
Just like with the head, you will attach the pieces by crocheting four together to form the outline of the block and then sew the end pieces around the outline to close it off.
Create the outline by crocheting together four of the panels. Then fold it in half and crochet the first and last panels together.
Attach the one of the remaining panel to the block outline by single crocheting all the way around both the panel and the outline. You may need to add extra sc in the corners to avoid big gaps.
Attach the last panel in like manner. Before you have finished completely attaching, however, stuff the body firmly. Finish attaching the side panel. Fasten off and hide end. That completes the body!
Now you need to attach the head to the body. Attach a piece of yarn to the body and sew it to the bottom of the head.
Skirt
Now, you are going to crochet a skirt to the bottom of the robot. Flip the head and body upside down and attach the Medium Grey yarn to the single crochets along the bottom of the body.
Round 1: 48 sc evenly into the crochets along the bottom of the body. Depending on whether or not you have placed extra stitches in the corners when attaching the panels, you may have more or less stitch than 48. So plan ahead to get all 48 stitches evenly around (48)
Round 2: [inc, 7 sc] x 6 (54)
Round 3: [4 sc, inc, 4 sc] x 6 (60)
Round 4: [9 sc, inc] x 6 (66)
Round 5: [5 sc, inc, 5 sc] x 6 (72)
Rounds 6-20: sc around (72)
Round 21: in BLO [5 sc, dec, 5 sc] x 6 (66)
Round 22: [9 sc, dec] x 6 (60)
Round 23: [4 sc, dec, 4 sc] x 6 (54)
Round 24: [dec, 7 sc] x 6 (48)
Begin stuffing and continue stuffing as you go along. Try not to over stuff the skirt as you want the bottom to be flat and not curved.
Round 25: [3 sc, dec, 3 sc] x 6 (42)
Round 26: [5 sc, dec] x 6 (36)
Round 27: [2 sc, dec, 2 sc] x 6 (30)
Round 28: [dec, 3 sc] x 6 (24)
Round 29: [sc, dec, sc] x 6 (18)
Round 30: [sc, dec] x 6 (12)
Round 31: dec x 6 (6)
Fasten off. Use the tail to weave through the last 6 stitches, then pull to cinch the hole closed. Hide end.
Buttons – make 4
I made four buttons each in a different color: Varsity Red, Varsity Green, Varsity Yellow, and Varsity Blue.
You can attach them to the body by sewing them on, but I used a hot glue gun. It was much easier and gave the edges of the buttons more distinction.
To make a button: 6 sc in mr, slst to the first sc, and fasten off. If you are going to sew the buttons on, leave a tail. If you are hot gluing the buttons on, weave in the end.
Glue or sew the buttons in the upper left corner of the robot’s body.
Shoulder Joints – make 2
With Lilac, create a magic ring.
Round 1: 6 sc in mr (6)
Round 2: inc x 6 (12)
Round 3: [inc, sc] x 6 (18)
Rounds 4-5: sc around (18)
Fasten off and leave a long tail for sewing.
Stuff and attach to the top of each side of the robot.
Arms – make 2
Start with Medium Rose. Stuff as you go along.
Create magic ring.
Round 1: 6 sc in mr (6)
Round 2: inc x 6 (12)
Round 3: [inc, sc] x 6 (18)
Round 4: [sc, inc, sc] x 6 (24)
Round 5: in BLO, sc around (24)
Round 6: [sc, dec, sc] x 6 (18)
Round 7: sc around (18)
Round 8: [dec, sc] x 6 (12)
Round 9: sc around (12)
Round 10: [sc, dec] x 4 (8)
Switch to Medium Gray.
Rounds 11-20: sc around (8)
Fasten off, leaving a long tail for attaching.
Sew each arm to the shoulder joints.
Head Antennas – make 2
Now we are going to make the antennas that go on either side of the head. For this, I use pink, black, and purple yarn. I also use a pipe cleaner to help the antennas stand up.
Using Medium Rose, create magic ring.
Round 1: 6 sc in mr (6)
Round 2: inc x 6 (12)
Rounds 3-4: sc around (12)
Round 5: dec x 6 (6)
Stuff and switch to black yarn.
Round 6: dec x 3 (3)
Rounds 7-12: sc around (3)
Switch to Lilac.
Round 13: inc x 3 (6)
Round 14: inc x 6 (12)
Round 15: [inc, sc] x 6 (18)
Round 16: [inc, 2 sc ] x 6 (24)
Rounds 17-18: sc around (24)
Fasten off and leave a long tail for attaching to the head.
Now we are going to insert the pipe cleaner using a tapestry needle.
Thread the pipe cleaner through the needle. I pulled the needle through to the middle of the pipe cleaner and folded it in half. This way the pipe cleaner was double thick and added extra support to the antenna.
Insert the needle into the opening in the purple part of the antenna.
Push it all the way through the black part of the antenna and out the pink part.
Cut the pipe cleaner to free the needle on one side and hide the ends on the other.
Stuff the purple portion of the antenna and sew it to the side of the head.
Legs – make 2
The legs are made with pink, grey, and purple yarn. Stuff as you go along.
With Medium Rose, create a magic ring.
Round 1: 6 sc in mr (6)
Round 2: inc x 6 (12)
Round 3: [inc, sc] x 6 (18)
Round 4: [sc, inc, sc] x 6 (24)
Round 5: [3 sc, inc] x 6 (30)
Round 6: in BLO, sc around (30)
Round 7: [3 sc, dec] x 6 (24)
Round 8: sc around (24)
Round 9: [sc, dec, sc] x 6 (18)
Round 10: sc around (18)
Round 11: [dec, sc] x 6 (12)
Switch to Medium Gray.
Rounds 12-22: sc around (12)
Switch to Lilac.
Round 23: [inc, sc] x 6 (18)
Round 24: [sc, inc, sc] x 6 (24)
Rounds 25-27: sc around (24)
Fasten off, leaving a tail for attaching.
Attach both legs to the bottom of the robot’s skirt.
Bow
Finally, to make this gal a little cuter, add a bow! I made mine using red.
With Varsity Red, ch 30 and slst to the first ch to form a circle.
Round 1: ch 1, hdc in the same ch as the slst and all the way around, slst to first hdc (30)
Rounds 2-4: ch1, hdc around, slst to first hdc of round (30)
Fasten off and leave a long tail for wrapping and attaching.
Fold the bow in half with the tail in the middle. Using the tail, wrap it tightly around the middle of the bow several times to cinch it.
Attach the bow to the robot’s head anywhere you’d like. I put mine in the upper left-hand corner.
And there you have it! Your robot is done! I have loved watching my girls run around flinging this robot all around.