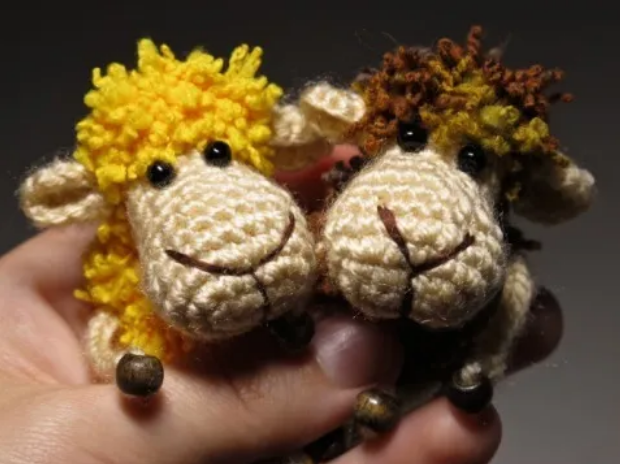
MATERİALS
beige DK
-weight yarn
– hook size that matches it
I crocheted with Baby acrylic beige yarn 300m in 100g. Steel hook #4 1.25 mm. And Baby PES with 2.25 mm hook B-1.
– bulky fluffy yarn that is about 1.5 – 2 times thicker than your beige yarn
– bigger hook size that matches the bulky yarn
– brown embroidery floss in 6 strands to embroider the nose
– 2 black beads for eyes (I used glass 3 mm beads), thin needle and black sewing thread to sew them
– toy stuffing (polyester fiberfill)
– yarn needle to assemble the toy
– 4 wooden beads (I use 6 mm ∅ beads)
– you can also take a keychain or any other hanger to join to you sheep
Abbreviations (USA terminology)
ch – chain
sl.st – slip stitch
sc – single crochet
dec – decrease (crochet 2 sc together or do an invisible decrease)
inc – increase (do 2 sc in next st)
st – stitch
Head
Begin with beige right side out.
1 – 6 ch, don’t join, crochet around the chains, beginning from the 2nd ch from hook: 4 sc, 3 sc in last ch, 4 sc, 1 sc into the skipped at the beginning ch (12)
2 – inc, 3 sc, 3 inc, 3 sc, 2 inc (18)
3 – (8 sc, inc) 2 times (20)
4 – 5 – 20 sc (2 rounds), 1 sc, move the mark here
6 – (8 sc, dec) 2 times (18)
7 – (3 sc, dec, 2 sc, dec) 2 times (14)
8 – 9 sc, dec, 3 sc (13)
9 – 11 – 13 sc (3 rounds), sl.st,
Fasten off.
Connect your fluffy yarn to the last beige sl.st. and with bigger hook size crochet reverse so that you wrong side was outside
12 – 13 sc (crochet 1 round or 2)
13 – (1 sc, dec) 4 times, 1 sc (9)
Fasten off, leave a small yarn tail. Stuff the head firmly.
Don’t tighten the opening yet. You may need to add extra stuffing after eyes sewing.
Body
With Bulky yarn and bigger hook size
1 – 2 ch, 6 sc into the 2nd ch from hook
2 – 6 inc (12)
3 – 4 – 12 sc (2 rounds)
5 – (5 sc, dec) 2 times (10)
6 – 2 sc, dec, 4 sc, dec, 2 sc (8)Fasten off, stuff the body.
You can tighten the opening now or after you sew the legs (it may be easier to hide the yarn ends and knots with the unclosed opening)
Ears(make 2)
With ordinary beige yarn and smaller hook size
1 – 2 ch, 6 sc into the 2nd ch from hook
2 – 6 inc (12)Fasten off leaving a yarn tail for sewing. Fold each ear in halves wrong side out and fix this shape with a few stitches. Pin the ears symmetrically to the first fluffy round of the head and sew.
Before you start crocheting the legs and arms thread the end of your beige yarn into a needle and pick up 4 wooden beads. Take the yarn out of the needle and start crocheting picking up one of the beads at the end of each limb.
Legs(make 2)
13 ch, pull one bead close to the hook and crochet 12 sl.st, one sl,st in each chain beginning from the 2nd ch from hook, fasten off leaving a small yarn tail for sewing.
Arms(make 2)
12 ch, pull one bead close to the hook and crochet 11 sl.st, one sl,st in each chain beginning from the 2nd ch from hook, fasten off leaving a small yarn tail for sewing.
Sew the legs and arms symmetrically to the body. Hide all yarn ends inside the body
Making the face
With brown embroidery floss in 6 strands (you can use any brown yarn instead) embroider the muzzle with three long stitches. Push the needle from the bottom of the head to the middle of the second round. You can make a knot at the beginning; I just leave a 15 cm tail and when the muzzle is done tie two yarn end together.
Embroider the muzzle using photos below as a guide. Pull each stitch to shape the muzzle a little.
Push the needle back to the bottom of the head. If you have left the yarn end at the beginning tie two tails together with a few knots. Or just fix the yarn tail if you haven’t left the first tail.
With firm black thread sew the beads for eyes (I sew with DMC Perle Cotton #8 or with sewing thread in 2 strands). It is better to choose the beads size after the head is stuffed and the muzzle is embroidered. I use glass beads 3 mm diameter.
1) Don’t fix the thread at the beginning just leave a 15 cm tail to tie it with the yarn tail that you will get at the end.
2) Push the needle through the head from its back to the proper place for the first eye.
NOT: I sew the eyes to the 10th round (the 2nd last beige round) and leave 3 stitches between two eyes.
3) Pick up one bead and push the needle back to the head bottom.
4) Make a small indent and push the needle through the head to the place where the 2nd eye should be.
5) Pick up the 2nd bead and push the needle to the bottom of the head.
6) Pull both thread ends hard and tie them together with a few knots. Continue to pull hard while tying.
If the beads are sewed not tight enough repeat steps 2 – 6 one more time.
These sheep are small enough to be a magnet, keychain, hang on your phone or backpack and so on. If you want to sew anything to the sheep’s head it is better to do it now. You’ll be able to hide the knots on the bottom of it and they will all be hidden after you sew the head to the body.

