Materials:
- 250g Purple Cotton Aran/Worsted Weight Yarn
- 3mm Crochet Hook (I use Clover Amour Crochet Hooks)
- Blunt End Yarn Needle
- 9mm Safety Eyes
- Polyester Toy Stuffing
- Scissors
- Stitch Markers
Difficulty: Moderate difficulty – Beginners may struggle with crocheting around a chain, the bobble toes and the large size of this amigurumi.
Must know how to work in the round, increase, invisible decrease, & chain..
This pattern uses the following U.S stitches & abbreviations:
- st = stitch
- sc = single crochet (double crochet for UK)
- dc = double crochet (treble crochet for UK)
- ch = chain
- sl st = slip stitch
- 2tog = 2 stitches together (decrease)
- bobble stitch (also known as the popcorn stitch or double crochet cluster – explained below)
How To: Bobble Stitch
The bobble stitch is used to create the hippo’s toes in this pattern. Also known as the popcorn stitch or double crochet cluster! When the pattern says “bobble” you do one of these special stitches.
1. Wrap yarn around hook
2. Insert hook into stitch
3. Yarn over, pull through
4. Yarn over, pull through first 2 loops on your hook.
5. Repeat steps 1-4 another four times until you have 6 loops on your hook.
6. Yarn over, pull through all 6 loops to create a little bobble!
The bobble will probably puff towards the inside of your work as opposed to outside. Simply finish the entire round then go back and use the blunt end of your hook or a pen to push the bobbles the right way out.
Not:
Do not join rounds, work in a continuous spiral unless stated otherwise. It is a good idea to use a stitch marker to mark the end of each round (You can use a bent paper clip or hair grip!) My notes, tips and further instructions are in italics.
Head:
Crocheting around a chain can be daunting at first, but it’s great for making an oval shaped piece instead of a typical, perfectly round amigurumi. To avoid holes in the front of your work I recommend working into the “back bumps” of your chain instead of the top (back) loop as you would usually do. Check out this link (courtesy of My Hobby Is Crochet) for a great tutorial about working in the back bumps of a chain.Starting from end of the snout and working to the back of the head:
Round 1) Ch 6
Skip first chain
Put a stitch marker in the first sc you make. This will make sure you will work into the correct first stitch of the next round and do not try to work into the skipped chain.
1sc in the next 4 chs
3sc in last ch
Now turn your work and start crocheting in the other side of the chain. For this side, you will see you now have both loops of the chain to work in like a normal stitch! Start working in the stitch left from the slip knot.
1sc in the next 3 sts
2sc in last st. (12)
Put a stitch marker in the last stitch you just did. You should now have 12 sts around. Now we start crocheting in the round as normal. Make sure you don’t try to crochet into the skipped first chain of round 1! Skip that entirely.
Round 2) 1sc, 2sc in next st, repeat until the end of the round (18)
Round 3) 2sc, 2sc in next st, repeat until the end of the round (24)
Round 4) 3sc, 2sc in next st, repeat until the end of the round (30)
Round 5) 4sc, 2sc in next st, repeat until the end of the round (36)
Round 6) 5sc, 2sc in next st, repeat until the end of the round (42)
Round 7) 6sc, 2sc in next st, repeat until the end of the round (48)
Round 8-16) 1sc in each st; for 9 rows total (48)
Round 17) 6sc then 2tog, repeat until the end of the round (42)
Round 18) 5sc then 2tog, repeat until the end of the round (36)
Round 19) 1sc, 2sc in next st, repeat until the end of the round (54)
Round 20) 8sc, 2sc in next st, repeat until the end of the round (60)
Round 21) 9sc, 2sc in next st, repeat until the end of the round (66)
Round 22-30) 1sc in each st; for 9 rows total (66)
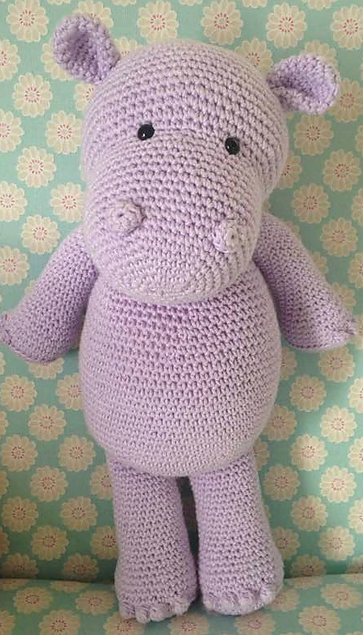
Attach 10mm black safety eyes to your piece. Mine are attached between rounds 19 and 20 and roughly 5 stitches apart for your reference. Make sure the starting oval at the end of your snout is positioned horizontally when you attach the eyes otherwise your snout will look oddly shaped! Make sure the backs of your safety eyes are “snapped” all the way down to the bottom of the stock. If your hippo is for a small child it may be safer to embroider your eyes using black embroidery thread – safety eyes are not always safe, despite the name!
Round 31) 9sc then 2tog, repeat until the end of the round (60)
Round 32) 8sc then 2tog, repeat until the end of the round (54)
Round 33) 7sc then 2tog, repeat until the end of the round (48)
Round 34) 6sc then 2tog, repeat until the end of the round (42)
Round 35) 5sc then 2tog, repeat until the end of the round (36)
Round 36) 4sc then 2tog, repeat until the end of the round (30)
Start stuffing the head.
Round 37) 3sc then 2tog, repeat until the end of the round (24)
Round 38) 2sc then 2tog, repeat until the end of the round (18)
Round 39) 1sc then 2tog, repeat until the end of the round (12)
Add in any more stuffing you need at this point – now we close our head piece!
Round 40) 2tog all the way around (6)
Slip stitch into the next st and fasten off leaving a long yarn tail. Weave yarn tail in and out of the front loops of the remaining 6 stitches and pull tight to close the hole. Knot yarn and hide the yarn tail inside the head.
Ears (Make 2):
Round 1) Magic circle with 6sc (6)
Round 2) 2sc in each st (12)
Round 3) 1sc, 2sc in next st, repeat until the end of the round (18)
Round 4-9) 1sc in each st; for 6 rounds total (18)
Slip stitch into the next stitch and fasten off, leaving a long tail for sewing. Do not stuff ears. Push both corners of the open end of the ear together to form a cute little hippo ear and sew to the head in this position.
Nostrils (Make 2):
Each nostril is just 2 magic circles (that have not been fully closed) sewn together.
1. Simply make 2 separate magic circles with 6sc but do not pull the circle tightly closed. Leave a hole in the middle so our hippo can breathe!
2. Fasten each off leaving a long tail for sewing and sew them one on top of the other.
Sew the nostrils to the head. My nostrils are sewn roughly between rounds 8 and 9 of the head for your reference.
Body:
Round 1) Magic Circle with 6sc (6)
Round 2) 2sc in each st (12)
Round 3) 1sc, 2sc in next st, repeat until the end of the round (18)
Round 4) 2sc, 2sc in next st, repeat until the end of the round (24)
Round 5) 3sc, 2sc in next st, repeat until the end of the round (30)
Round 6) 4sc, 2sc in next st, repeat until the end of the round (36)
Round 7) 5sc, 2sc in next st, repeat until the end of the round (42)
Round 8) 6sc, 2sc in next st, repeat until the end of the round (48)
Round 9) 7sc, 2sc in next st, repeat until the end of the round (54)
Round 10) 8sc, 2sc in next st, repeat until the end of the round (60)
Round 11) 9sc, 2sc in next st, repeat until the end of the round (66)
Round 12) 10sc, 2sc in next st, repeat until the end of the round (72)
Round 13-27) 1sc in each st; for 15 rounds total (72)
Round 28) 10sc then 2tog, repeat until the end of the round (66)
Round 29) 1sc in each st (66)
Round 30) 9sc then 2tog, repeat until the end of the round (60)
Round 31) 1sc in each st (60)
Round 32) 8sc then 2tog, repeat until the end of the round (54)
Round 33) 1sc in each st (54)
Round 34) 7sc then 2tog, repeat until the end of the round (48)
Round 35) 1sc in each st (48)
Round 36) 6sc then 2tog, repeat until the end of the round (42)
Round 37) 1sc in each st (42)
Round 38) 5sc then 2tog, repeat until the end of the round (36)
Round 39) 1sc in each st (36)
Round 40) 4sc then 2tog, repeat until the end of the round (30)
Round 41-42) 1sc in each st; for 2 rounds total (30)
Slip stitch into the next st and fasten off leaving a long tail for sewing. Stuff the body firmly but please don’t over stuff!
Leg (Make 2):
Starting from the sole of the foot and working to the top of the leg:
Round 1) Magic Circle with 6sc (6)
Round 2) 2sc in each st (12)
Round 3) 1sc, 2sc in next st, repeat until the end of the round (18)
Round 4) 2sc, 2sc in next st, repeat until the end of the round (24)
Round 5) 3sc, 2sc in next st, repeat until the end of the round (30)
Round 6) 4sc, 2sc in next st, repeat until the end of the round (36)
Important please read: Round 7 is where we make the hippos cute little toes using the bobble stitch! There are instructions on how to do the bobble stitch at the beginning of the pattern. This entire round is back loop only except for the first sc after each bobble stitch. Each bobble needs an sc after it to “pull” it down and make it puff out – this sc should be done through both loops. If you don’t go through both loops you may end up with a horrid looking hole where one loop has too much stress on it. Every bobble should be done in the back loop only.
Round 7) Back loop only: 1sc in the next 13 sts
1 bobble in the next st
1sc in the next 2 stitches (first sc should be both loops, second should be back loop only!)
1 bobble in the next st,
1sc in the next st, (both loops)
1 bobble in the next st
1sc in the next 2 stitches (first sc should be both loops, second should be back loop only!)
1 bobble in the next st
1sc in the next st, (both loops)
Back loop only: 1sc in each of the remaining 13 sts (36)The bobbles will probably puff towards the inside of your work as opposed to outside. Simply finish the entire round then go back and use the blunt end of your hook or a pen to push the bobbles the right way out.Back to working in both loops now!
Round 8-10) 1sc in each st; for 3 rounds total (36)
Round 11) 4sc then 2tog, repeat until the end of the round (30)
Round 12) 1sc in each st (30)
Round 13) 3sc then 2tog, repeat until the end of the round (24)
Round 14-28) 1sc in each st; for 15 rounds total (24)
Slip stitch into the next st and fasten off leaving a long tail for sewing. Stuff the leg making sure not to overstuff so the palm of the hippo stays flat.
Arms (Make 2):
Starting from the sole of the hand and working to the top of the arm:
Round 1) Magic Circle with 6sc (6)
Round 2) 2sc in each st (12)
Round 3) 1sc, 2sc in next st, repeat until the end of the round (18)
Round 4) 2sc, 2sc in next st, repeat until the end of the round (24)
Round 5) 3sc, 2sc in next st, repeat until the end of the round (30)
Important please read: Round 6 is where the bobbles come in again! This round is nearly the exact same as the bobble round on the feet. There are instructions on how to do the bobble stitch at the beginning of the pattern. This entire round is back loop only except for the first sc after each bobble stitch. Each bobble needs an sc after it to “pull” it down and make it puff out – this sc should be done through both loops. If you don’t go through both loops you may end up with a horrid looking hole where one loop has too much stress on it. Every bobble should be done in the back loop only.
Round 6) Back loop only: 1sc in the next 10 sts
1 bobble in the next st
1sc in the next 2 stitches (first sc should be both loops, second should be back loop only!)
1 bobble in the next st,
1sc in the next st, (both loops)
1 bobble in the next st
1sc in the next 2 stitches (first sc should be both loops, second should be back loop only!)
1 bobble in the next st
1sc in the next st, (both loops)
Back loop only: 1sc in each of the remaining 10 sts (30)The bobbles will probably puff towards the inside of your work as opposed to outside. Simply finish the entire round then go back and use the blunt end of your hook or a pen to push the bobbles the right way out.
Back to working in both loops now!
Round 7-9) 1sc in each st; for 3 rounds total (30)
Round 10) 3sc then 2tog, repeat until the end of the round (24)
Round 11) 1sc in each st (24)
Round 12) 2sc then 2tog, repeat until the end of the round (18)
Round 13-30) 1sc in each st; for 18 rounds total (18)
Slip stitch into the next st and fasten off leaving a long tail for sewing. Stuff the arm making sure not to overstuff so the palm of the hippo stays flat.
I know most people hate the sewing part of amigurumi. The following is the easiest order I have found for assembling your hippo:
1. Sew the nostrils to the head (if you haven’t already)
2. Sew the ears to the head
3. Sew the head to the body.
4. Sew the arms to the body, they go directly under the head at either side.
5. Sew the legs to the body.

