Materials:
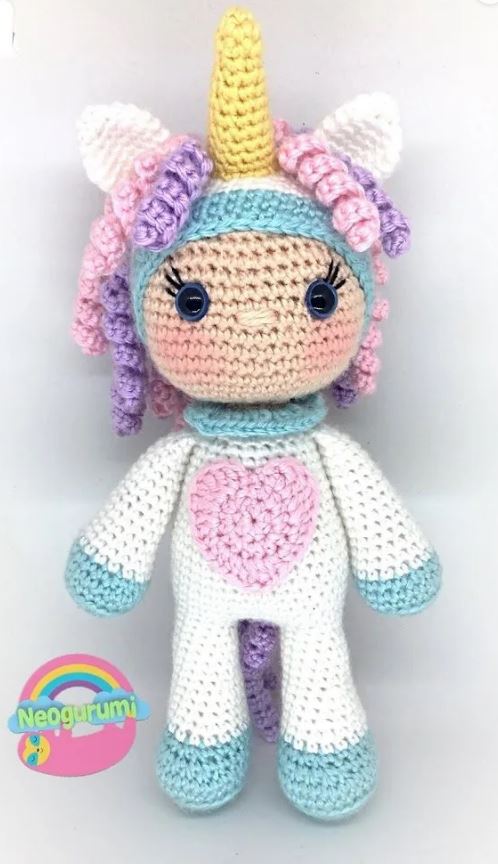
– Worsted weight yarn – approx. 80 yards skin tone color, 200 yards white, 50 yards turquoise, 50 yards hair color(s), scrap amount of yellow.
(I used Caron Simply Soft yarn in Light Country Peach, White, Robin’s Egg, Orchid, Soft Pink & Sunshine)
– Suggested hook size: 3.25mm (D)
– 2 x 12mm safety eyes
– Black embroidery floss
– Blush
– Polyfil
– Yarn needle
My doll measures 10” tall (minus the horn) when made with the above materials.
You can use any weight yarn or thread that you are comfortable using, just adjust your hook size accordingly.
All of my patterns are tested and checked for errors, however sometimes things get missed, so please feel free to contact me should you encounter any errors in the pattern, or if you need any assistance.
Stitch abbreviations:
Sc: single crochet
Hdc: half double crochet
Dc: double crochet
Tr: treble crochet
Inc: increase
Dec: decrease
Sl st: slip stitch
Ch: chain
BLO: back loops only
FLO: front loops only
*Pattern is worked in continuous rounds unless noted otherwise*
Part 1:
Arms
(Make 2- starting in turquoise)
R1: sc x 6 in magic ring (6)
R2: sc inc x 6 (12)
R3: (1 sc, sc inc) x 6 (18)
R4: 18 sc BLO (18)
R5-6: 18 sc (18) Change to white on the last st of R5
R7: (7 sc, sc dec) x 2 (16)
R8-10: 16 sc (16)
R11: (6 sc, sc dec) x 2 (14)
R12-13: 14 sc (14)
R14: (5 sc, sc dec) x 2 (12)
R15-16: 12 sc (12)
R17: (4 sc, sc dec) x 2 (10)
R18-19: 10 sc (10)
R20: (3 sc, sc dec) x2 (8)
R21: 8 sc
R22: Stuff arms, leaving the top unstuffed, 4 sc across both sides of the top of the arm to close.
Fasten off.
Legs
(Make 2- starting in turquoise)
R1: 6 sc in magic ring (6)
R2: sc inc x 6 (12)
R3: (1 sc, sc inc) x6 (18)
R4: (2 sc, sc inc) x 6 (24)
R5: In BLO – 10 sc, sc inc x 4, 10 sc (28)
R6: 28 sc (28)
R7: 8 sc, sc dec x 6, 8 sc (22)
R8: sc dec, 7 sc, sc dec x 2, 7 sc, sc dec (18) Change to white on the last st of this round.
R9-10: 18 sc (18)
R11: (7 sc, sc dec) x 2 (16)
R12-13: 16 sc (16)
R14: (6 sc, sc dec) x 2 (14)
R15-18: 14 sc (14)
R19: (5 sc, sc dec) x 2 (12)
R20: 12 sc (12)
Stuff and fasten off the 1st leg but not the 2nd.
Part 2 will be joining the legs and crocheting the body.
Part 2:
Body
Stuff the body as you go.
R1: Joining the legs – Starting where you left off on the 2nd leg, 6 sc (if you are not in the center where the legs should be connected, sc however many will take you to the center stitch and then continue as written), ch 3, 12 sc around the 1st leg, 1 sc in each ch 3, 6 sc around the remaining stitches of the 2nd leg
R2: 6 sc, sc in the other side of the ch 3, 21 sc (30)
R3: (4 sc, sc inc) x 6 (36)
R4-9: 36 sc (36)
R10: (10 sc, sc dec) x 3 (33)
R11: 33 sc (33)
R12: (9 sc, sc dec) x 3 (30)
R13-15: 30 sc (30)
R16: (8 sc, sc dec) x 3 (27)
R17-18: 27 sc (27)
R19: (7 sc, sc dec) x 3 (24)
R20: Attaching the arms: 1 sc, sc into one stitch on the 1st arm and one stitch on the body, joining them together, repeat joining next 3 arm stitches to next 3 stitches on body; 8 sc over to the other side of the body, then sc x 4 joining the 2nd arm to the next 4 stitches on the body; sc in remaining 7 sts on body. (24)
R21: (2 sc, sc dec) x 6 (18)
R22: (4 sc, sc dec) x 3 (15)
Stuff body and fasten off white.
Make the collar – Holding the doll upside down, join turquoise yarn to FLO of R22. Ch 3, 2 dc in FLO 1stst, 3 dc in FLO of each of the next 14 sts (45)
Heart
(Make 1 – in pink)
R1: In magic ring: Ch 1, 8 hdc. Sl st join to first hdc (8)
R2: Ch 1, hdc inc x8. Sl st join to first hdc (16)
R3: Ch 1, (dc, tr) in same st, tr x2, (tr, dc) in next st, (dc, hdc) in next st, hdc inc x2, (dc, tr, dc) in next st, hdc inc x2, (hdc, dc) in next st, (dc, tr) in next st, tr x2, (tr, dc) in next st, sl st.
Fasten off with long tail. Sew to the body.
Part 3 will be crocheting the head and adding a face to your doll.
Part 3:
Head
Stuff the head as you go.
R1: Attach skin tone yarn to BLO of R22 of the body in the back, 15 sc around (15)
R2: (3 sc, sc dec) x 3 (12)
R3: sc inc x 12 (24)
Insert neck support if you are using one, otherwise stuff as firmly as possible.
You can use foam hair rollers, popsicle sticks, plastic spoon, or crochet a tube the diameter of the neck and insert that. All of these methods will help prevent a bobble head.
R4: (1 sc, sc inc) x 12 (36)
R5: (5 sc, sc inc) x 6 (42)
R6: (6 sc, sc inc) x 6 (48)
R7-15: 48 sc (48)
R16: (6 sc, sc dec) x 6 (42)
R17: (5 sc, sc dec) x 6 (36)
R18: (4 sc, sc dec) x 6 (30)
R19: (3 sc, sc dec) x 6 (24)
Insert safety eyes between R12-13, 8 sts apart. Embroider eyelashes.
R20: (2 sc, sc dec) x 6 (18)
R21: (1 sc, sc dec) x 6 (12)
Finish stuffing head.
R22: sc dec x 6 (6)
Fasten off and close up head. Weave in ends.
Stitch a nose using skin tone color between R11-12.
Add blush to cheeks if desired.
Part 4:
Hat
(Make 1 – starting in white)
R1: 6 sc in magic ring (6)
R2: sc inc x 6 (12)
R3: (1 sc, sc inc) x 6 (18)
R4: (2 sc, sc inc) x 6 (24)
R5: (3 sc, sc inc) x 6 (30)
R6: (4 sc, sc inc) x 6 (36)
R7: (5 sc, sc inc) x 6 (42)
R8: (6 sc, sc inc) x 6 (48)
R9-16: 48 sc (48) Change to turquoise on last st of R16.
R17-19: 48 sc (48)
Fasten off with long tail. Sew the hat to the head.
Ears
(Make 2 – in white)
R1: 6 sc in magic ring (6)
R2: 6 sc (6)
R3: sc inc x 6 (12)
R4: (3 sc, sc inc) x 3 (15)
R5-7: 15 sc (15)
R8: (3 sc, sc dec) x 3 (12)
R9: (2 sc, sc dec) x 3 (9)
Fasten off with long tail. Flatten ears (do not stuff) and sew to the hat.
Horn
(Make 1 – in yellow)
R1: 4 sc in magic ring (4)
R2: (1 sc, sc inc) x 2 (6)
R3: 6 sc (6)
R4: (2 sc, sc inc) x 2 (8)
R5: 8 sc (8)
R6: (3 sc, sc inc) x 2 (10)
R7: 10 sc (10)
R8: (4 sc, sc inc) x 2 (12)
R9-12: 12 sc (12)
Fasten off with tail. Stuff and sew to the hat.
Part 5:
Long curls
(Make 16 – in choice of colors)
R1: Ch 41, 2 sc in 2nd ch from hook and next 39 chs (80)
Fasten off with tail. Sew 12 down the hat for the mane – in 2 rows of 6. Sew 4 to the body for the tail.
Short curls
(Make 4 – in choice of colors)
R1: Ch 21, 2 sc in 2nd ch from hook and next 19 chs (40)
Fasten off with tail. Sew 2 on either side of the horn.
You’re done!
Congratulations
More Amigurumi Unicorn Girl Ideas:
