Materials
Medium weight cotton yarn:
– colors of your choice:
– skin
– green (in two shades)
– white
– red
– yellow, brown or any other color for the hair
– 7 mm safety eyes
– 2 and 2,5 mm crochet hook (2,5 is used for the hat only)
– red embroidery floss, 1 thread (for lips)
– needles for sewing the parts together and mouth embroidery
– textile glue (for the hair)
– textile hardener (starch)
– powder blush or oil based crayons to color the cheeks
Abbreviations (US terms):
st(s) – stitch(es)
sl st – slip stitch
sc – single crochet
hdc – half double crochet
dc – double crochet
htr – half treble crochet stitch (yarn two times over the hook, insert hook into the stitch,
yarn over and draw through the stitch. Now having 4 loops on the hook. Yarn over and
draw through two loops . Yarn over and draw through remaining loops to finish the stitch.
pop corn – pop corn stitch (3dc worked in one stitch. Keep the last loop of each stitch on
the hook. Slip stitch into 4 loops on the hook to finish the stitch. This stitch is used for
making nose.)
fpsc – front post single crochet
R – row or round
* * – repeat what inside stars by number (x) following after
inc – increasing (2 stitches worked in 1 stitch)
dec – decreasing stitch (2 stitches worked together in order to create 1 stitch)
blo – work only the back loops of the stitch
flo – work only the front loops of the stitch
Head
R1: sc x6 in magic ring
R2: inc x6 (12 sts)
R3: inc x1, sc x1 x6 (18 sts)
R4: inc x1, sc x2 x6 (24 sts)
R5: inc x1, sc x3 x6 (30 sts)
R6: inc x1, sc x4 x6 (36 sts)
R7 inc x1, sc x5 x6 (42 sts)
R8, R9: sc x42 sts
R10: inc x1, sc x9, inc x1, sc x9, inc x1, sc x21 (45 sts)
R11, R12: sc x45 sts
R13 inc1, sc x10, inc1, sc x10, inc1, sc x22 (48 sts)
R14, R15: sc x48 sts
R16: sc x8, inc x3, sc1, pop corn st, sc x2, inc x3, sc x30 (54 sts)
R17, R18, R19: sc x54 sts
Place eyes now. Use middle round between R14 and R15 leaving 6 stitches between.
Make sure the nose comes in the round below them, centered between both eyes.
R20: sc x8, dec x3, sc x4, dec x3, sc x30 (48 sts)
R21: dec x1, sc x10, dec x1, sc x10, dec x1, sc x22 (45 sts)
R22: dec x1, sc x9, dec x1, sc x9, dec x1, sc x21 (42 sts)
R23: dec x1, sc x5 x6 (36 sts)
R24: dec x1, sc x4 x6 (30 sts)
R25: dec x1, sc x3 x6 (24 sts)
R26: dec x1, sc x2 x6 (18 sts)
tie off, stuff the head nice and firm.
Arms
start working with flash color yarn
R1: sc x6 in magic ring
R2: inc x1, sc x1* x3 (9 sts)
R3: sc x9 sts
R4: inc x1, sc x2* x3 (12 sts)
R5: sc x12 sts
R6: dec x1, sc x2* x3 (9 sts)
stuff this part and continue stuffing as you go. Stuff arms light.
R7, R8, R9: sc x9 sts
change color to one you will make sleeves.
R10: blo sc x9 sts
R11: sc x9 sts
R12: blo sc x9 sts
R13, R14, R15: sc x9 sts
R16: sc8, inc x1 (10 sts)
R17 to R29: sc x10 sts
tie off leaving long end for sewing the arms later
Legs
start with shoes (make 2)
R1 sc x4 in magic ring
R2, R3: inc x1, sc x1, dec x1 (4 sts)
R4: inc x1, sc x3 (5 sts)
R5: inc x1, sc x4 (6 sts)
R6: inc x1, sc x5 (7 sts)
R7: inc x1, sc x6 (8 sts)
R8: inc x1, sc x7 (9 sts)
R9: inc x1, sc x8 (10 sts)
R10: inc x1, sc x9 (11 sts)
R11: inc x1, sc x10 (12 sts)
R12: sc x12 sts
pull the left over yarn from forming magic ring and tie a knot inside the top of the shoe
(make sure to direct the point where your last stitch of the last round is) to make the shoe
tip keep desired form.
R13: ch1 and turn (work in rows) sc x10 sts
R14: ch1, turn, sc x10 sts
R15: ch1, turn, sc x3, dec x2, sc x3 (8 sts)
R16: ch1, turn, dec x1, sc x1, hdc x2, sc x1, dec x1 (6 sts)
R17: ch1 turn, dec x1, hdc x2, dec x1 (4 sts)
R18: ch1, turn, dec x2 (2 sts)
R19 ch1, turn, dec x1
R20: ch1, turn, sc x18, across the sides, front (2 sts left of R12) and back. (do not count
ch1 as a stitch. We’ll skip this one on the next round)
R21: sc18
before continuing with edging around the shoe, you might want to add yarn for the leg. Slip
stitch to one of the back loops of R21; dec x1, sc x1 x6 making 12 sts round.
Now return to shoe.
R22: ch5, turn your work opposite direction from one you worked R21 (so the right side of
the stitches made on chain are nice and visible) – starting from the second chain stitch, sl
st x1, sc x1, hdc x1, dc x2 in the last chain stitch
skip 2 sts on R21 and slip stitch to front loop of the third st.
repeat: ch5, sl st1, sc1, hdc1, dc2 in1 st, skip 2, sl st to third st around (making 6 star
points areound shoe). Slip stitch to the first front loop, ch1, turn
R23: sc to each of the front loops left on R22. Your work will look as ch1, sc x2 repeated
around.
Tie off, hide end.
Your shoe is done.
Legs (x2)
working in one or multiple colors
R1: dec x1, sc x1 x6 (12 sts) – made while working on shoe
stuff the legs as you go. Add little stuffing. Make legs nice and soft.
R2 to R31: sc x12 sts
tie off.
For nice sitting doll, flatten the top of the legs (right below you started the body) and sew
few stitches (with same color yarn as the last rounds on the legs) over the flattened top,
across both sides. You can repeat the same on the knees area as well.
Body
color of your choice
place legs side by side, both facing same direction.
R1: sl st to one of the inner stitches on one of the legs. Ch3, sc to opposite stitch of the
second leg.
Once legs are connected with the chain single crochet around making total of 30 sts
(12 one leg +3 chain +12 second leg +3chain=30 sts)
R2: inc x1, sc x4 x6 (36 sts)
R3: inc x1, sc x5 x6 (42 sts)
R4 to R11: sc x42 sts
R12: blo sc x42 sts
R13: sc x42 sts
R14: dec x1, scx5 xc6 (36 sts)
R15 to R17: sc x36 sts
R18: dec x1, sc x4 x6 (30 sts)
R19 to R21: sc x30 sts
R22 dec x1, sc x3 x6 (24 sts)
R23 to R25: sc x24 sts
change color to collar
R26 dec x1, sc x2* x6 (18 sts)
R27: blo sc x18 sts
change color to skin
R28: sc 18 st
tie off leaving long end for sewing body and head together.
Stuff body nice and firm.
Lower shirt part added on boy’s body:
slip stitch with the same color yarn used
for the body, to one of front loops left on
R12.
R1: sc x42 sts
R2: inc x1, sc x6 x6 (48 sts)
R3, R4, R5: sc x48 sts
R6: inc x1, sc x7 x6 (54 sts)
R7, R8, R9: sc x54 sts
R10: inc x1, sc x8* x6 (60 sts)
tie off hide end.
Skirt for girl:
slip stitch with the same color yarn used
for the body, to one of front loops left on
R12.
R1: inc x1, sc x6 x6 (48 sts)
R2: inc x2, sc x6* x6 (60 sts)
R3: inc x4, sc x6* x6 (84 sts)
R4: inc x8, sc x6* x6 (120 sts)
R5 to R10 sc x120 sts
tie off and hide end.
Belt(s):
make a chain (I used 42 chain stitches for both dolls, but make sure to measure the length
and add or decrease stitches accordingly.
To make belts look nice, work the loop you’ll find on the back side of the chain. It is one
single loop, pointing up and standing in between two loops.
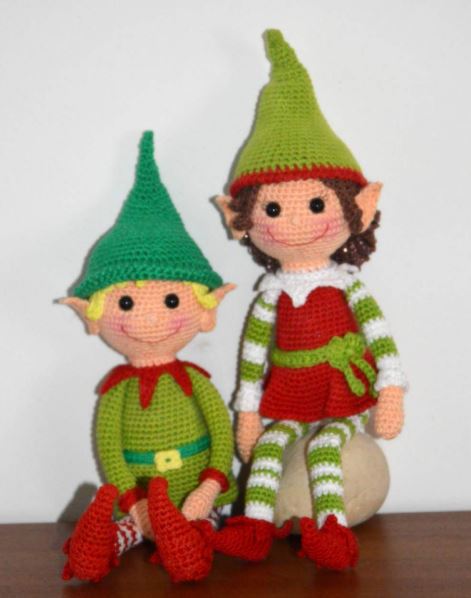
Look at the photo for more details.
Using this loop, your belt will look the same on the bottom and top.
For male elf I used single crochet and for girl I worked with half double crochet across the
chain to create the belt. Use the stitch you like better.
Stitch across the chain and sew end around doll’s waist once done. You can sew across
stitch or two on the body to secure the belt stays in place.
Belt bucket:
work in the magic ring
sc1, ch1, sc2, ch1, sc1, ch1, sc2, ch1
close the magic ring
Shape the square with your fingers pointing chains out.
Glue the belt bucket on the belt.
Bow:
work in the magic ring
ch3, dc4, ch3, sl st1, ch3, dc4, ch3, sl st1
close the magic ring. Tie off but leave enough yarn to wrap around bows middle and for
sewing later.
Hanging bow ends:
ch18, starting from the the 3rd chain st, hdc1, sl st next 13 sts, hdc last, work around chain
to slip stitch to 1 st and finish nicely.
Hide ends in the back of the bow.
Tie this lower part on the back of up bow part and sew them or glue them on the belt.
Ears
Ear1:
R1: sc x10 in magic ring
don’t close the ring completely. Leave it half opened for easier working.
R2: ch1 turn, fpsc x6, sc x3, sl st x1, sl st to magic ring. Ch1, turn.
R3: skip 2slip stitches of the previous round, hdc4 to next st, sl st x2, sc x2, hdc x1, dc+htr
to next st, make picot of 2 ch sts on htr, hrt+dc to the next st, skip one and sl st to last st. sl
st to the base of the first stitch made on this side.
Tie off leaving long end for sewing. Close the magic ring and shape the ear nice.
Ear2:
R1: sc x10 in the magic ring
don’t close the ring completely. Leave it half opened for easier working.
R2: ch1, turn, sl st first st, sc x3, fpsc x6
ch1, turn
R3: sc to first st, dc+htr to next sts (make 2ch picot on htr), htr+dc to next st, hdc, sc x2, sl
st x2, hdc x4 to next sts, sl st last st and base of the first st made on this side.
Tie off leaving long end for sewing.Close the magic ring and shape the ear nice.
To make your ears nice, use fabric hardener (starch or sugar water). Model the ear while
damp and let it dry completely
Collars:
Boy elf collar:
working on the front loops of R27 of the body
sl st to one of front loop stitches,
*ch6, sl st1, sc1, hdc, dc x2, skip 2 sts and sl st to 3rd * repeat around
For extra touch and better look, sc around to all front loops left undone. (same as what we
did on shoe).
Ch1, sc2… around
tie off hide ends inside the body
Girl collar:
R1: inc x1, sc x2 x6 (24 sts)
R2: sc1, hdc1, dc-picot-dc to one st, hdc1, sc1, sl st1 ….around (6 petals)
tie off hide ends
edgings on sleeves:
You can try variations.
For boy I used simple single crochet around top round and then attached back loop
stitches just made with front loops left on the lower arm part using single crochet again
For girl. Started with single crochet and in the second round added 1 ch stitch between
each stitch on the bottom line.
Hat:
Will give you the pattern for standard
elven hat (light green one you can see on
girl)
Work with 2,5 mm hook (if working with
different size hooks than 2/2,5 use half
size bigger hook from one you used to
make the doll).
I started the hat from the bottom and
crocheted to top. You can do either way.
Important is to start stitches you can
divide by 5 or 6 for easier counting.
On top, to make hat narrow and pointy,
you can work 3-4 rounds. Middle part of
the hat decrease every third round
(example: having 42 sts one round -either
after decreasing or increasing previous
round, next two rounds sc same amount
of stitches. In this case it would be 42.
Following round either decrease or increase – depending if you started from bottom or top of the hat).
My hat started with ch45 (slip stitched last to first chain stitch to form the ring and continue
in spiral).
R1 to R4: sc x45 sts
R5: dec x1, sc x7* x5 (40 sts)
R6, R7 : sc x40 sts
R8: dec x1, sc x6* x5 (35 sts)
R9, R10: sc x35 sts
R11: dec x1, sc x5* x5 (30 sts)
R12, R13: sc x30 sts
R14: dec x1, sc x4* x5 (25 sts)
R15, R16: sc x25 sts
R17: dec x1, sc x3* x5 (20 sts)
R18, R19: sc x20 sts
R20: dec x1, sc x2* x5 (15 sts)
R21, R22: sc x15 sts
R23: dec x1, sc x1* x5 (10 sts)
R24, R25: sc10 sts
R26: dec x5 (5 sts)
R27 to R30: sc5
tie off leaving long end for sewing. Thread the needle and close last round nicely. Hide the
access yarn inside the hat.
After I finished with the hat and green yarn, used red to make the edging. First I single
crocheted bottom line and in next round used reverse (crab) stitch all around.
If you’ve noticed, top of the head is little folded on the side. I achieved that by decreasing
R20 and R24 repeatedly.
Instead of normal decrease dec1,sc2… I did dec5, sc remaining stitches.
I didn’t write it in the pattern, because to me it doesn’t look anything special. I think normal
decrease, all around would look same way
For the dark brown hat I don’t have the
pattern but will try to describe what I
did to get this nice shape.
Again started from the bottom. This
time I made 50 stitches chain, slip
stitched last to first and worked in
rounds.
Same as previous hat. This one was
divided by 5 for easier counting the
stitches and rounds.
First 4 rounds are repeated 50 sts
each round
then decreasing started; first was
dec1, sc8 x5, followed by two rounds
of same stitch count, and second
decrease was dec1, sc7 x5 followed
with two rounds of same stitch count again.
From this part on I made decreases on half of the hat only.
For example: if the round was 40 sts, I made those 5 decreases on half of the hat, or just
over 20 stitches. Tried to count to apply them as evenly as possible on this half.
After decreasing round, followed 2 repeating rounds of the same stitch count.
This way I worked all the way it was possible to count and work decrease on the half of
the hat.
Finished with 5sts, and repeated this 4 times before closing the last round.
Important is that decreases are at the same part of the hat. This way the hat will curl
naturally. If I will have time I will try to write down exact pattern for this hat. It is really nice
one.
I am also sure that many of you will be able to make such hat without my help.
Decrease on half of the hat evenly (every third round)! That is all the magic there is!
Bottom of the hat; slip stitched to first round. Single crocheted 50sts 3 times and 4th round
finished with reverse (crab) stitch.
These 3x repeating and reverse stitch at the end made hat curl naturally at the bottom
what added extra charm to this little pixie hat.
Hair:
Boy’s hair
Start with magic ring but do not close it until hair is done completely
R1:
– sc1 in magic ring and from this sc, ch 17 – sl st to the second chain stitch from the
hook and sc x15
– repeat above 1 more time
– sc1 to the magic ring, ch10 – starting from the second chain stitch from the hook,
slip stitch 9
– repeat above (ch10) three more times
– repeat ch17 (from the start) two more times
– sc5, ch1 turn (continue working in rows over these 5 stitches)
– inc x5 (10 sts) ch1, turn
R2: inc x1, sc x1 x5 (15 sts) ch1, turn
R3: inc x1, sc x2 x5 (20 sts) ch1, turn
R4: inc x1, sc x3 x5 (25 sts) ch1, turn
R5: inc x1, sc x4 x5 (30 sts) ch1, turn
R6 to R12: sc x30 sts
from next round do not chain1 but turn each round. Skip 1st stitch and make decrease (2nd
and 3rd st). Make one decrease at the end of the row. Do not chain but turn and continue
decreasing at beginning and end on each row, or until you reach 3 sts row count.
R13: (skip 1st st) dec x1, sc x25, dec x1 (27sts)
R14: (skip 1st st) dec x1, sc x23, dec x1 (25 sts)
R15: (skip 1st st) dec x1, sc x21, dec x1 (23 sts)
R16: (skip 1st st) dec x1, sc, x19, dec x1 (21 sts)
R17 (skip 1st st) dec x1, sc x17, dec x1 (19 sts)
R18 (skip 1st st) dec s1, sc x15, dec x1 (17 sts)
R19: (skip 1st st) dec x1, sc x13, dec x1 (15 sts)
R20: (skip 1st st) dec x1, sc x11, dec x1 (13 sts)
R22 (skip 1st st) dec x1, sc x 9, dec x1 (11 sts)
R23: (skip 1st st) dec x1, sc x7, dec x1 (9 sts)
R24: (skip 1st st) dec x1, sc x5, dec x1 (7 sts)
R25 (skip 1st st) dec x1, sc x3, dec x1 (5 sts)
R26 (skip 1st st) dec x1, sc x1, dec x1 (3 sts)
tie off
Close the magic ring now.
Slip stitch to R13, ch4 – starting from the second chain hook, sl st3
repeat this from R13 one side all the way around side and bottom to R13 opposite side.
This will create little hairs on the back of the head. Try making them little longer if you’d
like. Ch5 or 6 instead of 4. Will look even better than these short ones.
Glue the base of the hair first. Place on the head and pin all around. After hair is placed
and pinned, arrange the hairs in front of doll’s face.
Two longer hairs place right in front of the ears and fringes arrange the way you like.
You can glue these hairs or sew them. Which way you prefer.
Back hairs, short ones done last, leave as they are. Loose and free. They will shape the
head and give extra touch to your doll.
Girl’s hair
Start with magic ring but do not close it until hair is done completely
R1:
– sc1 in magic ring and from this sc, ch 20 – sl st to the second chain stitch from the
hook and sc x18
– repeat above 1 more time
– sc1 to the magic ring, ch12 – starting from the second chain stitch from the hook,
slip stitch 10
– repeat above (ch10) one more time
– sc1 to magic ring, ch16, starting from the second chain stitch from the hook, slip
stitch 15 sts
– repeat ch 20 (from the start) two more times
– sc5, ch1 turn (continue working in rows over these 5 stitches)
– inc x5 (10 sts) ch1, turn
R2: inc x1, sc x1 x5 (15 sts) ch1, turn
R3: inc x1, sc x2 x5 (20 sts) ch1, turn
R4: inc x1, sc x3 x5 (25 sts) ch1, turn
R5: inc x1, sc x4 x5 (30 sts) ch1, turn
R6 to R12: sc x30 sts
From now on decrease x1 at start and end of the row. Ch1 and turn when starting new
row.
R13: dec x1, sc x26, dec x1 (28 sts)
R14: dec x1, sc x24, dec x1 (26 sts)
R15: dec x1, sc x22, dec x1 (24 sts)
R16: dec x1, sc x20, dec x1 (22 sts)
R17: dec x1, sc x18, dec x1 (20 sts)
R18: dec x1, sc x16, dec x1 (18 sts)
R19: dec x1, sc x14, dec x1 (16 sts)
R20: dec x1, sc x12, dec x1 (14 sts)
R21: dec x1, sc x10, dec x1 (12 sts)
R22: dec x1, sc x8, dec x1 (10 sts)
tie off.
Slip stitch to side on R13; ch40 and sl st to next side stitch. Work this way on both sides of
the hair.
From the photo you can see I worked only the sides. You can work all the way, including
the bottom row of back of the hair, and even the upper rows. You can chain more stitches
in order to create longer hair, or make shorter ones.
I added few photos of some hair styles that crossed my mind. Might give you an idea of
what hair style to make for your doll.
Wishing you lots of fun time while creating and coming up with some unusual and beautiful
hair styles. Make sure to share you ideas and photos with us. I would love to hear and see
what you came up with.

