Materials
5 ply cotton yarn in various colors (white, black, green, red, brown light/dark)
Merino wool or any other wool suitable for brushing (for Santa’s and Gnome’s beard)
2 mm crochet hook
darning/embroidery needle
little tiny jungle bells for hats (if you can’t find these, make pom-poms or use bows, beads,
buttons…)
4 mm round black beads for eyes
blushing powder (for cheeks)
textile glue (to make everything easier and faster)
5 mm wide satin ribbon
Polyester stuffing or any other of your choice
Abbreviations
sc – single crochet (US terms)
ch – chain
inc – increase, two stitches in one stitch
dec – decrease, invisible decrease
2sctog – 2 stitches together decrease (used on beard only)
sl st – slip stitch
hdc – half double crochet (US terms)
Basic Ornament’s Head
color of your choice, depending what ornament you will make
Sc 6 in magic ring
R1 inc6 (12 sts)
R2 inc1, sc1 x6 (18 sts)
R3 inc1, sc2 x6 (24 sts)
R4 inc1, sc3 x6 (30 sts)
R5 inc1, sc4 x6 (36 sts)
R6 inc1, sc5 x6 (42 sts)
R7-R11 sc42
R12 dec1, sc5 x6 (36 sts)
R13 dec1, sc4 x6 (30 sts)
R14 dec1, sc3 x6 (24 sts)
R15 dec1, sc2 x6 (18 sts)
Begin stuffing the head.
R16 dec1, sc1 x6 (12 sts)
R17 dec6 (6 sts)
Tie off leaving long end for sewing. Sew/close the last row and hide ends.
Once you finish the head, and close the last round nicely and clearly, turn it up.
The last row will be up (will be covered by hat later).
Place the eyes in between rows 9-10, leaving three-four stitches between them
With red yarn embroider the nose one row below the eyes.
Embroider or paint the lips and as final touch add blushing on the cheeks.
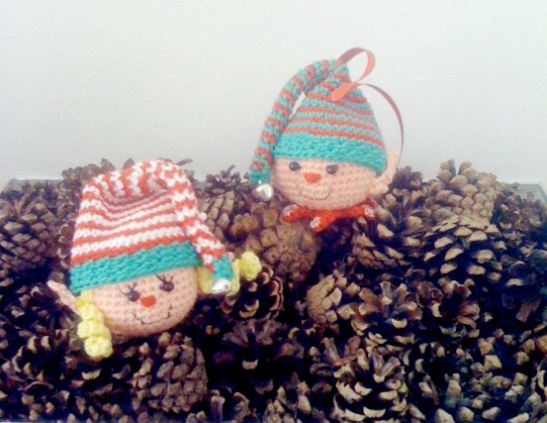
Elf’s hat (green top and bottom, white/red stripes)
Start with green yarn
Sc6in magic ring
R1-R2 sc6
Change color at the last stitch of the previous row.
You will change it following way. Push the hook through the stitch, yarn over
and pull the working color yarn. Now you have 2 loops on the hook. Change
yarn color at this point to one for the next row and pull thorugh both loops in
order to finish single crochet stitch. Continue with next row. In the same way,
continue changing the yarn color at every row.
R3-R18 sc6 (changing color at each row from R3-R37)
R19 inc1, sc2 x2 (8 sts)
R20 inc1, sc3 x2 (10 sts)
R21 inc1, sc4 x2 (12 sts)
R22 inc1, sc5 x2 (14 sts)
R23 inc1, sc6 x2 (16 sts)
R24 inc1, sc7 x2 (18 sts)
R25 inc1, sc8 x2 (20 sts)
R26 inc1, sc9 x2 (22 sts)
R27 inc1, sc10 x2 (24 sts)
R28 inc1, sc11 x2 (26 sts)
R29 inc1, sc12 x2 (28 sts)
R30 inc1, sc13 x2 (30 sts)
R31 inc 1, sc14 x2 (32 sts)
R32 inc1, sc15 x2 (34 sts)
R33 inc1, sc16 x2 (36 sts)
R34 inc1, sc17 x2 (38 sts)
R35 inc1, sc18 x2 (40 sts)
R36 inc1, sc19 x2 (42 sts)
R37 inc1, sc20 x2 (44 sts) change color to green at last stitch
R38-R40 sc44 following way (one stitch back loop, next one front loop. Work
this way for entire row. Overlap the bl/fl for the next two rows as well. If you
start with back loop at the first row (R38) start every following row (39 & 40)
with back loop stitch as well.
If this seems to complicated, stitch the last three rows in plain single crochet
through both loops.
Elf’s Star collar
sc5 in magic ring
R1 inc5 (10 sts)
sc1, ch5, starting at the second chain from hook sl st1, sc1, hdc2, slip stitch to next stitch repeat until all 5 points of the star are made. Tie off, hide ends and
sew or glue on the bottom of Elf’s head. Decorate with glitter, beads or
anything you like.
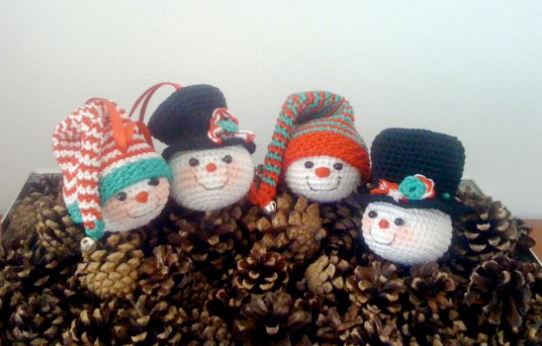
Black Snowman’s hat
Sc5 in magic ring
R1 inc5 (10 sts)
R2 inc10 (20 sts)
R3 inc1, sc1 x10 (30 sts)
R4 inc1, sc2 x10 (40 sts)
R5 work blo sc40
R6-R7 sc40
R8 dec1, sc6 x5 (35 sts)
R9-R11 sc35
R12 dec1, sc5 x5 (30 sts)
R13-R15 sc30
R16 work flo inc1, sc1 x15 (45 sts)
R17 sc45
R18 inc1, sc2 x15 (60 sts)
Tie off hide end.
For hat decoration I used white/red twisted yarn pieces I placed under tiny
crocheted wreath I made by making 8 sc in magic ring, slip stitched last to first
stitch and tried not to close the ring to tight.
You can use beads, buttons, glitters, bows…play a little and experiment.
Decorate the smiling snowman the way you like.
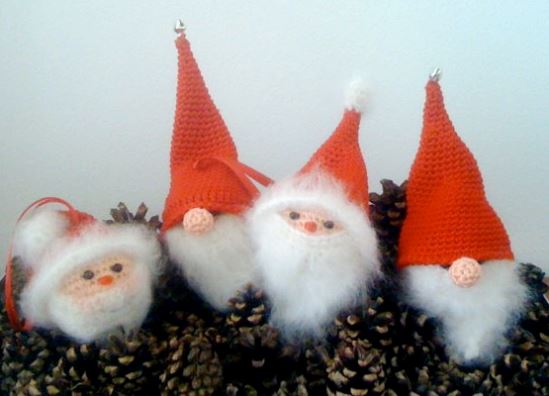
Santa’s hat
White yarn (I used Red Heart, Soft Merino yarn, but any yarn you can brush
later or one that will give you fuzzy effect will work fine)
Sc6 in magic ring
R1 inc1, sc1 x3 (9 sts)
R2 sc9
R3 dec1, sc1 x3 (6 sts)
Change to red yarn
R4-R5 sc6
R6 inc1, sc2 x2 (8 sts)
R7 sc8
R8 inc1, sc3 x2 (10 sts)
R9 sc10
R10 inc1, sc4 x2 (12 sts)
R11 inc1, sc5 x2 (14 sts)
R12 inc1, sc6 x2 (16 sts)
R13 inc1, sc7 x2 (18 sts)
R14 inc1, sc8 x2 (20 sts)
R15 inc1, sc9 x2 (22 sts)
R16 inc1, sc10 x2 (24 sts)
R17 inc1, sc11 x2 (26 sts)
R18 inc1, sc12 x2 (28 sts)
R19 inc1, sc13 x2 (30 sts)
R20 inc 1, sc14 x2 (32 sts)
R21 inc1, sc15 x2 (34 sts)
R22 inc1, sc16 x2 (36 sts)
R23 inc1, sc17 x2 (38 sts)
R24 inc1, sc18 x2 (40 sts)
R25 inc1, sc19 x2 (42 sts)
R26 inc1, sc20 x2 (44 sts)
Change color to white
R27-R29 sc44 sts
Tie off, hide ends and brush well top of the hat and bottom edge.
Santa’s/Gnome’s Beard
ch17
we are making rows here, don’t forget to chain one before turning
R1-R2 sc16
R3 2sctog, sc12, 2sctog (14 sts)
R4 sc14
R5 2sctog, sc10, 2sctog (12 sts)
R6 sc12
R7 2sctog, sc8, 2sctog (10 sts)
R8 sc10
R9 2sctog, sc6, 2sctog (8 sts)
R10 sc8
R11 2sctog, sc4, 2sctog (6 sts)
R12 sc6
R13 2sctog, sc2, 2sctog (4 sts)
R14 sc4
R15 2sctog x2 (2 sts)
R16 sc2
R17 2sctog (1st)
R18 sc1 (tie off)
Gnome’s Nose
sc6 in magic ring
R1 inc1, sc1 x3 (9 sts)
R2 sc9
add some stuffing
R3 dec1, sc1 x3 (6 sts)
R4 flatten the piece and stitch through both sides (should make 2sc). Tie of
leaving long end for sewing.
Instead of embroidering the nose, sew this one on the Gnome’s had.
Gnome’s hat – longer
In order to make gnome’s hat longer, what you will do is repeat each increased
row. For example, if you increased working row is 8 sc, the next one you won’t
increase, but will repeat same stitch count.
I suggest increasing+repeat way, maximum reaching stitch count 20 (otherwise
the hat will be too long), then continue with increasing each line (as written in
the pattern for Santa’s hat)
Gnome’s hat has no fuzzy edges, so make it all one colored. Add one or two
extra rows at the end so the hat falls more over Gnome’s eyes.

Reindeer
Horns
Tiny Side Horns x2
sc4 in magic ring
R1-R2 sc4
Tie off
Top horn to start with:
Sc4 in magic ring
R1-R3 sc4
R4 sc2 attaching one of the smaller horns previously made (stitch through the
loose horn and working horn), sc2 (on the working horn) (4 sts)
R5 sc2 (recently attached horn only), sc2 working horn (4 sts)
R6 inc1, sc1, inc1, sc1 (attaching the third horn-again stitch through both, lose
horn and working piece) (6 sts)
R7 sc5, sc3 (work the stitches attached horn only) (8 sts)
R8 sc8
R9 dec1, sc2 x2 (6 sts)
R10-R11 sc6
Tie off leaving long end for sewing
Ears x2
leave long end here, when starting the chain
for sewing the ear on the head later Ch5
Starting as second chain from the hook: slst1, sc1, hdc1, 3hdc in last stitch,
work around chain, hdc1, sc1, slst1
Tie off. To secure the knot at the end of the ear piece, I like to add drop of glue
or drop of clear nail polish (this way don’t have to hide the end and ear finish
with nice pointy look
Nose
Ch4
R1 sc2, 3sc in one stitch, continue working around chain, sc1, inc1 (8 sts)
R2 inc1, sc1, inc3, sc1 inc2 (14 sts)
R3 sc1, inc1, sc2, inc1, sc1 x2, inc1, sc2, inc1, sc1, inc1 (20)
R4-R6 sc20
Tie off, stuff, pin and sew onto head.
On top, with red yarn and embroidery or darning needle embroider red nose.
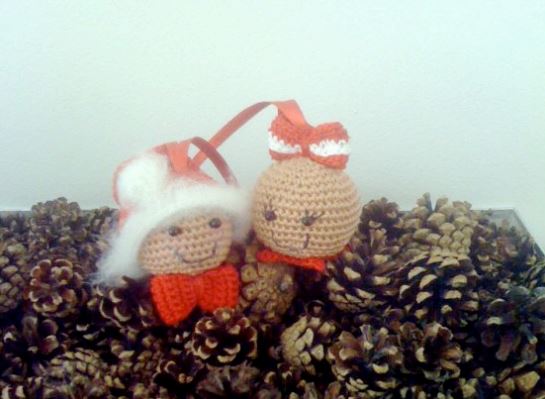
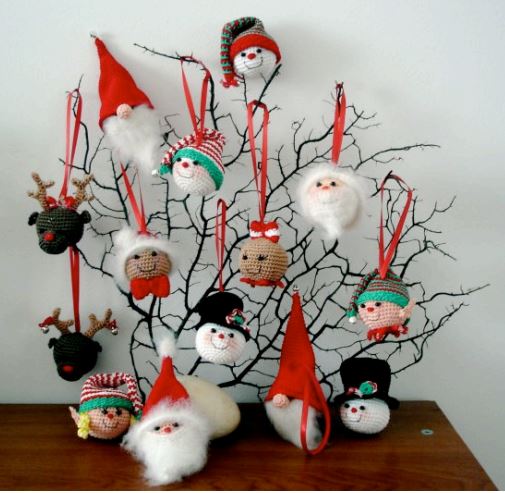
GingerMen heads are just in addition to all above! One is using Santa’s hat.
Girl has Elf’s collar. You can really use many different variations.
The bows used:
ch6
R1-22 sc5
Tie off, sew ends together. Use yarn to wrap around middle in order to create
bow.
or
ch23
R1-R6 sc22 (changing colors as desired)
Tie off, sew the ends, create the bow.
You can also use star collar

