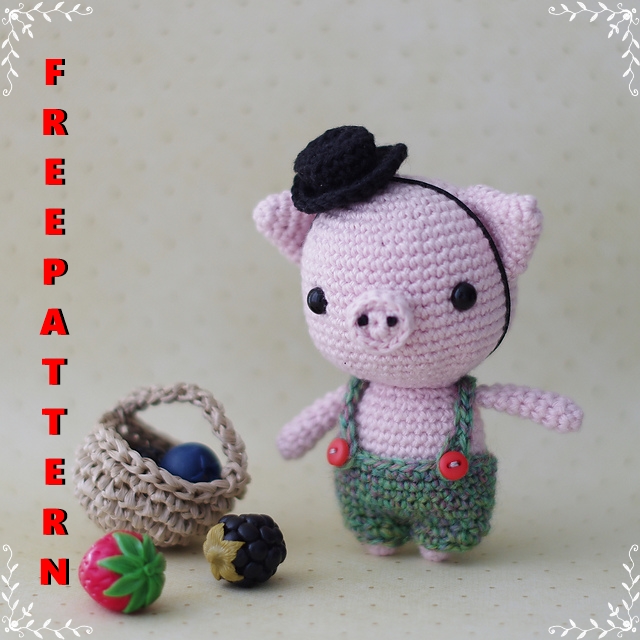
Materials
I use fine cotton yarn (165 m per 50 g or 181 yards per 1.75 oz), 2.5 mm crochet hook and hypoallergic
fiberfill for stuffing. In a small box there are 6 mm safety eyes (though you can use beads, tiny buttons
or you can embroider eyes), black thread to embroider the nose, several pins and a yarn needle. I use
fine section-dyed merino yarn for the pants, and cotton black yarn for the hat. When it comes to pants,
it’s better that your yarn was thinner than the yarn for toy (something about 220 m per 50 g), so that
the garment fabric was not too bulky or boardy. Also, in the box there are 2 tiny buttons for the pants
and some thread to sew them. I use elastic thread to secure the hat.
My crocheting style is quite tight, so keep in mind your own crocheting manner as well as the yarn
weight and the hook size before you start crocheting.
Abbreviations
MR – amigurumi magic ring
ch – chain
sc – single crochet
hdc – half-double crochet
dc – double crochet
sl.st. – slip stitch
st – stitch
sts – stitches
[] x number – repeat stitches in parenthesis indicated number of times
inc – increase (crochet 2 sc sts in one st)
dec – invisible decrease (insert hook in front loop of next st, do not yarn over but immediately insert
hook in front loop of the next st, yarn over and pull the loop through both front loops (you have 2 loops
on your hook now), yarn over and pull the loop through both loops on your hook. The invisible decrease
is done).
MC – main colour
CC – contrast colour
Rnd – round
HEAD
Rnd 1: 6 sc in MR, join with a sl.st. in 1st sc.
Rnd 2: inc in each st (12 sts).
Rnd 3: [sc, inc] x 6 (18 sts).
Rnd 4: [inc, 2 sc] x 6 (24 sts).
Rnd 5: [3 sc, inc] x 6 (30 sts).
Rnd 6: [2 sc, inc, 2 sc] x 6 (36 sts).
Rnd 7: [5 sc, inc] x 6 (42 sts).
Rnd 8: [3 sc, inc, 3 sc] x 6 (48 sts).
Rnds 9-18: 48 sc (48 sts).
Rnd 19: [3 sc, dec, 3 sc] x 6 (42 sts).
Note: In the next Rnd and in the Rnd 22 I will add an extra sc
in the beginning of the round to shift the starting point for a
neater look, it will not count in the end stitch count. If you
prefer not to add the extra st just skip it and crochet as usual.
Rnd 20: sc (does not count as st in round total); [5 sc, dec] x 6
(36 sts).
Rnds 21: [2 sc, dec, 2 sc] x 6 (30 sts).
Now, if you use safety eyes, it’s the right time to secure them
on the wrong side of the head. Find the position of the eyes
that seems perfect to you, and secure the eyes with the washers. Positioning the eyes a little bit higher and closer to each other provides a more classic, traditional look, while positioning them lower and
wider gives a more kawaii look. Experiment and find your own way!
Rnd 22: sc (does not count as st in round total); [3 sc, dec] x 6 (24 sts).
It’s the right time to start adding some stuffing. Continue adding stuffing as you go.
Rnd 23: [sc, dec, sc] x 6 (18 sts).
Work sc and then sl.st., cut yarn and fasten off.
The head is ready!
EARS (make 2)
Rnd 1: 6 sc in MR, join with a sl.st. in 1st sc.
Rnd 2: [sc, inc, sc] x 2 (8 sts).
Rnd 3: [3 sc, inc] x 2 (10 sts).
Rnd 4: [2 sc, inc, 2 sc] x 2 (12 sts).
Rnd 5: [3 sc, inc] x 3 (15 sts).
Rnd 6: [2 sc, inc, 2 sc]] x 3 (18) sts.
Make a sl.st, and cut yarn leaving a long tail to sew the ear
later.
The ears are ready!
SNOUT
Rnd 1: 6 sc in MR. join with a sl.st. in 1st sc.
Rnd 2: inc in each st (12 sts).
Rnd 3: Working in back loops only, make 12 sc. Make a sl.st, and cut
yarn leaving a long tail to sew the snout later.
Now, go back to the front loops of Rnd 3. Hold the snout with the
right side facing you, insert the hook from inside to the outside, and
work a Rnd of slip stitches across the front loops. Cut the yarn and
sew in the end. I also prefer to embroider the nose immediately (tiny
black stitches), however, you can leave this step for later.
LEGS AND BODY
Leg 1:
Rnd 1: 7 sc in MR, join with a sl.st. in 1st sc.
Rnds 2 – 3: 7 sc (7 sts).
Make a sl.st., cut yarn and fasten off.
Leg 2:
Rnd 1: 7 sc in MR, join with a sl.st. in 1st sc.
Rnds 2 – 3: 7 sc (7 sts).
Make 3 sc and a sl.st. Do not cut yarn. Chain 2
Now, let’s form the BODY:
Work a sc just left from the sl.st. of Leg 1, thus joining Leg 2 to Leg 1. Continue working around both legs
and both sides of the chain:
7 sc around Leg 1 + 2 sc on one side of the ch + 7 sc around Leg 2 + 2 sc on the opposite side of the chain
Rnd 1: 18 sts. Please, note that here we have to work sc stitches in sl.st. of legs 1 & 2. You may use a smaller hook to work those sts, and then go back to the main hook.
Rnd 2: [inc, 2 sc] x 6 (24 sts).
Rnd 3: [3 sc, inc] x 6 (30 sts).
Rnd 4: 30 sc (30 sts).
The next Rnd is the Rnd with a tail.
Rnd 5: 13 sc, ch 7, 6 sl.sts. across the chain, sc in next st of the
body, 16 sc to finish the body Rnd (30 sts).
In the next Rnd, be attentive and don’t skip the sts from the
both side of the tail (sts 13 & 14) or don’t work those stitch
twice! See the picture on the right. The picture on the right
shows how the finished Rnd 5 looks from the back.
Rnds 6-10: 30 sc (30 sts).
Slightly stuff the legs while working those Rnds.
Rnd 11: 21 sc (we still have 30 sts altogether, but just leave this Rnd unfinished and begin a new Rnd
starting from this point).
Rnd 12: [3 sc, dec] x 6 (24 sts).Here you can start stuffing the body and add more stuff as you go. I prefer to use not really much
stuffing, so that the body just kept the shape and was not bulky.
Rnd 13: [sc, dec, sc] x 6 (18 sts).
Make sl.st., and cut yarn leaving a long tail to sew the head later.
The body is ready!
ARMS (make 2)
Rnd 1: 6 sc in MR, join with a sl.st. in 1st sc.
Rnds 2 – 6: 6 sc (6 sts).
I add just a small amount of stuff in lower part of the arm, so that
it had a shape but was not too bulky.
Fold the arms in half so that the last loop on the hook was on your
right and work a joining Rnd of sc stitches, trapping sc stitches on
the both sides of the arm (I made 2 sc altogether). Cut yarn leaving
a long tail for sewing.
The arms are ready!
ASSEMBLY
Before sewing any detail, find a perfect position and secure it with pins. And do not forget to
experiment! Remember that you always can, for example, place the snout higher or lower, or change
the distance between the ears. All these provide individuality to your toy.
I prefer to sew in the following order:
1) Head (the head is very easy to sew because you can work stitch to stitch).
2) Ears.
3) Snout (you may add some stuff while sewing).
4) Arms (I sew the arms between the body’s rounds 12 and 13).
So, the pig is ready and if you wish you can even dress it.
PANTS
Pants crocheting process is very similar to the body’s one. Work with the yarn for pants.
Part 1
Ch 10 and join to crochet in rounds being careful not to twist the sts. Work a Rnd of sc around the chain
(10 sc) and make a sl.st. in 1st sc. Cut the yarn and fasten off.
Part 2
Ch 10 and join to crochet in rounds being careful not to twist the sts. Work a Rnd of sc around the chain
(10 sc), then work 4 sc and make a sl.st. Do not cut yarn, but instead ch 2 and join with sc to Part 1 just
left from the sl.st. of Part 1.
Begin the joining Rnd: 10 sc of Part 1 + 2 sc on one side of chain + 10 sc of Part 2 + 2 sc on the other side
of chain =
Rnd 1: 24 sc (24 sts).
Rnd 2: [3 sc, inc] x 6 (30 sts).
Rnd 3: [7 sc, inc, 7 sc] x 2 (32 sts).
In the next Rnd we are going to make a hole for the tail.
Rnd 4: 14 sc, ch 2, skip 2 sts, 16 sts to finish the Rnd (32 sts).
Rnds 5&6: 32 sc (32 sts).
In the next Rnd we are going to make suspenders.
Rnd 7: sc 13, ch 19, sc in 5th ch from hook (this is the button
loop, so try to pull the button through it and adjust the loop size
as necessary), then work sl.sts. across the rest of the chain and
join with a sc just left from the suspender. Work 4 sc, and make
the 2nd suspender in the same way. Join with a sc just left from
the suspender, sl.st. in next st.
Before you cut yarn and fasten off try the pants on your pig and
make sure the suspenders fit good. My design supposes that
suspenders are crossed on the pig’s back, however, you can
make it to your taste. Adjust the suspenders length if necessary,
then fasten off. Find the perfect position for the buttons and
sew them.
The pants are ready!
HAT
Work with the hat yarn.
Main part
Rnd 1: 6 sc in MR, join with a sl.st. in 1st sc.
Rnd 2: inc in every st (12 sts).
Rnd 3: [inc, sc] x 6 (18 sts).
Rnd 4: work through back loops only, 18 sc (18 sts).
Rnd 5: [dec, sc] x 6 (12 sts).
Rnd 6: 12 sc (12 sts).
Rnd 7: work in front loops only, [inc, sc] x 6 (18 sts).
Rnd 8: [inc, 2 sc] x 6 (24 sts).
Make a sl.st, cut yarn and fasten off.
Bottom part
Rnd 1: 6 sc in MR, join with a sl.st. in 1st sc.
Rnd 2: inc in every st (12 sts).
Make a sl.st. and cut yarn leaving a long tail for sewing.
Now, try elastic thread around the pig’s head and measure the right
length (not too loose and not too tight). Make a knot and cut the
thread.
If you don’t have elastic thread, you can crochet the chain of the
necessary length and work across it with slip stitches or you can just
sew the hat to the pig’s head.
Assemble the hat.
Working through the stitches of the last Rnd of the bottom part and
the back loops of Rnd 7 of the main part, sew the details together.
Somewhere in the middle of the sewing process insert the elastic
thread in the hat to hide the knot inside it and to secure the thread.
Also, slightly stuff the hat as you go.

