Caron Simply Soft Harvest Red (Color A) scrap amount
Caron Simply Soft White (B) scrap amount
Caron Simply Soft Light Country Peach (C) scrap amount
Size H (5.0 mm) crochet hook
Scrap amount of white faux fur material
Small Snowflake button embellishment
(optional) small amount of poly-fill or fiber fill to stuff hat
Stitch marker
Tapestry Needle
For Assembly choose one of the following methods:
super glue
Color coordinated embroidery thread
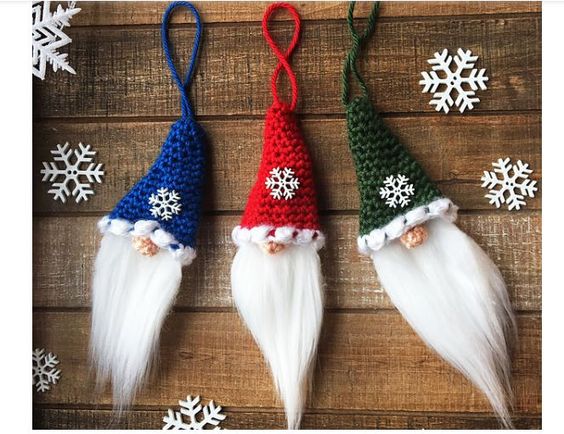
Approximate finished size: 3 1/4” tall (without loop or beard) x 2 1/2” wide
Abbreviations:
MC = magic circle
ch = chain
sc = single crochet
st = stitch
sk = skip
WS = wrong side
Bobble = Bobble Stitch (see special stitches section below)
sc2tog = single crochet 2 st together (see special stitches section below)
Special Stitches:
Bobble = yo, insert hook into indicated st, yo, pull up a loop, (3 loops on hook), yo, pull through 2 loops on hook (2 loops left on hook), yo, insert hook into same st, yo, pull up a loop, (4 loops on hook), yo and pull through all 4 loops.
sc2tog = (insert hook into next st, yo and pull up a loop) twice, yo and pull through all 3 loops on hook.
Notes about pattern:
- Hat and nose are worked in seamless rounds
Hat (worked in seamless rounds)
Round 1: With Color A, 6 sc st in MC, place a stitch marker in the 1st sc made. Do not join with sl st to 1st st after last sc st. (6) Note: leave a long tail from MC as this will be used for the hanging loop.
Note: Continue moving up your stitch marker to the 1st st of each round.
Round 2: 1 sc in each st around. (6)
Round 3: 2 sc in 1st st, sc in remaining st. (7)
Round 4 – 16: repeat round 3. (st count = 20 at the end of round 16)
Fasten off Color A.
Round 17: With Color B, TURN, (now working on the WS of hat), ch 3, dc in same st, sl st in next st, *bobble in next st, sl st in next st* repeat between * * to end, sl st to base of 1st st from beginning of round.
Fasten off. Weave in ends.
Knot yarn before pushing needle down through top of hat
To make the loop for hanging, with long tail left from MC, tie a simple sewing knot by inserting needle in crochet fabric to create a loop of yarn, then inserting needle through loop of yarn and pulling tight. This will prevent MC from coming loose. Push needle down into top of hat, leaving a loop large enough for hanging, knot off again inside hat and weave in end.
Knot yarn before pushing needle into top of hat to create loop for hanging
Nose (worked in seamless rounds)
Round 1: With Color C, 3 sc st in MC, place a stitch marker in the 1st sc made. Do not join with sl st to 1st st after last sc st. (3)
Note: Continue moving up your stitch marker to the 1st st of each round.
Round 2: 2 sc in each st. (6)
Round 3: sc2tog 3 times. Join with sl st to first st. (3). Fasten off. Pull yarn through last st, sew yarn end through front loop of each of the 3 st, pull tight to close the circle.
Cut faux fur material to size desired for beard approx 2 1/4” wide at top x 2 1/2” long to tip. Taper cut slightly going towards bottom of beard. With embroidery thread, sew top of beard to bottom edge of the inside of hat. OR use super glue to attach to hat.
Sew or glue beard to inside bottom edge of hat
With a long length of Color A, sew nose to inside bottom edge of hat in the middle OR use a small dab of super glue to glue to bottom edge of hat on top of beard.
Sew or glue snowflake button embellishment to hat, if desired.
If you would like the hat to be more filled out, add a small amount of scrap yarn or poly fill to stuff and then sew or glue closed to secure.

