Legend:
KA – amigurumi ring sbn
– single crochet
pr – increase (knit 2 columns in one loop)
ub – decrease (two columns together)
VP – air loop
Head
1 – 6 sbn in KA
2 – 6 pr.sbn (12)
3 – (1 sbn, pr) * 6 (18)
4 – (2 sbn, pr) * 6 (24)
5 – (3 sbn, pr) * 6 (30)
6 – 30 sbn
7 – (4 sbn, pr) * 6 (36)
8-9 – 36 sbn
10 – (5 sbn, pr) * 6 (42)
11 – 42 sbn
12 – (6 sbn , pr) * 6 (48)
13-16 – 48 sc
17 – (2 sc, dec) * 12 (36)
18 – (dec, 1 sc) * 12 (24)
19 – 24 sc
20 – (1 sc, ub) * 12 (18)
21 – 18 sbn, finish, leave the thread for sewing.
Upper paws (2 parts)
Cast on a chain of 4 VP, from the second loop from hook
1 – (pr, 1 sbn) * 2, pr (8), then knit in a spiral
2-12 – 8 sbn, fasten and cut the thread.
Lower paws (2 parts)
Cast on a chain of 5 VP, from the second loop
1 – pr, 3 sbn, 3 sbn in the extreme loop, 2 sbn (9), then we knit in a spiral to the length of paws you need 15-17 rows of 9 sbn …
Cut the thread on the 1st leg and fasten it, continue knitting the body with the thread of the second leg.
With a chain of 6 VP, we connect both legs and then we knit 9 SBN along the second leg, 6 SBN along the chain VP, 9 SBN along the first leg, 3 SBN along the chain (30).
We put a marker (it should be in the center of the back all the time) and continue to knit the body :
1 – 30 sb, you can insert a frame and fill your legs, do not fill your foot
2 – 12 sb, 6 pr sb, 12 sb (36)
3-9 – 36 sbn
10- (4 sbn, ub) * 6 (30)
11-15 – 30 sbn
16 – 9 sbn, 6 ub, 9 sbn (24), in the next row we attach the upper paws
17 – 6 sbn on the back, 8 sbn on the arm, 12 sc on the chest, 8 sc on the 2nd hand, 6 sc on the back (40)
18 – 5 sc, dec, 6 sc, dec, 10 sc, dec, 6 sc, dec, 5 sc (36)
Insert the frame into hands, we do not fill our hands very much. Do not forget to stuff the body while knitting.
19 – (4 sc, dec) * 6 (30)
20 – (3 sc, dec) * 6 (24)
21 – 24 sc
22 – (2 sc, dec) * 6 (18)
23 – 18 sb, finish, fasten the thread.
Ears (2 parts)
1 – 6 sc in KA
2 – 6 increments (12)
3 – (1 sc, pr) * 6 (18)
4 – (2 sc, at) * 6 (24)
5 – (3 sc, pr) * 6 (30)
6 – (4 sbn, pr, * 6 (36)
7 – 36 sbn, finish, leave the thread for sewing.
The tail can be tied and sewn, or you can wrap the wire with yarn.
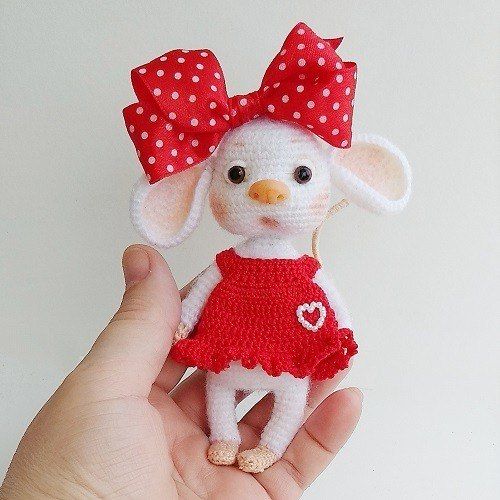
Assembly and design
I make the eye shaping between 9 and 10 rows of the head at a distance of about 6-8 loops, the mouth between 15-17 rows. You can do as you wish.
I sew the ears in the region of the 6-7th row of the head, you see for yourself where you want, where you like best.
You can start the legs with yarn of a different color, again at your request, and change it to the main color, when you see fit, the tail too. I don’t describe the clothes either, everyone is free to wear them according to their taste and color.
Maybe someone does not want to make a frame, in this case, we simply reduce the number of rows of lower legs by the size of the foot, this is somewhere in rows 5-6, and we stuff the legs and the whole mouse harder.

