MATERIALS FOR SLOTH CROCHET PATTERN (RECOMMENDATIONS IN PARENTHESES)
- Lightweight yarn (light worsted, DK, 8-ply) in 5 colors (Ricorumi Cotton DK or Patons Grace Yarn)
- Body color – Ricorumi Cotton DK in Spray Beige (#208)
- Face color – Ricorumi Cotton DK in Cream (#002)
- Eye color – Ricorumi Cotton DK in Caramel (#053)
- Main hat color – Ricorumi Cotton DK in Rose (#008)
- Accent hat color & scarf – Ricorumi Cotton DK in Blue (#032)
- 2.25 mm (B) hook (Clover Amour)
- Toy stuffing (Fairfield Poly-Fil)
- Embroidery floss in black for face (DMC Embroidery Floss in black)
- Embroidery needle ((DMC Embroidery Needles)
- Tapestry needle (DMC Tapestry Needle Size 16)
- Stitch marker (Clover Quick-Locking Stitch Markers Small – I LOVE these, they don’t leave big holes in your work!)
- Scissors (Gingher Stork Scissors)
- Heavy-duty upholstery thread or strong sewing thread for making pompom (Dual Duty XP Heavy Thread)
- Sewing pins to pin pieces in place before attaching (Pearlized Sewing Pins)
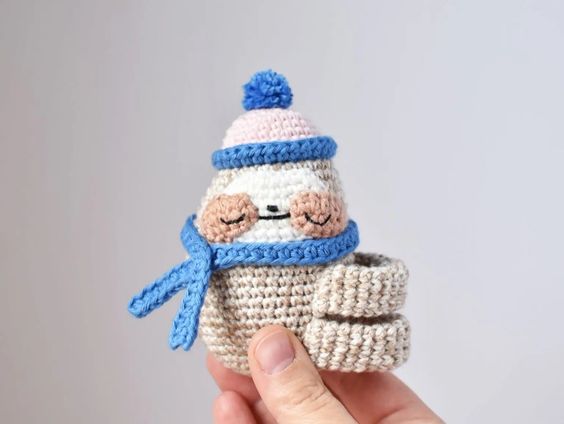
My finished crochet sloth is 4 inches long when using a 2.25 mm hook and Ricorumi Cotton DK yarn. You can use other hook and yarn combinations to make your crochet sloth bigger or smaller. Just make sure your stitches are tight to avoid stuffing showing through.
CROCHET STITCHES & ABBREVIATIONS
US TERMINOLOGY
ch – chain
FLO – front loop only
hdc – half double crochet
hdc inc – half double crochet increase
inc – single crochet increase
magic ring – see tutorial here.
rnd(s) – round(s)
sc – single crochet
sl st – slip stitch
st(s) – stitch(es)
[ ] – repeat steps between brackets for the specified number of times
( ) – the number of stitches you should have at the end of each round
NOTES
– Worked in a continuous round.
– Mark the beginning of each round with a stitch marker.
– Demonstration photos are shown right-handed.
– Pin pieces in place before attaching to avoid having to fix the position later!
– If you’re not familiar with crocheting in the back bump of chain stitches, check out this blog post.
Hang your sloth crochet Christmas ornament on your your tree through the arm and leg loops!
SLOTH CROCHET PATTERN
HEAD & BODY
rnd 1: with body color, sc 6 into a magic ring (6 sts)
rnd 2: inc 6 (12 sts)
rnd 3: [sc 1, inc 1] 6 times (18 sts)
rnd 4: [sc 1, inc 1, sc 1] 6 times (24 sts)
rnd 5: sc around (24 sts)
rnd 6: [sc 3, inc 1] 6 times (30 sts)
rnd 7: sc around (30 sts)
rnd 8: [inc 1, sc 1] 3 times, sc in remaining sts (33 sts)
rnd 9: sc around (33 sts)
rnd 10: [sc 1, inc 1, sc 1] 3 times, sc in remaining sts (36 sts)
rnds 11-12 (2 rnds): sc around (36 sts)
rnd 13: [sc 2, inc 1] 3 times, sc in remaining sts (39 sts)
rnds 14-24 (11 rnds): sc around (39 sts)
rnd 25: sc 1, [sc 2, inv dec 1] 3 times, sc in remaining sts (36 sts)
rnd 26: [sc 4, inv dec 1] 6 times (30 sts)
• • • Start stuffing now and continue stuffing until closed. Massage your piece into an oval shape with the increases from rnds 8, 10, and 13 to the left side. • • •
rnd 27: [sc 3, inv dec 1] 6 times (24 sts)
rnd 28: [sc 2, inv dec 1] 6 times (18 sts)
rnd 29: [sc 1, inv dec 1] 6 times (12 sts)
rnd 30: inv dec 6 times (6 sts)
Sl st 1 into next st, fasten off and finish off.
SLOTH SHAPE
Massage your sloth into an oval shape like the photos below.
FACE
• • • Work into back bump of chain stitches and then, when you turn to work down other side of chain, work into front and back loop of chain stitches. • • •
rnd 1: with face color, ch 6, starting in 2nd ch from hook sc 4, sc 3 in next ch, turn to work down other side of chain, sc 3, inc 1 (12 sts)
rnd 2: [inc 1, sc 3, inc 2] 2 times (18 sts)
rnd 3: [sc 1, inc 1, sc 4, inc 1, sc 1, inc 1] 2 times (24 sts)
Sl st 1 in next st. Fasten off, leaving a 20-inch tail for attaching.
EYE (MAKE 2)
• • • Work into back bump of chain stitches and then, when you turn to work down other side of chain, work into front and back loop of chain stitches. • • •
rnd 1: with eye color, ch 5, starting in 2nd ch from hook hdc inc 1, hdc 2, hdc 4 in next ch, turn to work down other side of ch, hdc 2, hdc inc 1 (12 sts)
Sl st 1 in next st. Fasten off, leaving a 15-inch tail for attaching.
EMBROIDER & ATTACH FACE & EYES
1. Using only 4 strands, cut a 10-inch piece of embroidery floss. Thread your embroidery needle and double knot end. Starting with the nose, make 3 horizontal stitches at center about 1 stitch wide. Make each stitch close to the previous one so they look connected. Embroider a long horizontal stitch on the rnd below nose for mouth. Secure thread on the back of your piece and cut.
2. Rethread your embroidery needle and double knot end. To embroider the eye, start at the inner corner and make 4 back stitches in a soft U shape. Secure thread on the back of your piece and cut. Repeat step 3 for 2nd eye.
3. Using a sewing pin, pin face at the center of body over rnds 8-13.
4. Thread tapestry needle with yarn tail and attach face to body, first going under a st of the body.
5. Insert needle into next st on face from back to front
6. Insert needle back into the same hole you previously came out of on body and up through next one following around the face until it’s fully attached. Weave in end.
7. Using sewing pins, pin eyes centered with the face with 4 sts between them.
8. Attach eyes using the same method for attaching as the face.
ARM & LEG LOOP (MAKE 2)
rnd 1: with body color,start with an 8-inch tail for attaching, ch 5, starting in 2nd ch from hook, sc 3, sc 3 in next ch, turn to work down other side of ch, sc 3 (9 sts)
rnds 2-19 (18 rnds): sc around (9 sts)
Fasten off, leaving a 10-inch tail for attaching.
ATTACH ARM & LEG LOOPS
1. Using sewing pins, pin arm and leg loops in position. I attached my arm loop over rnds 17-20 and my leg loop is attached over rnds 22-25 with 11 sts between loop ends.
2. Make sure to pin both sides of arm loop on the correct rnds.
3. I started with the leg loop. Insert tapestry needle threaded with yarn tail under stitch of sloth.
4. Fold leg piece in half and insert needle through both the front and back stitches.
5. Repeat steps 3 and 4 until you reach the end of the loop (should be attached over 4 rnds of sloth body).
6. Repeat steps 3-5 for arm loop, then move to the other side of arm and leg loops and attach.
HAT
rnd 1: with main hat color, sc 6 into a magic ring (6 sts)
rnd 2: inc 6 (12 sts)
rnd 3: [sc 1, inc 1] 6 times (18 sts)
rnd 4: [sc 1, inc 1, sc 1] 6 times (24 sts)
rnd 5: [sc 3, inc 1] 6 times (30 sts)
rnds 6-7: sc around (30 sts for 2 rnds)
rnd 8: change to accent hat color sc around (30 sts)
rnd 9: in FLO, hdc around (30 sts)
Sl st 1 in next st, fasten off leaving a 20-inch tail for attaching.
ASSEMBLE & ATTACH HAT
1. Make a tiny pompom using the video tutorial above.
2. Using your tapestry needle, bring ends of the pompom through the top of the hat.
3. Flip rnd 9 of hat up to form brim. With tapestry needle, bring ending yarn tail to base of brim for attaching. Stuff other ends inside hat.
4. Position the hat on the sloth’s head over rnd 6.
5. At back of sloth, insert needle under st of rnd 6.
6. Insert needle through st on hat.
7. Insert needle into same st your needle came out of and up through next st. Repeat steps 6-7 until you’ve fully attached the hat. Weave in end.
SCARF
row 1: ch 56, hdc 55 starting in 2nd ch from hook and working in the back bump of the ch sts (55 sts)
Fasten off and weave in beginning yarn tail.
ATTACHING SCARF
1. Wrap scarf around sloth, under face. Use a sewing pin to pin scarf in place.
2. Bring ending yarn tail to the point where scarf overlaps.
3. Sew point together with several stitches. Once secure, weave in yarn tail.
4. The final scarf look!

