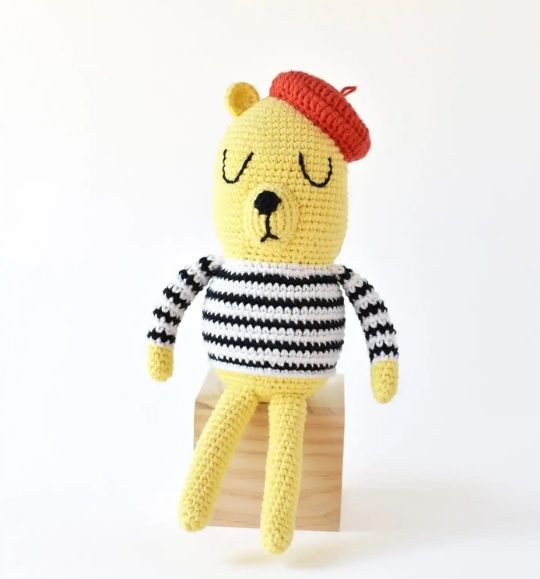
MATERIALS (RECOMMENDATIONS IN PARENTHESES)
• Medium weight yarn (worsted or aran) in 4 colors
• Color A – Body color – 40 yards (Paintbox Yarns Cotton Aran Daffodil Yellow)
• Color B – Main shirt color – 28 yards (Paintbox Yarns Cotton Aran Paper White)
• Color C – Contrast color and nose – 24 yards (Paintbox Yarns Cotton Aran Pure Black)
• Color D – Beret color – 11 yards (Paintbox Yarns Cotton Aran Tomato Red)
• 2.75 mm (C) hook (Clover Amour)
• Toy stuffing (Fairfield Poly-Fil)
• Stitch marker (Clover Quick Locking Stitch Markers Small – I LOVE these, they don’t leave big holes in your work!)
• Embroidery needle (DMC Embroidery Needle)
• Tapestry needle (DMC Tapestry Needle Size 16)
• Scissors (Gingher Stork Scissors)
• Sewing pins
GAUGE
To achieve an 11 inch tall Monsieur Bear, this is the gauge: 12 single crochet stitches x 13 rows = 2×2 inches. Gauge is not as important as keeping a consistent tension so stuffing doesn’t show through your bear!
For a smaller bear, simply use DK weight yarn and a 2.25 mm (B) hook! The blue Monsieur Bear above was made with this yarn and hook combo! To learn more about switching up yarn weights for your amigurumi projects.
STITCHES & ABBREVIATIONS
US TERMINOLOGY
ch – chain
mr – magic ring
rnd(s) – round(s)
st(s) – stitch(es)
sl st – slip stitch
sc – single crochet
inc – increase
inv dec – invisible decrease
dc – half double crochet
dc inc – half double crochet increase
FLO – front loop only
BLO – back loop only
rm – remove marker
pm – place marker
[ ] – repeat steps between brackets for the specified number of times
( ) – the number of stitches you should have at the end of each round
SPECIAL TECHNIQUES
• Magic Ring
• Invisible Decrease
• Finish off
• Standing sc – Make a slipknot on your hook, insert hook into specified stitch and make a single crochet as normal.
NOTES
• All sections are worked in a continuous round unless otherwise specified.
• Mark the beginning of each round with a stitch marker.
• Demonstration photos are shown right-handed.
• When stuffing legs and arms, use the end of your crochet hook to push the stuffing into it.
• Attach pieces in the order presented in the pattern.
MONSIEUR BEAR PATTERN
MUZZLE (worked around foundation chain)
rnd 1: With color A, ch 5, sc in 2nd ch from hook, sc 2, sc 3 in next st, sc 2, inc (10 sts)
rnd 2: [Inc, sc 2, inc 2] 2 times (16 sts)
rnd 3: [sc 1, inc, sc 3, inc, sc 1, inc] 2 times (22 sts)
rnd 4: Sc around (22 sts)
Sl st into next st, fasten off, leave a 15-inch tail for attaching.
NOSE
rnd 1: With color C, make a mr, sc 8 into mr. Sl st into first st. Leave a 20-inch tail for attaching and mouth. Weave in beginning yarn tail.
– – – ASSEMBLE MUZZLE NOW. – – –HEAD & BODY
rnd 1: With color A, make a mr, sc 6 into mr (6 sts)
rnd 2: [inc 1] 6 times (12 sts)
rnd 3: [sc 1, inc 1] 6 times (18 sts)
rnd 4: [sc 2, inc 1] 6 times (24 sts)
rnd 5: [sc 3, inc 1] 6 times (30 sts)
rnd 6: Sc around (30 sts)
rnd 7: [sc 4, inc 1] 6 times (36 sts)
rnd 8: [sc 5, inc 1] 6 times (42 sts)
rnd 9: [sc 6, inc 1] 6 times (48 sts)
rnd 10: Sc around (48 sts)
rnd 11: [sc 7, inc] 6 times (54 sts)
rnds 12-24: Sc around (54 sts for 13 rnds)
rnd 25: [sc 7, inv dec] 6 times (48 sts)
rnd 26: Sc around (48 sts)
rnd 27: [sc 6, inv dec] 6 times (42 sts)
rnd 28: [sc 5, inv dec] 6 times (36 sts)
– – – IN THE FOLLOWING RNDS, YOU’LL START CHANGING COLOR. COUNT EACH SL ST AS A NORMAL ST, MAKING SURE TO SC INTO EACH SL ST. – – –
BODY CONT.
rnd 29: Sc 1, change to color B, sl st, sc 3, inc [sc 5, inc] 5 times (42 sts) Cut color A and weave in end.
rnd 30: [sc 6, inc] 6 times (48 sts)
– – – ATTACH MUZZLE AND EMBROIDER EYES NOW. – – –
rnd 31: Sc 2, change to color C, sl st, inc, [sc 7, inc] 5 times, sc 4 (54 sts) Don’t cut color B or C, you’ll be carrying them up on the inside.
rnd 32: Sc 3, change to color B, sl st, sc around (54 sts)
rnd 33: Sc around (54 sts)
rnd 34: Sc 3, change to color C, sl st, sc around (54 sts)
rnd 35: Sc 4, change to color B, sl st, sc around (54 sts)
rnd 36: Sc around (54 sts)
rnd 37: Sc 4, change to color C, sl st, sc around (54 sts)
rnd 38: Sc 5, change to color B, sl st, sc around (54 sts)
rnd 39: Sc around (54 sts)
rnd 40: Sc 5, change to color C, sl st, sc around (54 sts)
rnd 41: Sc 6, change to color B, sl st, sc around (54 sts)
rnd 42: Sc around (54 sts)
rnd 43: Sc 6, change to color C, sl st, inv dec, [sc 7, inv dec] 5 times (48 sts)
– – – THE FOLLOWING RNDS USE FLO, BLO, AND STANDING SC. – – –
rnd 44: Sc 7, change to color B, in FLO, sl st 1, sc around (48 sts) Cut color C.
rnd 45: In FLO, sc 7, sl st 1. With color A in BLO of rnd 43, make a standing sc, continuing in BLO, sc around (48 sts) Cut color B and weave in ends.
rnd 46: Rm, in BLO of rnd 45, sc 7. In both loops, sc 1, pm, sc around (48 sts)
rnd 47: [sc 6, inv dec] 6 times (42 sts)
rnd 48: Sc around (42 sts) rnd 49: [sc 5, inv dec] 6 times (36 sts)
rnd 50: [sc 4, inv dec] 6 times (30 sts)
– – – STUFF BODY FIRMLY AND CONTINUE STUFFING UNTIL CLOSED. – – –
rnd 51: [sc 3, inv dec] 6 times (24 sts)
rnd 52: [sc 2, inv dec] 6 times (18 sts)
rnd 53: [sc 1, inv dec] 6 times (12 sts)
rnd 54: [inv dec] 6 times (6 sts)
Fasten off, leaving a 12-inch tail. Finish off and weave in ends.
ARM (Make 2)
rnd 1: With color A, make a mr, sc 8 into mr (8 sts)
rnd 2: [sc 3, inc] 2 times (10 sts)
rnds 3-5: Sc around, change to color B in last sc of rnd 5 (10 sts for 3 rnds)
– – – IN THE FOLLOWING ROUNDS, COUNT EACH SL ST AS A NORMAL ST, MAKING SURE TO SC IN EACH SL ST. – – –
rnd 6: Sl st, sc 9 (10 sts) Cut color A, double knot color A and B ends inside arm to stuff.
rnd 7: Sc 1, change to color C, sl st, sc 8 (10 sts) Don’t cut color B or C – carry through the inside. Double knot color C yarn end inside arm.
rnd 8: Sc 2, change to color B, sl st, sc 7 (10 sts)
rnd 9: Sc around (10 sts)
rnd 10: Sc 2, change to color C, sl st, sc 7 (10 sts)
rnd 11: Sc 3, change to color B, sl st, sc 6 (10 sts)
rnd 12: Sc around (10 sts)
rnd 13: Sc 3, change to color C, sl st, sc 6 (10 sts)
rnd 14: Sc 4, change to color B, sl st, sc 5 (10 sts)
rnd 15: Sc around (10 sts)
rnd 16: Sc 4, change to color C, sl st, sc 5 (10 sts)
rnd 17: Sc 5, change to color B, sl st, sc 4 (10 sts)
rnd 18: Sc around (10 sts)
rnd 19: Sc 5, change to color C, sl st, sc 4 (10 sts)
rnd 20: Sc 6, change to color B, sl st, sc 3 (10 sts)
rnd 21: Sc 9, sl st into last st of round (10 sts)
Fasten off, leave a 15-inch tail for attaching. Lightly stuff to allow bending.
LEG (Make 2)
rnd 1: With color A, make a mr, sc 8 into mr (8 sts)
rnd 2: [sc 3, inc] 2 times (10 sts)
rnd 3: [sc 4, inc] 2 times (12 sts)
rnds 4-23: Sc around (12 sts for 20 rnds)
Fasten off, leave a 15-inch tail for attaching. Weave in beginning yarn tail. Lightly stuff to allow bending.
EAR (Make 1 or 2, you’ll be covering 1 side with beret)
rnd 1: With color A, make a mr, sc 7 into mr, sl st into first st of rnd (7 sts)
rnd 2: Ch 1 (count as st), turn work, hdc into same st, [hdc 1, hdc inc] 2 times, hdc 2, sl st into last st (10 sts)
Fasten off, leave a 12-inch tail for attaching. Weave in beginning yarn tail.
BERET (joined rnds, not continuous spiral)
rnd 1: With color D, start with a mr, leaving an 8-inch tail on the outside for beret’s loop. Ch 3 (count as st), dc 10 (11 sts)
rnd 2: Sl st into ch of last round, ch 3 (count as st), dc in same st, [dc inc] 10 times (22 sts)
rnd 3: Sl st into ch of last round, ch 3 (count as st), dc inc, [dc 1, dc inc] 10 times (33 sts)
rnd 4: Sl st into ch of last round, ch 3 (count as st), dc 1, dc inc, [dc 2, dc inc] 10 times (44 sts)
rnd 5: Sl st into ch of last round, ch 3 (count as st), dc around (44 sts)
rnd 6: Sl st into ch of last round, ch 1 (count as st), sc 1, inv dec, [sc 2, inv dec] 10 times (33 sts)
Fasten off, leave a 30-inch tail for attaching. Make a loop with yarn tail at top of beret. Weave in a stitch inside hat and double knot to secure.
ASSEMBLING THE MUZZLE
You’ll be attaching the nose to the muzzle and then using the excess yarn tail to embroider the mouth.
1. Position nose under 3rd rnd with knot towards the bottom.
2. Insert needle in center of muzzle.
3. Working counter-clockwise, bring needle up through next st of muzzle and nose
4. Insert needle into muzzle through same hole you came up. Repeat steps 3 & 4 until you’ve gone around nose.
5. Bring needle up through center of muzzle.
6. Bring yarn down center of muzzle and insert into hole after rnd 1.
7. Bring needle up through hole to left and under rnd 3
8. Bring needle and yarn through center line.
9. Insert needle under 2nd rnd to the right of center. Double knot in back to secure.
ATTACHING THE MUZZLE
1. Tuck the knot in by bringing needle up through st to right.
2. Center muzzle on face on opposite side of color changes, between rnds 17 & 27.
3. After positioning muzzle, insert needle through hole on face between rnds 26 and 27.
4. Working counter-clockwise, bring needle up through st above.
5. Bring needle up through next st of muzzle.
6. Insert needle back into same hole you came up through in step 4. Repeat steps 4-6 until you’ve attached most of muzzle.
7. Stuff muzzle when you’ve gone most of the way around. Continue repeating steps 4-6 until you’ve attached muzzle.
8. Once you’ve made it around the muzzle, insert needle into 1st st attached.
9. Weave yarn through a stitch inside of head and double knot to secure.
EMBROIDERING THE EYES
We’ll be embroidering U’s onto Monsieur Bear’s face for eyes! Use the image below for placement reference. I’ve chosen to freehand my eyes, but you can use a water soluble (removable) marker to draw your eyes on before embroidering if you’d like. My bear’s eyes go from rnd 13 to below rnd 17.
The key to face embroidery on crochet is to make sure to insert your needle into a stitch and not in a hole between stitches so your thread remains secure. It is also much easier to embroider on crochet before you’ve finished and stuffed your piece. To begin, cut a 30-inch piece of black yarn, thread your embroidery needle, and double knot end.
1. Starting from inside of head, bring needle up through st at 13th rnd.
2. Insert needle into stitch below.
3. Bring needle up through st.
4. Insert needle into the bottom of previous st
5. Repeat steps 3 and 4 until you complete your eye.
6. Mirror steps 1-5 for the second eye. Secure thread by weaving through a st on inside of head and double knotting.
CHANGING COLOR
The pattern will read something like sc 4, change color. You will be changing color in the last sc (so the 4th sc in this example). Follow steps 1-3 below to change color. After each color change, the next st will be a sl st to reduce jagged colors. Treat each sl st like a normal st and sc into it in the following rnd
1. Make a sc as normal until you get to the last yarn over
2. Complete the last yarn over with your new color.
3. Pull through both loops on hook.
4. Follow each color change with a sl st in the next st with new color. Tie loose yarn ends inside body or weave in
FLO, BLO, AND STANDING SC
Use the below as a reference for rnds 44-46. Crocheting in the FLO and BLO gives a great texture to the bottom of your amigurumi bear’s shirt.
1. Identify front loop of your sts. (It’s easier to see on the white!)
2. Insert hook into the front loop only. Finish your sc as normal and complete rnd 44.

3. Identify the back loop of rnd 43 by folding rnd 44 towards you.
4. Standing sc join – make a slip knot on your hook with color A.
5. Insert your hook into back loop of rnd 43. Complete sc.
6. Sc normally around in BLO until you get back to 1st sc of round.
7. Insert hook into first st of rnd.
8. Make a sc and put stitch marker in this st. This will mark the start of the following rnds.
ATTACHING THE ARMS
On the image below, the red dots show where you’ll be attaching your arm to the body starting with the left side. Attach your arm between rounds 29 and 30
1. Pinch arm with color changes toward you.
2. Insert needle into next st to hide knot and begin sewing arm closed
3. Insert needle through top and bottom stitches.
4. Make sure the yarn is coming over the arm opening and not to the side of it.
5. Repeat step 3 four more times until the arm opening is sewn shut.
6. Make sure color changes are on inside of bear’s arm, insert your needle through bottom of stitch under rnd 29.
7. Insert needle into bottom of arm (through both sides of arm).
8. Insert needle into same hole that needle came out of in step 6 and out through hole to left.
9. Repeat steps 7 & 8 until you reach end of arm. After last stitch, insert needle through same hole yarn came out.
10. To secure, bring needle out through body, weave through a few stitches and bring through body again. Cut yarn close to body.
ATTACHING THE LEGS
We’ll be attaching the legs between rnds 48 and 51. Place a sewing pin in the center of your bear at round 50. You will be connecting the legs to either side of the sewing pin. The legs will be slightly pinched to allow better bending. I’ve shown how to connect leg 2 below.
1. Insert needle through next st to hide knot
2. Insert needle under rnd 50.
3. Insert needle in next st of leg from inside to outside.
4. Going into same hole yarn came out of in step 2, insert needle under rnd 49.
5. Insert needle in next st from inside to outside.
6. Insert needle in same hole yarn came out of and bring it out one to the left. Repeat steps 5 and 6 four more times.
7. Insert needle in next st of leg from inside to outside.
8. Insert needle under rnd 49.
9. Insert needle in next st of leg from inside to outside.
10. Insert needle under rnd 50.
11. Insert needle in next st of leg from inside to outside.
12. Insert needle in same hole yarn came out of and bring it out one to the left. Repeat steps 11 and 12 four more times.
13. Insert needle into top of 1st st attached
14. Bring needle out through another part of body
15. Weave yarn through a few stitches. Repeat step 14 and cut close to the body to secure.
ATTACHING THE EARS
We’ll be attaching the ears to the top of the bear’s head. You’ll be covering the right ear with the beret, so if you want to omit the 2nd ear, you can! But… I say do it! Your amigurumi bear won’t be complete without both ears!
1. Insert needle through next st to hide knot.
2. Insert needle from front to back between rnds 4 and 5
3. Insert needle in hole on bottom of ear from back to front.
4. Insert needle through stitch between rnds 5 and 6.
5. Repeat steps 3 and 4 (moving to a space between the next 2 rnds) until you’ve attached ear to 4 sts.
6. Bring needle up through head, weave through a few stitches, bring needle up through head again and cut.
ATTACHING THE BERET
You’ll be attaching the beret over the amigurumi bear’s right ear.
1. Thread needle with yarn tail. Insert from inside of beret to outside in next st to hide knot.
2. Position beret over right ear where you’d like it to go. Work clockwise around the hat.
3. Insert needle into holes between stitches like shown.
4. Insert needle in next st from inside to outside of beret.
5. Insert needle into same st you came out of in step 3 and out next st to the left. Repeat steps 4 and 5 until you’ve worked around hat. To secure, bring needle through head, weave through a few sts, bring needle through head again and cut yarn close to head.

