SKILL LEVEL: Intermediate
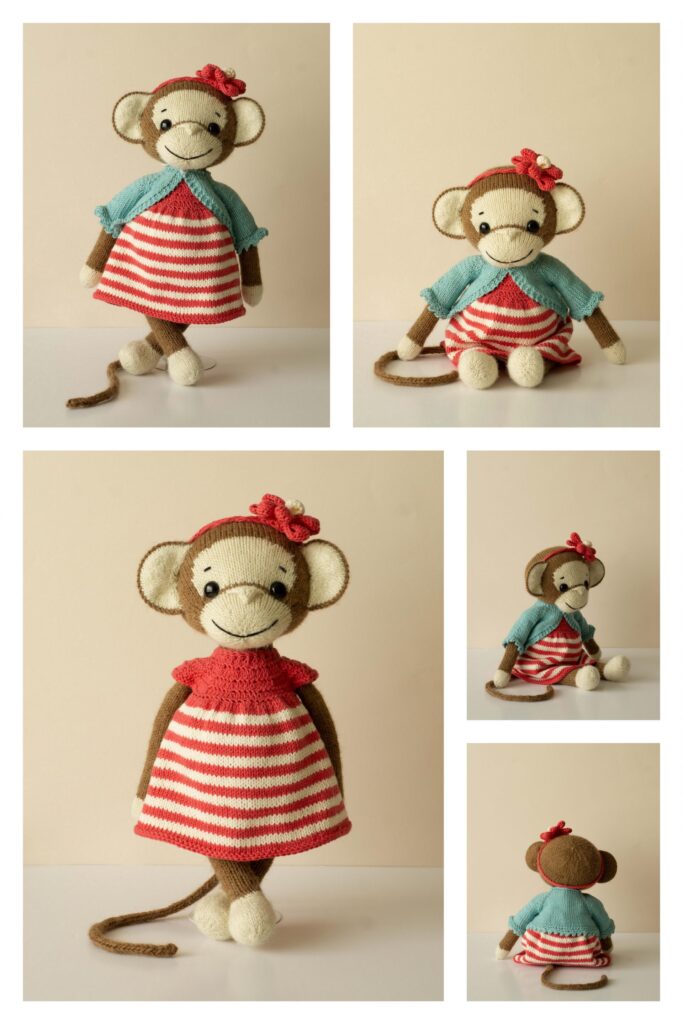
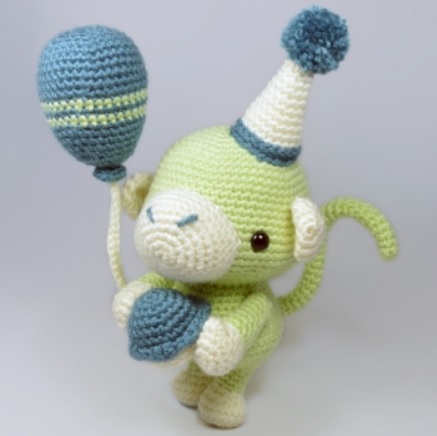
FINISHED SIZE: 9” Tall (with hat)
MATERIALS NEEDED
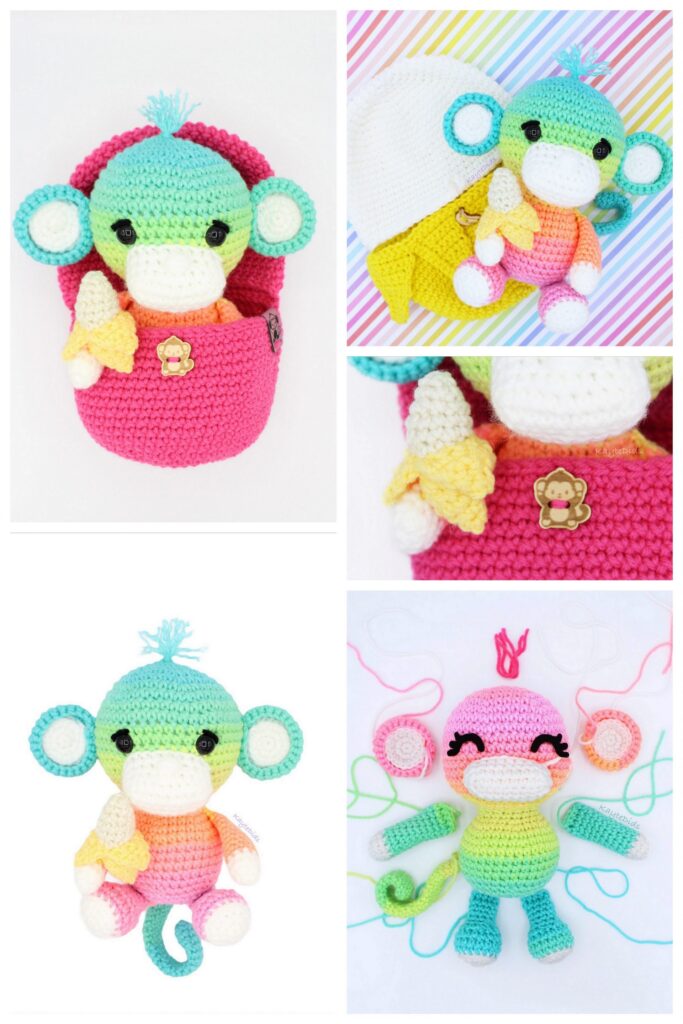
• Worsted weight yarn: light green,
cream, teal
• Stuffing
• 10mm safety eyes
• E/4-3.5mm crochet hook
• Yarn needle
• Scissors
• Chenille stem or wire
• Fork
ABBREVIATIONS-US Terms
• Chain – ch
• Slip stitch – slst
• Single crochet – sc
• Double crochet – dc
• Increase – inc
• Decrease – dec
• 4-dc-bobble – BOB
• Back Loops Only – BLO
• Front Loops Only – FLO
• Stitch – st
HEAD (with light green yarn)
Rnd 1: start 6 sc in magic ring [6]
Rnd 2: inc 6 times [12]
Rnd 3: (sc, inc) repeat 6 times [18]
Rnd 4: (sc in next 2 st, inc) repeat 6 times [24]
Rnd 5: (sc in next 3 st, inc) repeat 6 times [30]
Rnd 6: (sc in next 4 st, inc) repeat 6 times [36]
Rnd 7: (sc in next 5 st, inc) repeat 6 times [42]
Rnd 8: (sc in next 6 st, inc) repeat 6 times [48]
Rnd 9: (sc in next 7 st, inc) repeat 6 times [54]
Rnd 10-13: sc in all 54 st [54]
Rnd 14: (sc in next 17 st, inc) repeat 3 times [57]
Rnd 15: sc in all 57 st [57]
Rnd 16: (sc in next 18 st, inc) repeat 3 times [60]
Rnd 17: sc in all 60 st [60]
Rnd 18: (sc in next 9 st, inc) repeat 6 times [66]
Rnd 19-21: sc in all 66 st [66]
Rnd 22: (sc in next 9 st, dec) repeat 6 times [60]
Rnd 23: (sc in next 8 st, dec) repeat 6 times [54]
Rnd 24: (sc in next 7 st, dec) repeat 6 times [48]
Rnd 25: (sc in next 6 st, dec) repeat 6 times [42]
Rnd 26: (sc in next 5 st, dec) repeat 6 times [36]
Rnd 27: (sc in next 4 st, dec) repeat 6 times [30]
Insert eyes in-between rnds 18-19, 19 st apart. Start stuffing.
Rnd 28: (sc in next 3 st, dec) repeat 6 times [24]
Rnd 29: (sc in next 2 st, dec) repeat 6 times [18]
Finish stuffing.
Rnd 30: (sc, dec) repeat 6 times [12]
Rnd 31: dec 6 times [6]
Fasten off and weave in yarn ends.
SNOUT (with cream yarn)
Rnd 1: start 6 sc in magic ring [6]
Rnd 2: inc 6 times [12]
Rnd 3: (sc, inc in next 3 st, sc in next 2 st) repeat 2 times [18]
Rnd 4: (sc in next 2 sc, inc, sc, inc, sc, inc, sc in next 2 st) repeat 2 times [24]
Rnd 5: (sc in next 3 st, inc, sc 2, inc, sc 2, inc, sc 2) repeat 2 times [30]
Rnd 6: (sc in next 6 st, inc, sc 2, inc, sc 5) repeat 2 times [34]
Rnd 7-8: sc in all 34 st [34]
Rnd 9: sc in next 15 st, dec 2 times, sc in last 15 st [32]
Slst & fasten off, leaving a long tail for sewing. Stuff and attach to face between the eyes. With teal yarn, embroider two diagonal lines to create the nostrils.
EARS (make TWO with cream yarn)
Rnd 1: start 6 sc in magic ring [6]
Rnd 2: inc 6 times [12]
Rnd 3: (sc, inc) repeat 6 times [18]
Rnd 4-5: sc in all 18 st [18]
Rnd 6: (sc, dec) repeat 6 times [12]
Rnd 7: (sc in next 4 st, dec) repeat 2 times [10]
Fasten off, leaving a long tail for sewing.
Do not stuff, flatten, and attach to both sides of the head in-between rnds 15-19.
LEGS & BODY
LEFT LEG (starting with cream yarn)
Rnd 1: start 6 sc in magic ring [6]
Rnd 2: inc 6 times [12]
Rnd 3: sc in next 2 st, inc in next 6 st, sc in last 4 st [18]
Rnd 4-5: sc in all 18 st [18]
Rnd 6: sc in next 3 st, dec 6 times, sc in last 3 st [12]
Rnd 7: sc in next 3 st, dec 3 times, sc in last 3 st [9]
Stuff the foot & change to light green yarn
Rnd 8-10: sc in all 9 st [9]
Rnd 11: sc in next 7 st, inc in last 2 st [11]
Mark the last st of rnd 11.
Rnd 12: inc in next st, slst in next st.
Do NOT finish this round. [12]
Fasten off & stuff the leg.
RIGHT LEG (starting with cream yarn)
Rnd 1: start 6 sc in magic ring [6]
Rnd 2: inc 6 times [12]
Rnd 3: sc in next 2 st, inc in next 6 st, sc in last 4 st [18]
Rnd 4-5: sc in all 18 st [18]
Rnd 6: sc in next 3 st, dec 6 times, sc in last 3 st [12]
Rnd 7: sc in next 3 st, dec 3 times, sc in last 3 st [9]
Stuff the foot & change to light green yarn
Rnd 8-10: sc in all 9 st [9]
Rnd 11: inc in next 3 st, sc in last 6 st [12]
Stuff the leg but do NOT fasten off; the next rnd will connect the two legs and start to form to body.
Rnd 12 (of second leg): sc 3, insert hook into marked st of first leg, sc in next 12 st, insert hook back into second leg, sc in last 9 st [24]
Rnd 13: (sc in next 3 st, inc) repeat 6 times [30]
Rnd 14: (sc in next 4 st, inc) repeat 6 times [36]
Rnd 15: (sc in next 5 st, inc) repeat 6 times [42]
Rnd 16: (sc in next 6 st, inc) repeat 6 times [48]
Rnd 17-19: sc in all 48 st [48]
Rnd 20: (sc in next 6 st, dec) repeat 6 times [42]
Rnd 21-22: sc in all 42 st [42]
Rnd 23: (sc in next 5 st, dec) repeat 6 times [36]
Rnd 24: sc in all 36 st [36]
Rnd 25: (sc in next 4 st, dec) repeat 6 times [30]
Sc in next 5 st, slst in next st. Fasten off, leaving a long tail for sewing. Stuff firmly and attach to the bottom of the head, sewing st for st on rnd 27. Also using left over yarn tail, sew the gap between the
legs shut.
ARMS (make TWO starting with
cream yarn)
Rnd 1: start 6 sc in magic ring [6]
Rnd 2: inc 6 times [12]
Rnd 3: (sc, inc) repeat 6 times [18]
Rnd 4: sc in all 18 st [18]
Rnd 5: dec, sc, dec, sc, dec, BOB, dec, sc, dec, sc, dec, sc [12]
Rnd 6: sc in all 12 st [12]
Change to light green yarn
Rnd 7: BLO sc in all 12 st [12]
Rnd 8: (sc in next 2 st, dec, sc in next 2 st) repeat 2 times [10]
Rnd 9-10: sc in all 10 st [10]
Stuff the hands
Rnd 11: (sc in next 2 st, dec, sc in next st) repeat 2 times [8]
Rnd 12-14: sc in all 8 st [8]
Stuff the arms
Rnd 15: (sc in next 2 st, dec) repeat 2 times [6]
Fasten off, leaving a long tail for sewing.
Join the arms on either side of the body, making sure the thumbs stick out towards the front.
Optional: if you want Joke to hold his cupcake, make sure his arms are pointed to the front as if he was giving you a thumbs up.
TAIL (with light green yarn)
Rnd 1: start 6 sc in magic ring [6]
Rnd 2-35: sc in all 6 st [6]
Do not stuff and fasten off, leaving a long tail for sewing. Trim a chenille stem or wire so that it is just longer than the tail. Insert the tip of the chenille stem or wire into the center, back of rnd 18 of
the body. Cover the chenille stem or wire with the tail and attach the tail to the body. Curve & twist the tail to the shape of your liking
CUPCAKE (starting with teal yarn)
Rnd 1: start 6 sc in magic ring [6]
Rnd 2: inc 6 times [12]
Rnd 3: (sc, inc) repeat 6 times [18]
Rnd 4: (sc in next 5 st, inc) repeat 3 times [21]
Rnd 5: (sc in next 6 st, inc) repeat 3 times [24]
Rnd 6: sc in all 24 st [24]
Rnd 7: FLO (sc, dc in next 2 st, sc) repeat 6 times [24]
Fasten off & weave in yarn ends. Now we make the bottom half of the cupcake. With cream yarn, draw up a loop in the last open back loop of rnd 6. Starting in the next open back loop:
Rnd 8: sc in all 24 open back loops [24]
Rnd 9: sc in all 24 st [24]
Rnd 10: (sc in next 6 st, dec) repeat 3 times [21]
Rnd 11: sc in all 21 st [21]
Rnd 12: BLO (sc, dec) repeat 7 times [14]
Stuff the cake
Rnd 13: dec 7 times [7]
Fasten off, leaving a long tail for sewing. Close gap at the bottom of the cake.
Optional: Sew onto each of Joke’s hands to make him hold his cupcake.
HAT (starting with cream yarn)
Rnd 1: start 6 sc in magic ring [6]
Rnd 2: sc in all 6 st [6]
Rnd 3: (sc, inc) repeat 3 times [9]
Rnd 4: sc in all 9 st [9]
Rnd 5: (sc in next 2 st, inc) repeat 3 times [12]
Rnd 6: sc in all 12 st [12]
Rnd 7: (sc in next 3 st, inc) repeat 3 times [15]
Rnd 8: sc in all 15 st [15]
Rnd 9: (sc in next 4 st, inc) repeat 3 times [18]
Rnd 10: sc in all 18 st [18]
Rnd 11: (sc in next 5 st, inc) repeat 3 times [21]
Rnd 12: sc in all 21 st [21]
Change to teal yarn
Rnd 13: loosely slst in all 21 st [21]
Rnd 14: working back into the open st of rnd 13, (sc in next 6 st, inc) repeat 3 times [24]
Fasten off, leaving a long tail for sewing.
POMPOM (with teal yarn)
Wrap a long piece of teal yarn around a fork 35-40 times. Cut the yarn but keep it in place.
Cut a new 10” (25cm) strip of teal yarn and tie it around the middle of the pompom to keep it secure. Take the pompom off the fork and cut all of the loops. Trim around the pompom to create a smooth surface make sure you do not cut the long yarn ends used to keep the pompom together With the
long yarn tails, sew the pompom onto the tip of the hat.
Stuff the hat & attach it to the top of the head, slightly to the monkey’s left.
BALLOON (starting with teal yarn)
Rnd 1: start 6 sc in magic ring [6]
Rnd 2: inc 6 times [12]
Rnd 3: (sc, inc) repeat 6 times [18]
Rnd 4: (sc in next 2 st, inc) repeat 6 times [24]
Rnd 5: (sc in next 3 st, inc) repeat 6 times [30]
Rnd 6: (sc in next 4 st, inc) repeat 6 times [36]
Rnd 7: sc in all 36 st [36]
Rnd 8: (sc in next 11 st, inc) repeat 3 times [39]
Rnd 9-10: sc in all 39 st [39]
Rnd 11: (sc in next 11 st, dec) repeat 3 times [36]
Change to light green yarn
Rnd 12: sc in all 36 st [36]
Change to teal yarn
Rnd 13: (sc in next 10 st, dec) repeat 3 times [33]
Change to light green yarn
Rnd 14: sc in all 33 st [33]
Change to teal yarn
Rnd 15: (sc in next 9 st, dec) repeat 3 times [30]
Rnd 16: sc in all 30 st [30]
Rnd 17: (sc in next 8 st, dec) repeat 3 times [27]
Rnd 18: (sc in next 7 st, dec) repeat 3 times [24]
Rnd 19: (sc in next 6 st, dec) repeat 3 times [21]
Rnd 20: (sc in next 5 st, dec) repeat 3 times [18]
Rnd 21: (sc, dec) repeat 6 times [12]
Stuff the balloon lightly
Rnd 22: dec 6 times [6]
Rnd 23: FLO inc 6 times [12]
Slst in next st & fasten off, leaving a long tail for sewing.
BALLOON STRING (with cream yarn)
Ch 31.
Row 1: starting in second ch from hook, slst in next 30 st [30]
Fasten off and weave in yarn tails.
Stick the string into the neck of the balloon and, using the leftover tail from the balloon, sew the string so that it’s secure.
Congratulations
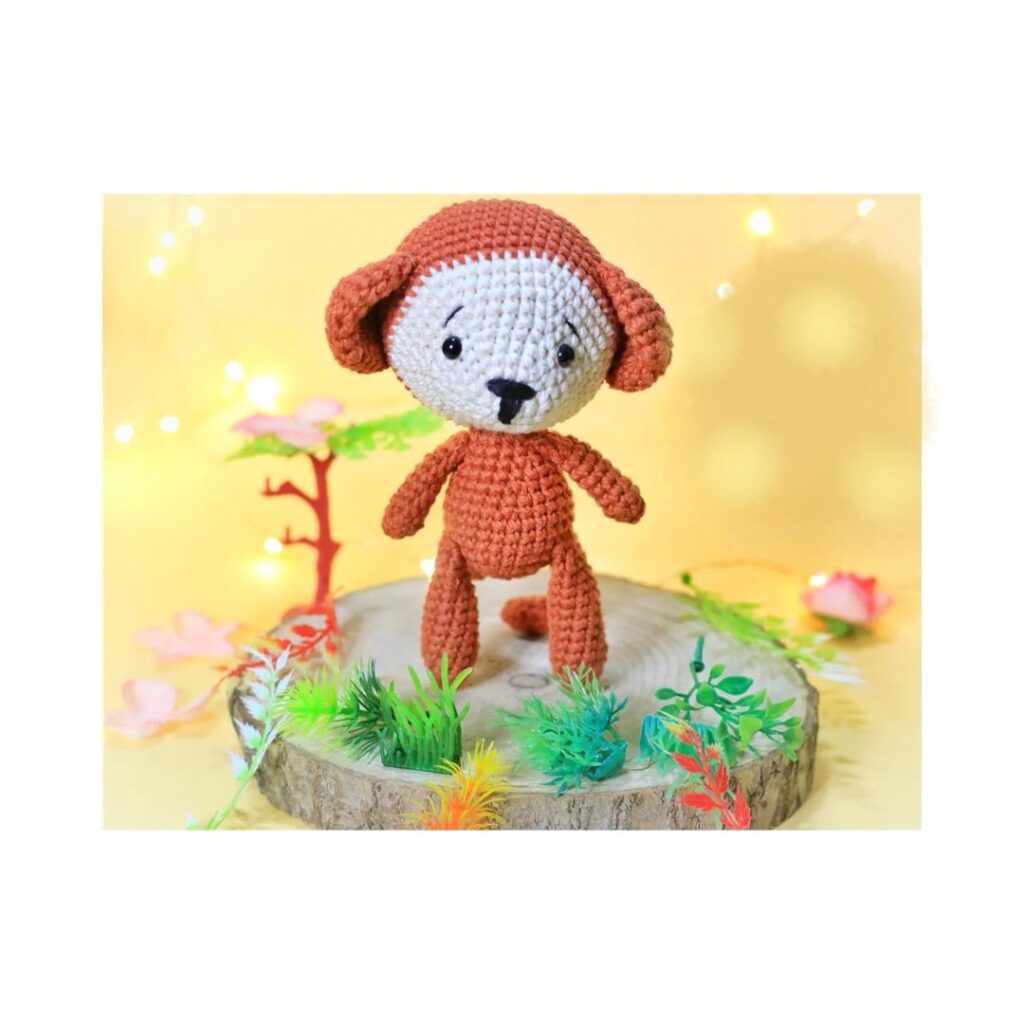
More Amigurumi Monkey Ideas: