Materials:
– F hook (3.75 mm)
– G hook (4.00 mm)
– Worsted-weighted yarn in taupe (about ½ skein Vanna’s Choice) and beige (about ¼ skein Vanna’s Choice)
– polyester filling
– ½” black shank buttons (or 13 mm safety eyes)
– small amounts of felt for beak and bow
– small amount of thread (to attach bow)
– hot glue
– pink acrylic paint
Body:
Using a G hook:
Round 1: 6 sc in magic ring. (6 st)
Round 2: 2 sc in ea st. (12 st)
Round 3: *Sc in next st, 2 sc*, rep 6 times. (18 st)
Round 4: *Sc in next 2 st, 2 sc*, rep 6 times. (24 st)
Round 5: *Sc in next 3 st, 2 sc*, rep 6 times. (30 st)
Round 6: *Sc in next 4 st, 2 sc*, rep 6 times. (36 st)
Round 7: *Sc in next 5 st, 2 sc*, rep 6 times. (42 st)
Round 8: *Sc in next 6 st, 2 sc*, rep 6 times. (48 st)
Rounds 9-20: Sc in ea st around. (48 st)
Round 21: *Sc in next 6 st, sc2tog*, rep 6 times. (42 st)
Round 22: *Sc in next 5 st, sc2tog*, rep 6 times. (36 st)
Round 23: *Sc in next 4 st, sc2tog*, rep 6 times. (30 st)
Round 24: *Sc in next 3 st, sc2tog*, rep 6 times. (24 st)
Round 25: *Sc in next 2 st, sc2tog*, rep 6 times. (18 st)
Round 26: *Sc in next st, sc2tog*, rep 6 times. (12 st)
Round 27: Sc2tog 6 times. (6 st)Fasten off. Leave tail for sewing (~12″).
Wings (make 2):
Using a G hook:
Round 1: 6 sc in magic ring. (6 st)
Round 2: 2 sc in ea st around. (12 st)
Round 3-5: Sc in ea st around. (12 st)
Fasten off. Leave tail for sewing (~10″).
Face:
Switch to F hook:
Row 1: Create a 12 sc foundation row, ch 1, turn. (12 st)
Row 2: Sc in first st, 2 sc in next st, sc in next 8 st, 2 sc in next st, sc in last st, ch 1, turn. (14 st)
Row 3: Sc in first st, 2 sc in next st, sc in next 10 st, 2 sc in next st, sc in last st, ch 1, turn. (16 st)
Row 4: Sc in first st, 2 sc in next st, sc in next 12 st, 2 sc in next st, sc in last st, ch 1, turn. (18 st)
Row 5: Sc in first st, 2 sc in next st, sc in next 14 st, 2 sc in next st, sc in last st, ch 1, turn. (20 st)
Row 6: Sc in ea st across, ch 1, turn. (20 st)
Row 7: Sc in first st, sc2tog, sc in next 14 st, sc2tog, sc in last st, ch 1, turn. (18 st)
Row 8: Sc in first st, sc2tog, sc in next 12 st, sc2tog, sc in last st, ch 1, turn. (16 st)
Row 9: Sc in first st, sc2tog, sc in next 4 st, ch 1, turn. (6 st)
Row 10: Sc in next 3 st, sc2tog, sc in last st. Fasten off. (5 st)
Row 9 continued: Skip next 2 st in row 8, sc in next 4 st, sc2tog, sc in last st, ch 1, turn. (6 st)
Row 10 continued: Sc in first st, sc2tog, sc in next 3 st, ch 1, turn. (5 st)
Sc around for a clean edge.
Leave long tail for sewing (~30″).
Bow Tie:
Cut two pieces of felt in the following sizes:
– 1½” x 1¼”
– ¼” x ½”
Sew the smaller rectangle around the center of the bigger piece.
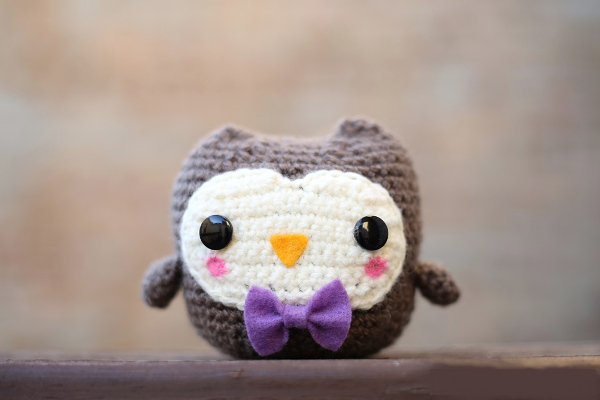
Assembly:
1. Sew face, wings, and bow tie to the body.
2. Attach the eyes. Safety eyes with washers are preferable to buttons as they’re more secure.
3. Fill with stuffing until firm.
3. Pinch the opening to create a flat curved shape. Sew together.
4. For the beak, cut a small triangle from felt and use hot glue to attach to the face.
5. Dab on a little pink paint for blush.
Congratulations
More Amigurumi Owl Ideas: